CustomLinc Staff Documentation
Staff guides for the CustomLinc ticketing and booking system.
- Reports
- Bookings
- Annual Pass
- How to: Send or re-send a Sign up/Confirmation Email for Annual Pass Customer
- How: An Annual Pass Member can make an excursion booking themselves
- How To: Cancel an Annual Pass booking
- How to: Register your Annual Pass account
- How to: Purchase an Annual Pass
- How: A User can reset their password
- How to: Reset a Annual Pass user password
- How to: Renew a membership/ Annual pass
- How: A user can edit their service booking in the Annual Pass Portal
- How to: Merge a Member into another Members Account
- Meal Requests/Dietary Requirements
- Creating a New Booking with a Meal Request or Dietary Requirement
- Editing or Adding a Meal Request to an existing booking
- How a Customer will make Meal Requests for applicable products.
- Dietary Requests on Manifests
- Agent Portal
- Custom Linc Password Change
- Creating a New User / CustomLinc
- Adding RFID - Custom Linc
- Removing RFID - CustomLinc
- Agent Management/CRM
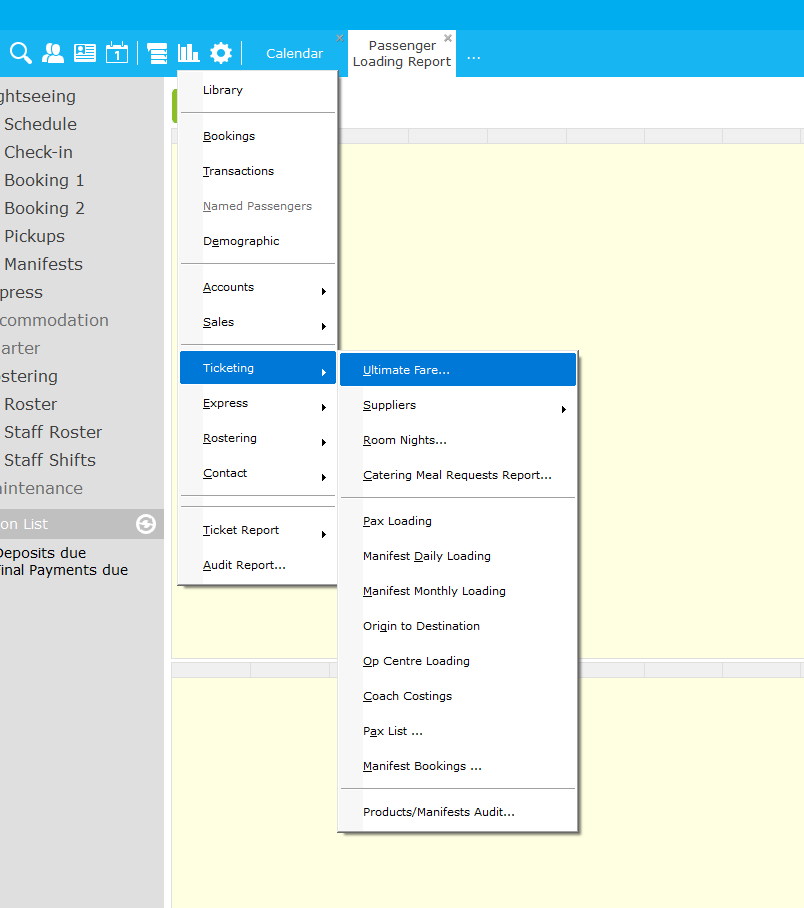
Reports
Fare Report by Product
This will provide a report which breaks down Product sales over a certain time period by product, fare type, add-ons, discounts, refunds and commissions.
Under Reports > Ticketing > Ultimate Fare
This is the dialog box you will be presented with. This date is based off travel date and not booking date.
You run the report on the product category, where you can narrow down to components, and specific products
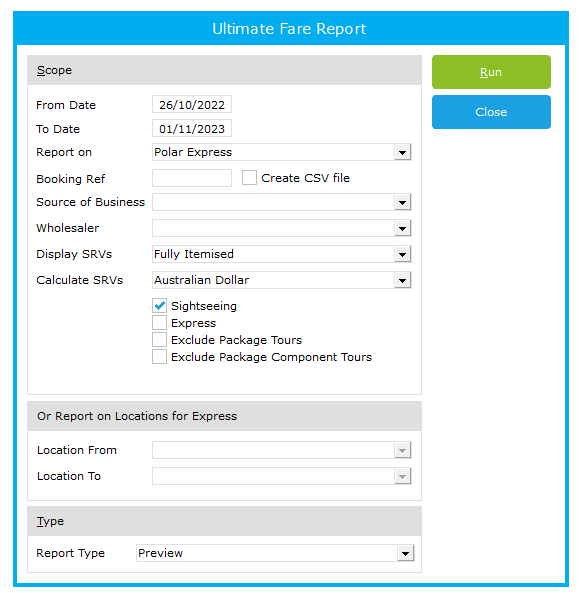
You can even choose by add-on product, like Grazing Boxes, and sightseeing products with the relevant mapped Express Service, if appropriate.
On issuing the report, you will see the breakdown of the selected products by pax and $ figure.

This can then be printed out of CustomLinc into a PDF or CSV
How to run a Customlinc Report
You can run several types of reports within CustomLinc to give more detailed information for large sections of bookings.
To do this click Reports tab in the top left
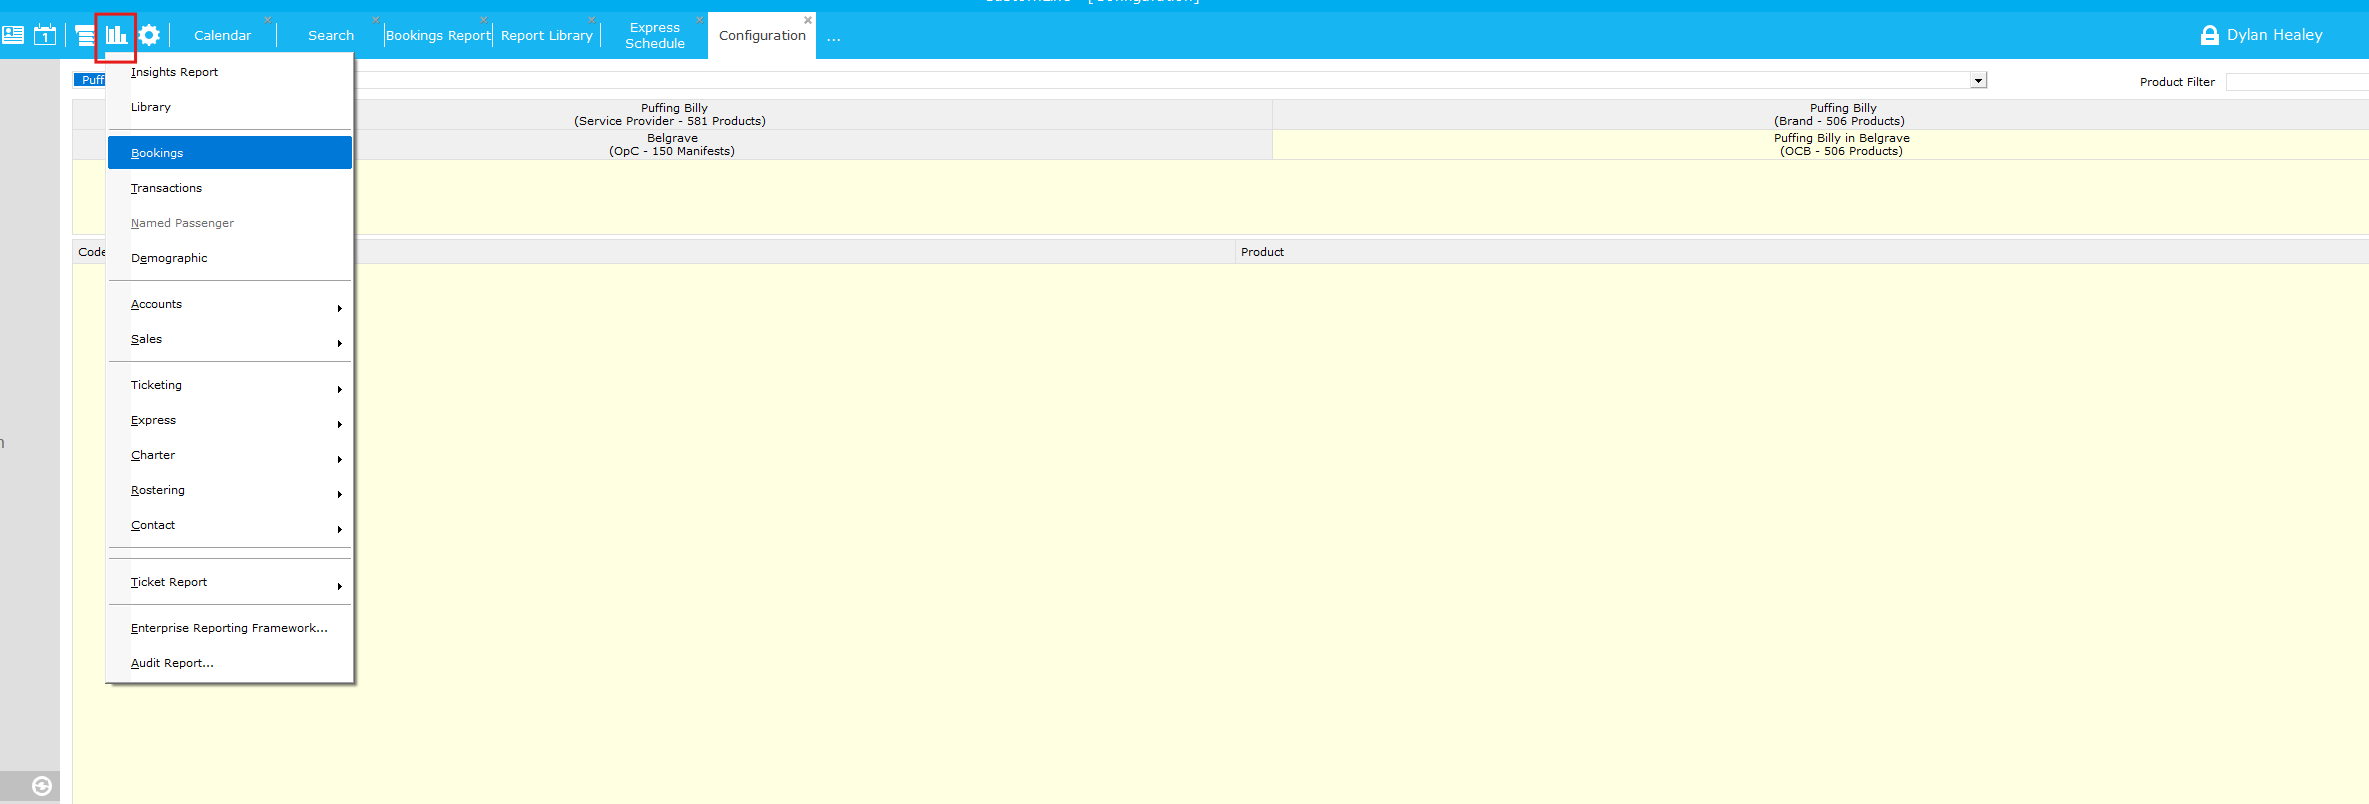
For this example we will run a Bookings report.
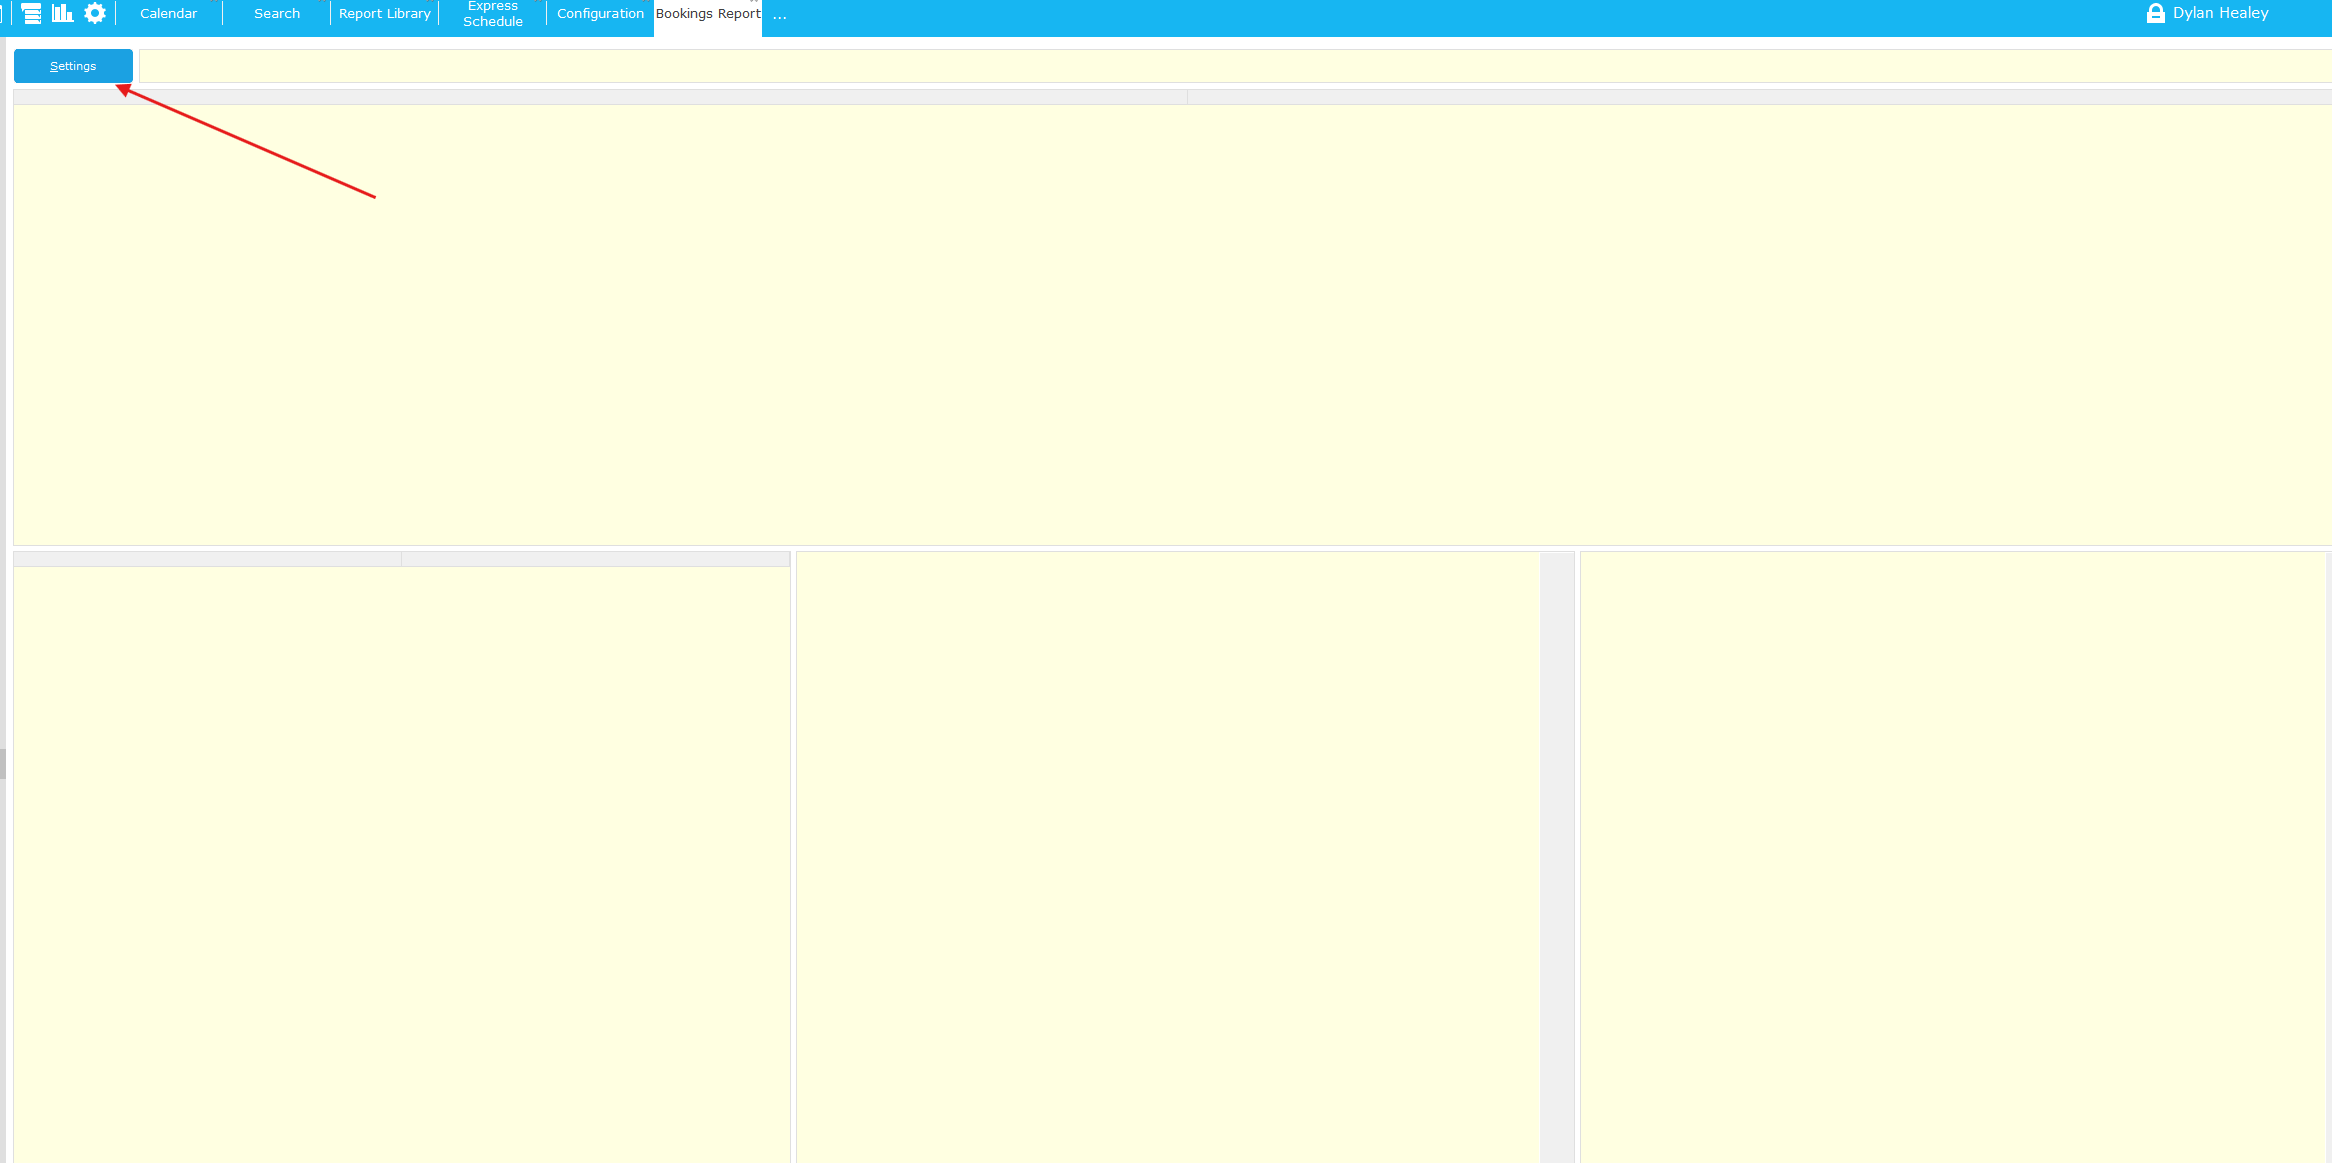
After clicking, bookings you will need to go to Settings
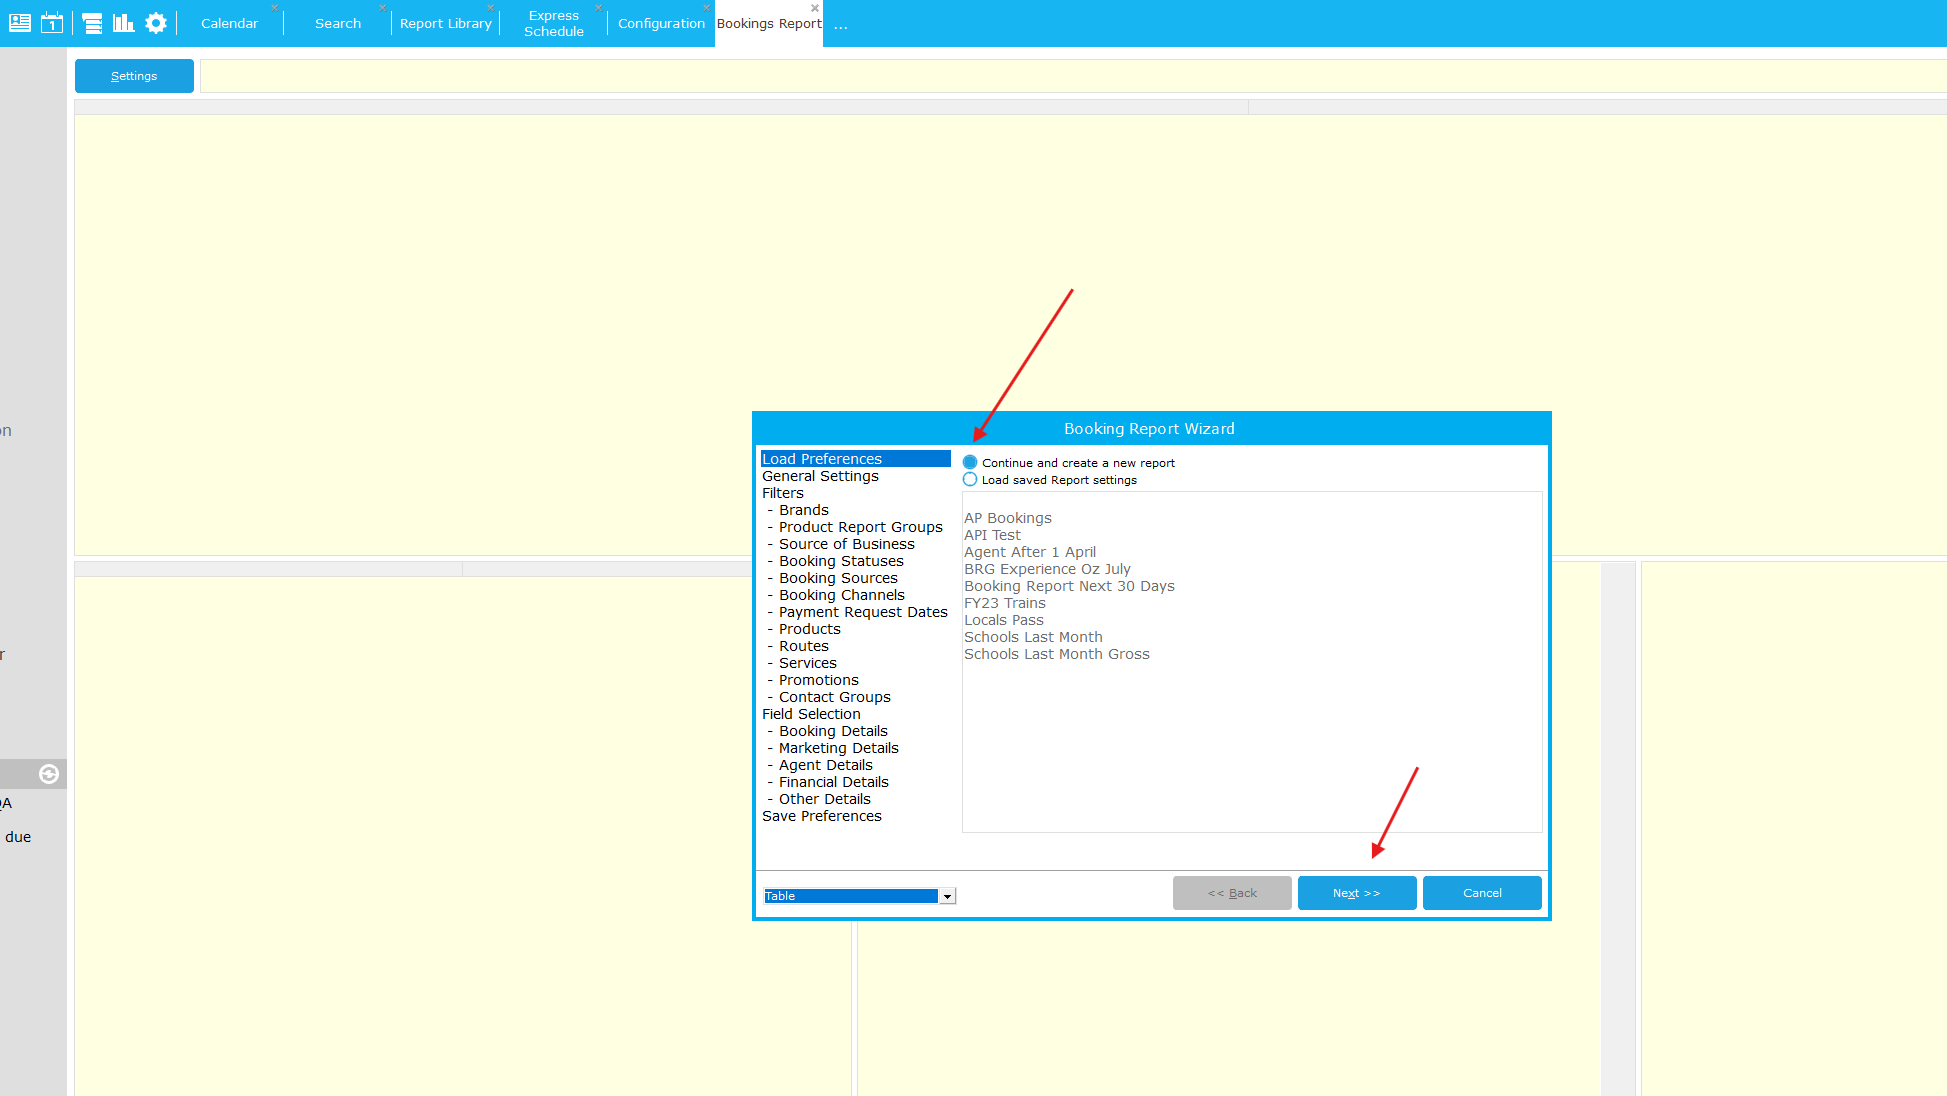
Select continue and create a new report then Next
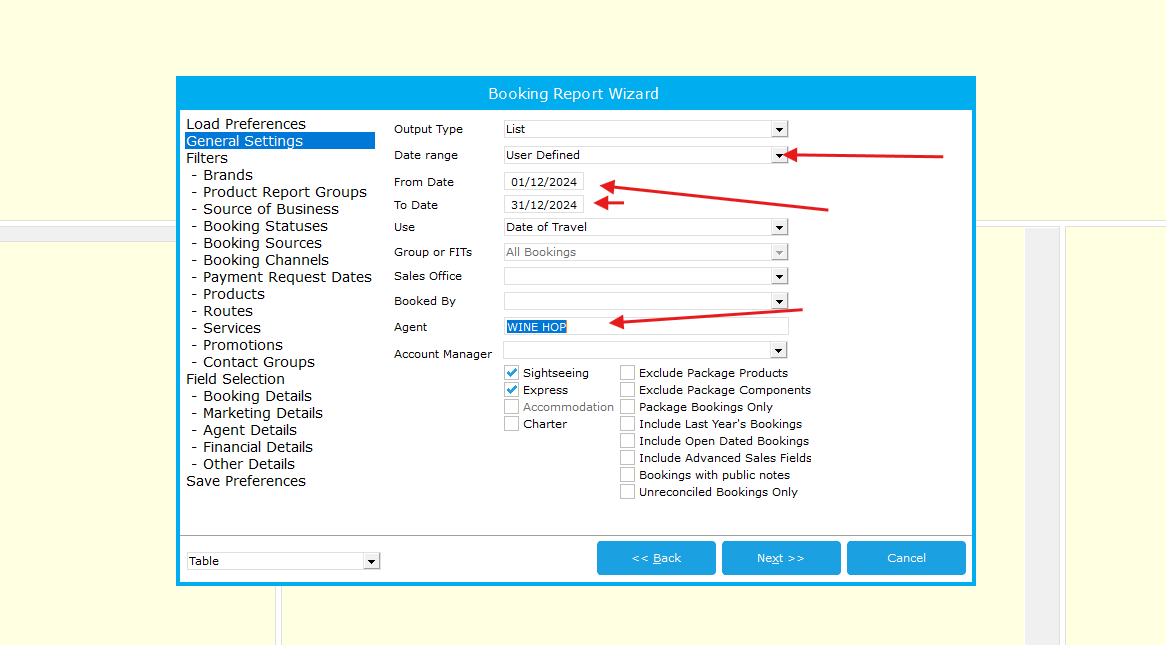
Configure your search parameters.
Here I have selected to define my own dates of Date of Travel from 1/12/2024 to 31/12/2024, and only for travel booked under the agent WINE HOP
The next area is filters, here you can filter for certain things such as products, promotions and booking channels.
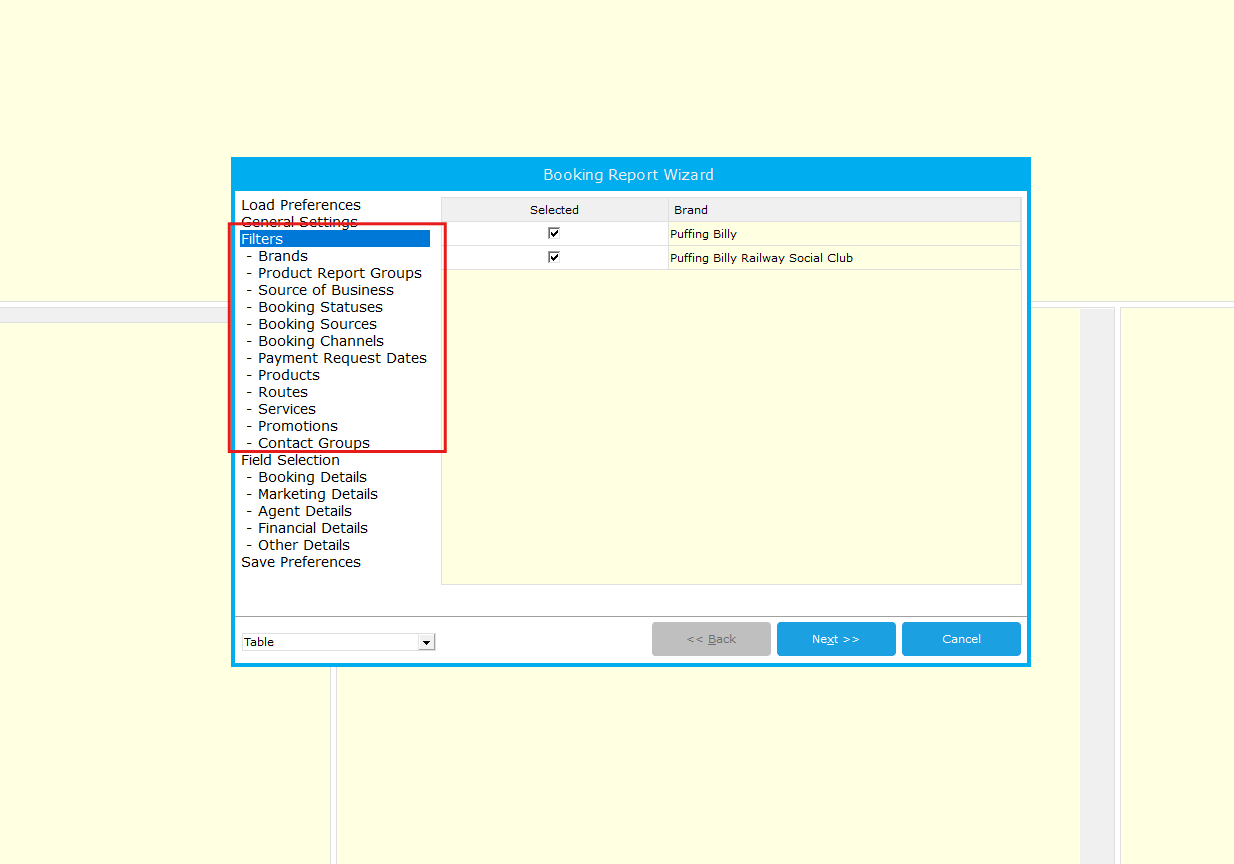
The next area is Field Selection, this is where you will choose what information you want to see from the data that is grabbed. This includes, party numbers, pax, product codes, party name, cost and so much more.

We recommend using as few of these as required to keep your data relevant.
Finally if you want to reuse this report in future you can save the report,
Save Preferences will only be available if you loaded a saved report at the start.
Save Preferences As allows you create a new saved report.
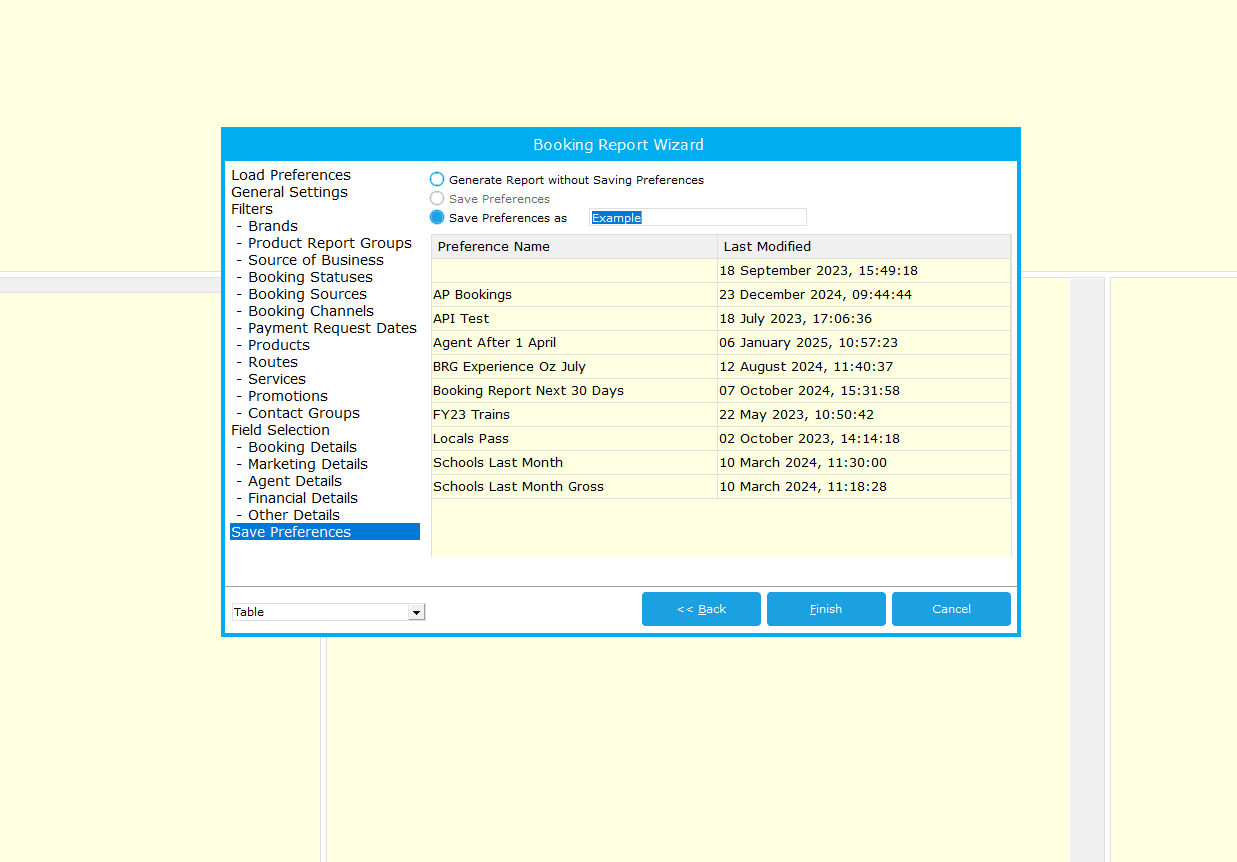
Hit finish and your report will be generated.
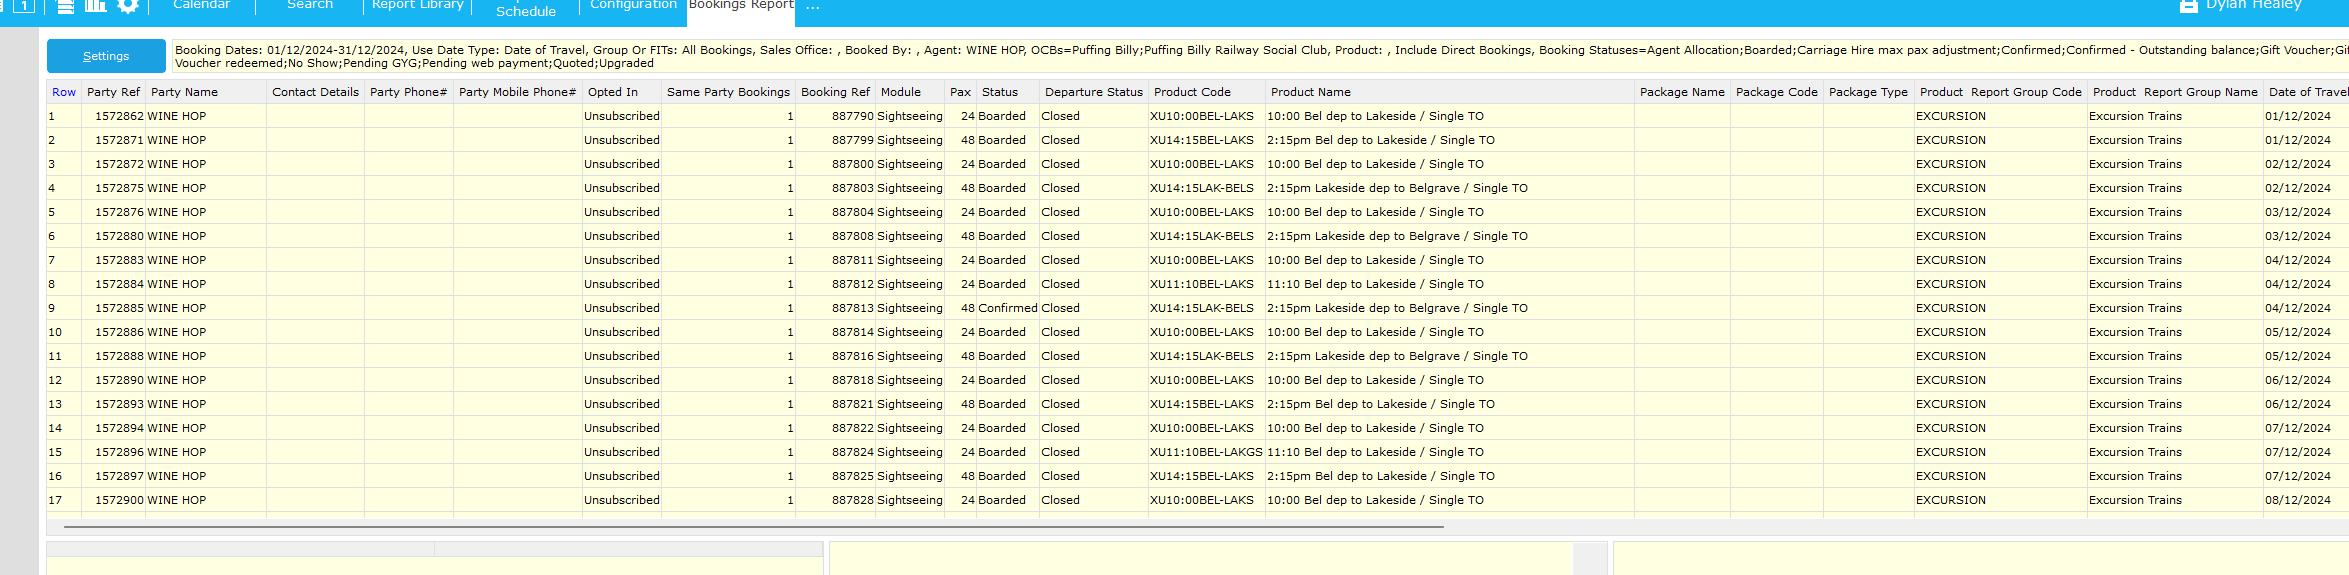
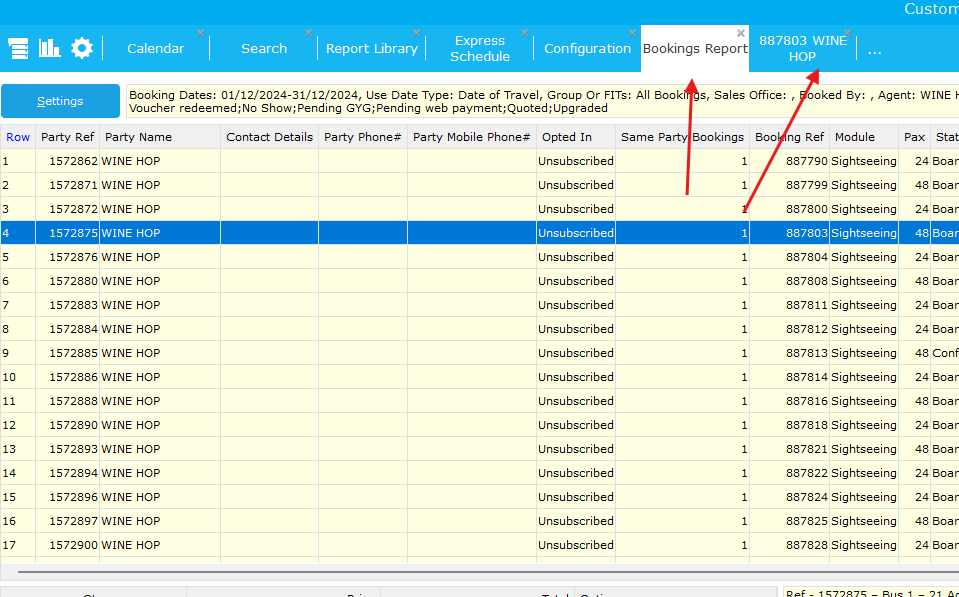
From here you can double click an item in this list to be taken to the actual booking, you can also right click and export as a .CSV if you would like to look at this in excel.
You can traverse between the report and bookings with the tabs at the top.
Bookings
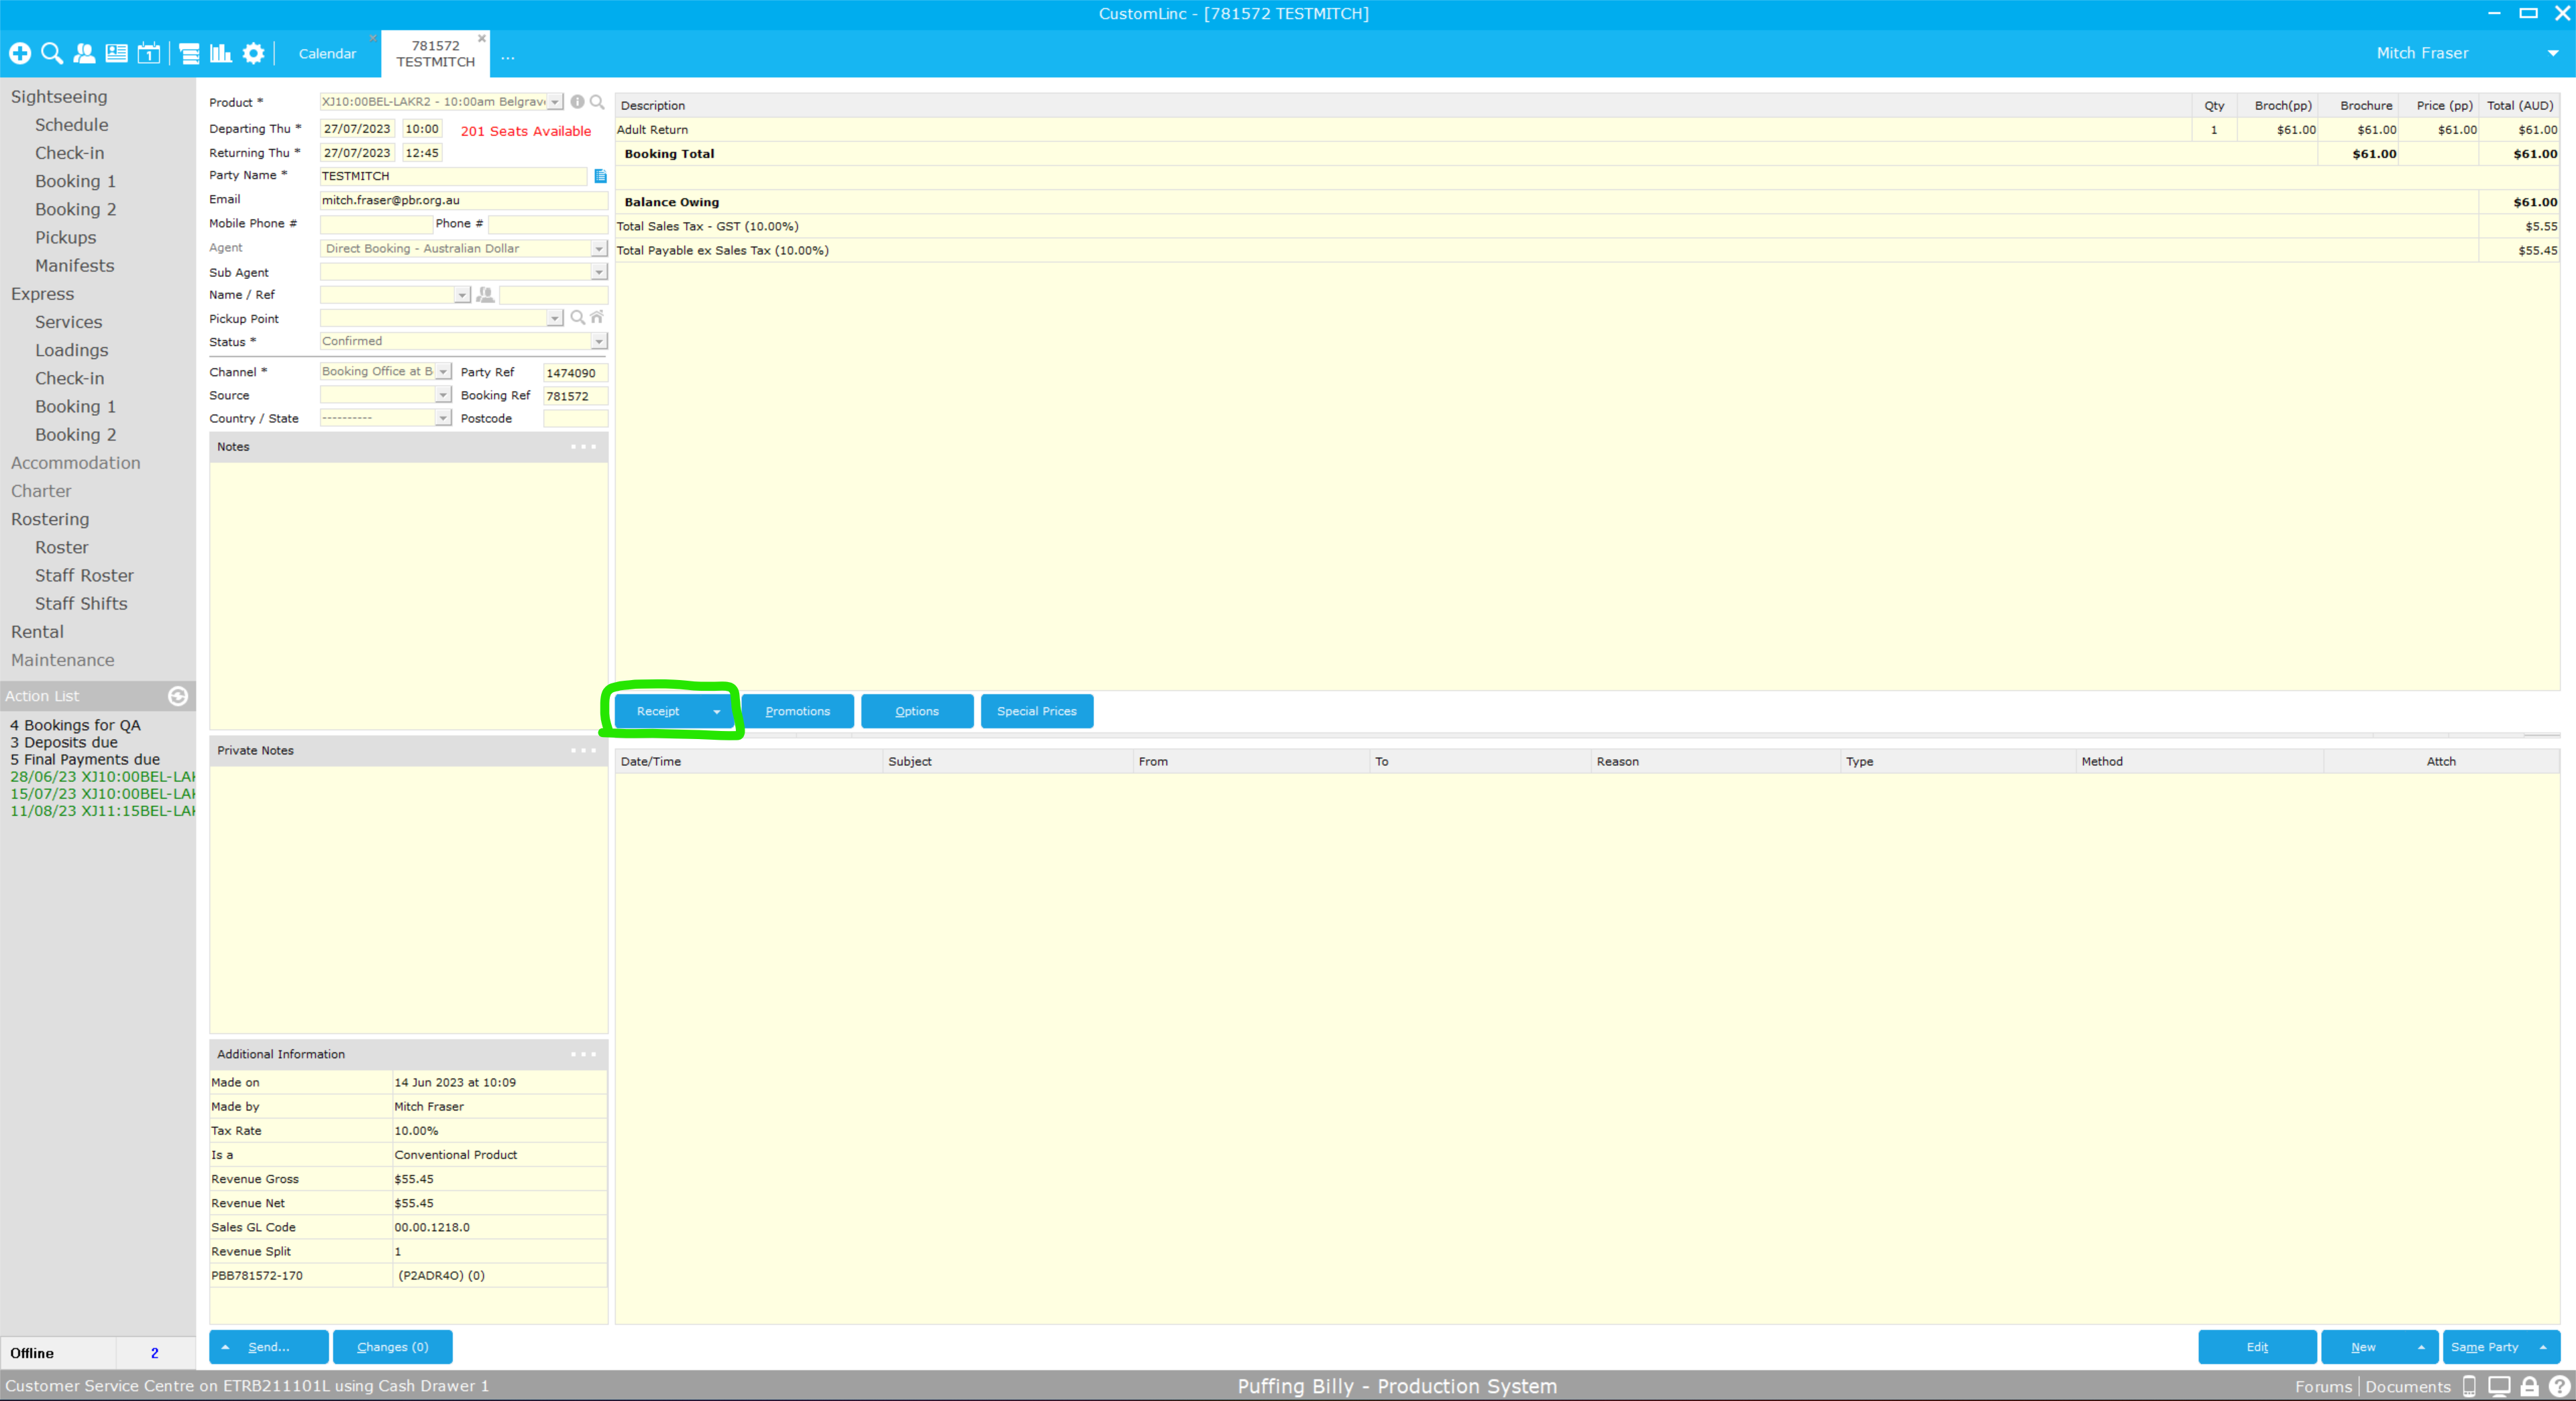
Receipting a booking using the Online Payment Link in CustomLinc
To receipt a booking over the phone inside of CustomLinc, the Online Payment Link is now the method to complete this.
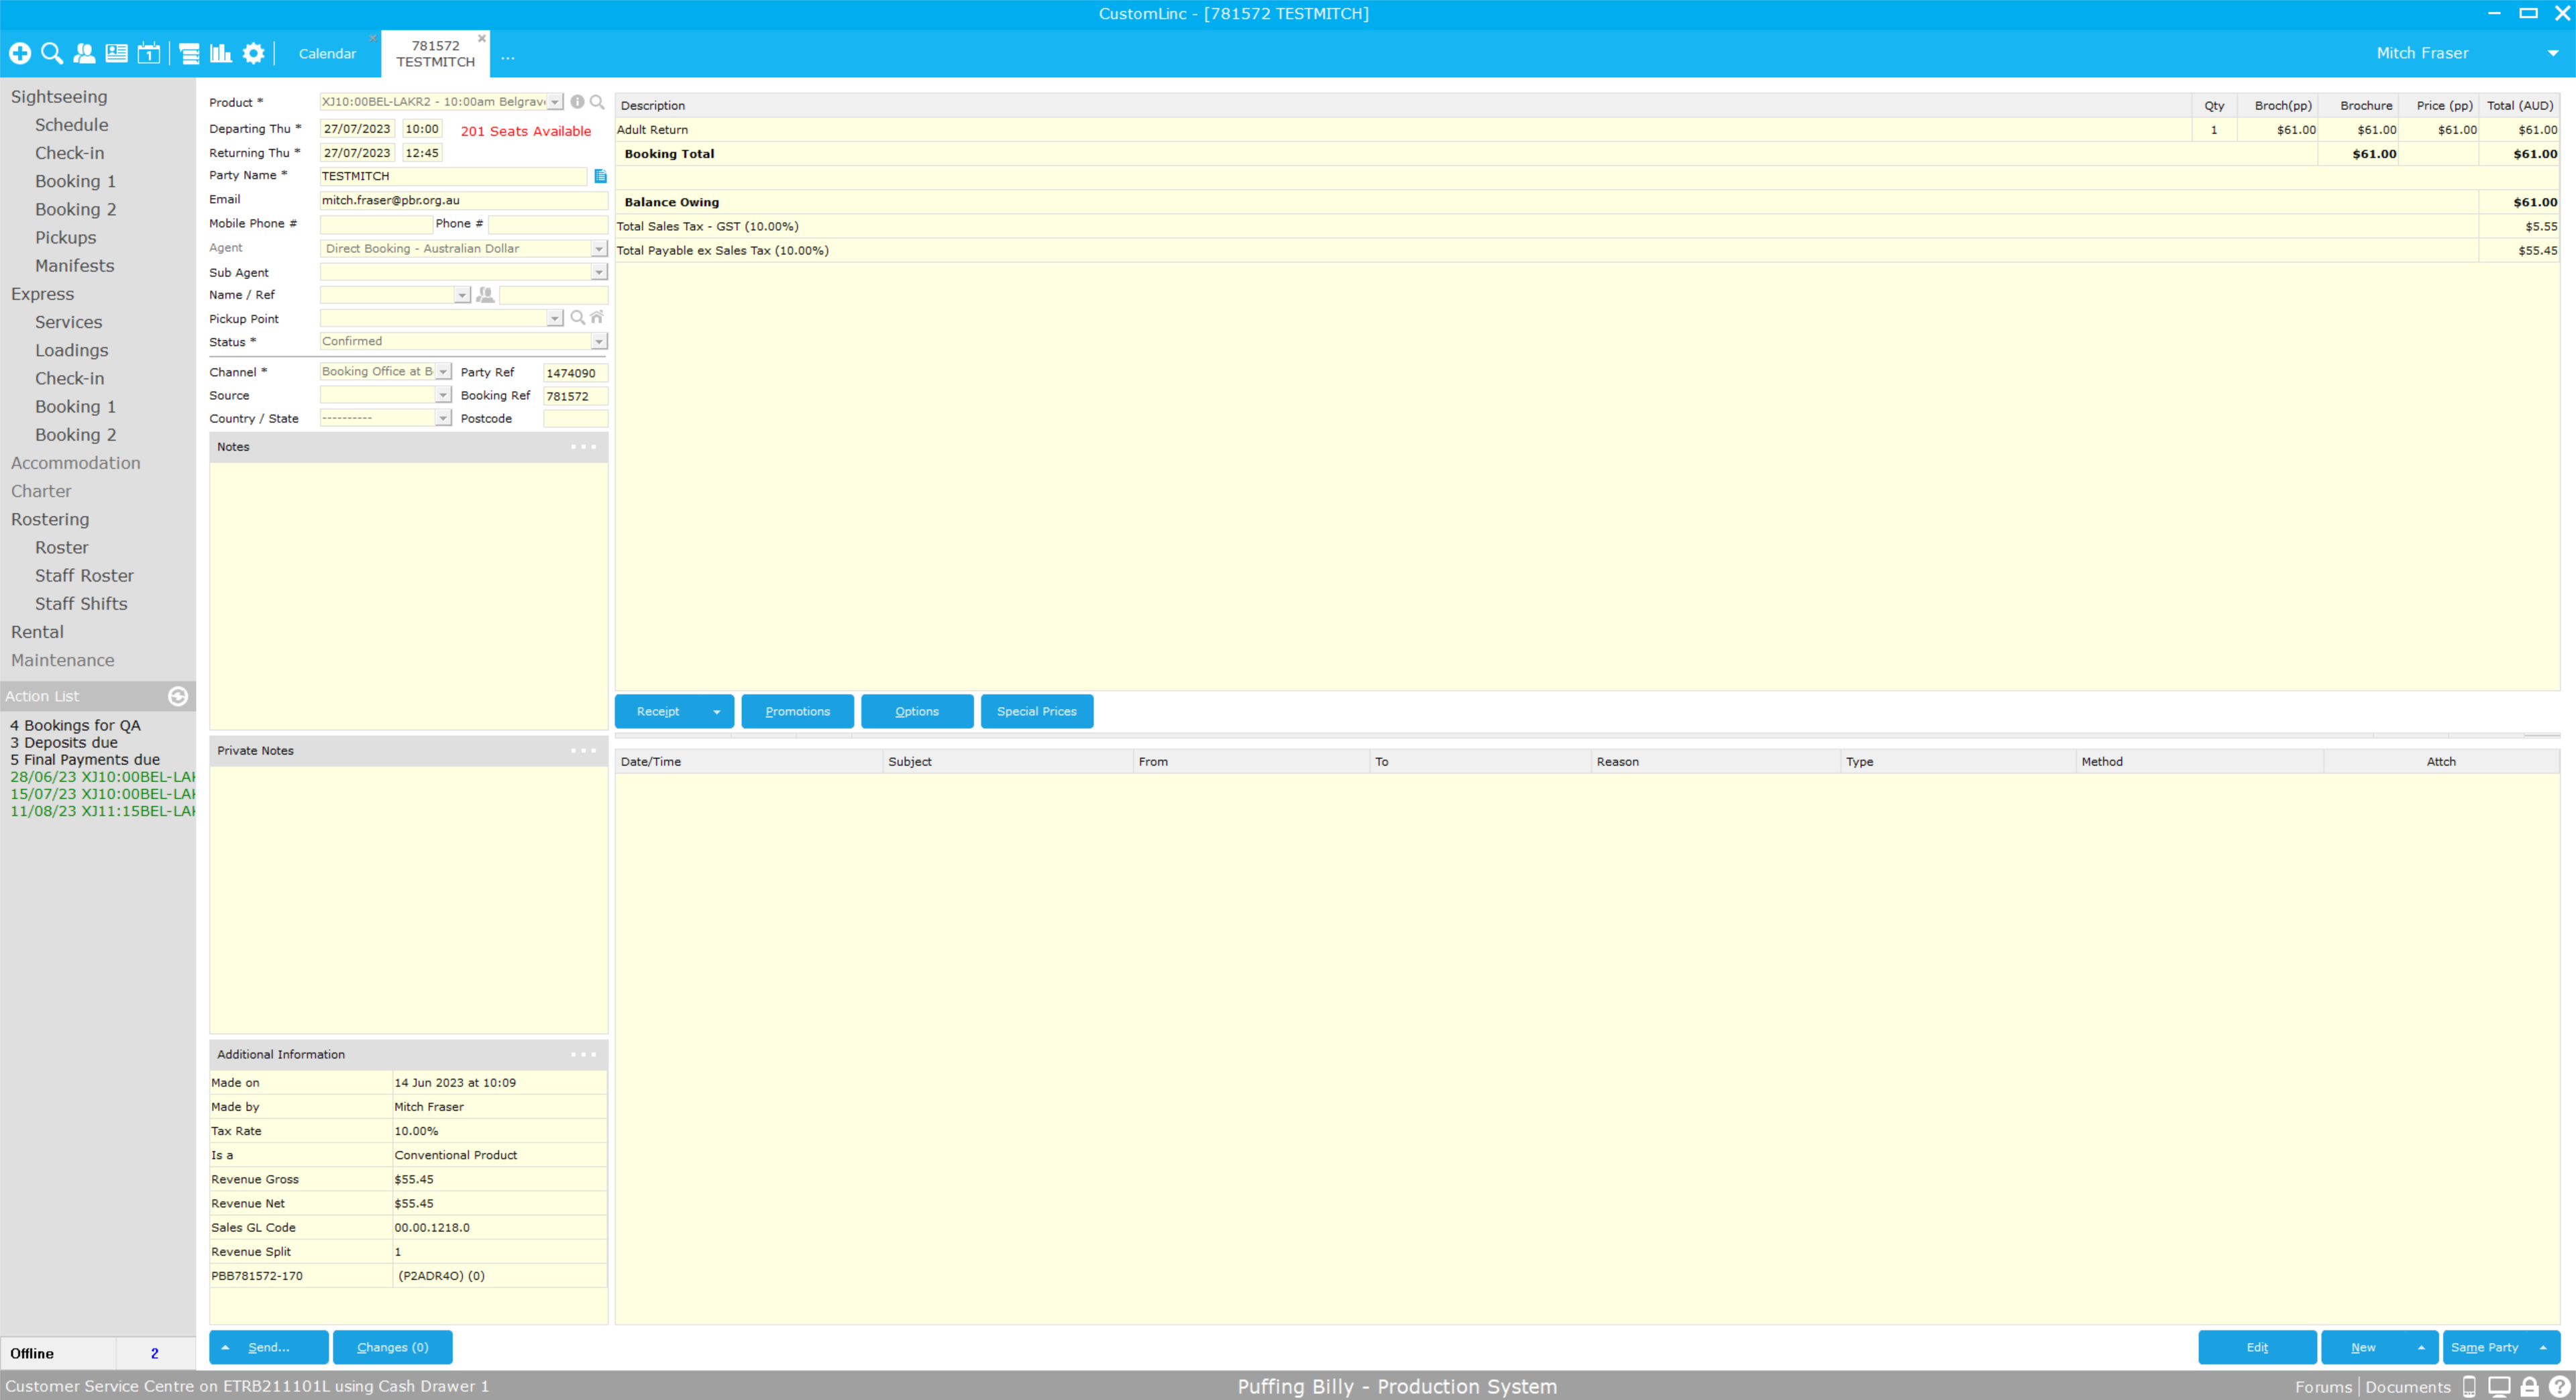
Inside the booking, Select Receipt
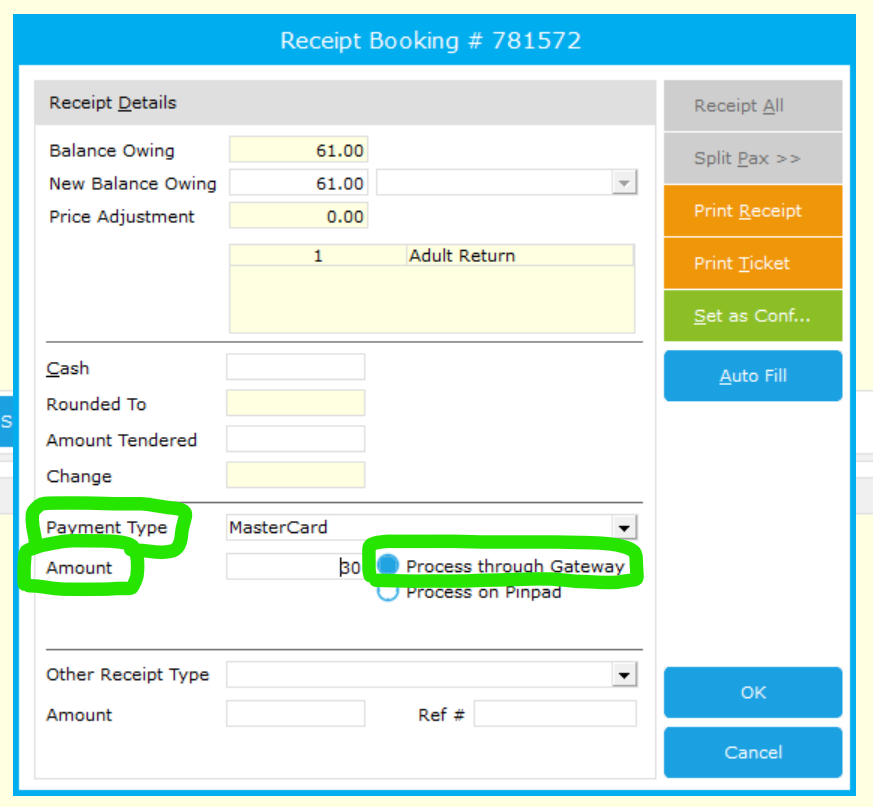
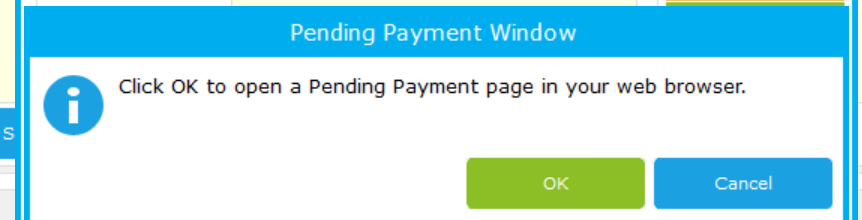
Pressing okay will prompt opening of the pending payment page
This page then presents details for payment, similar to the online site.
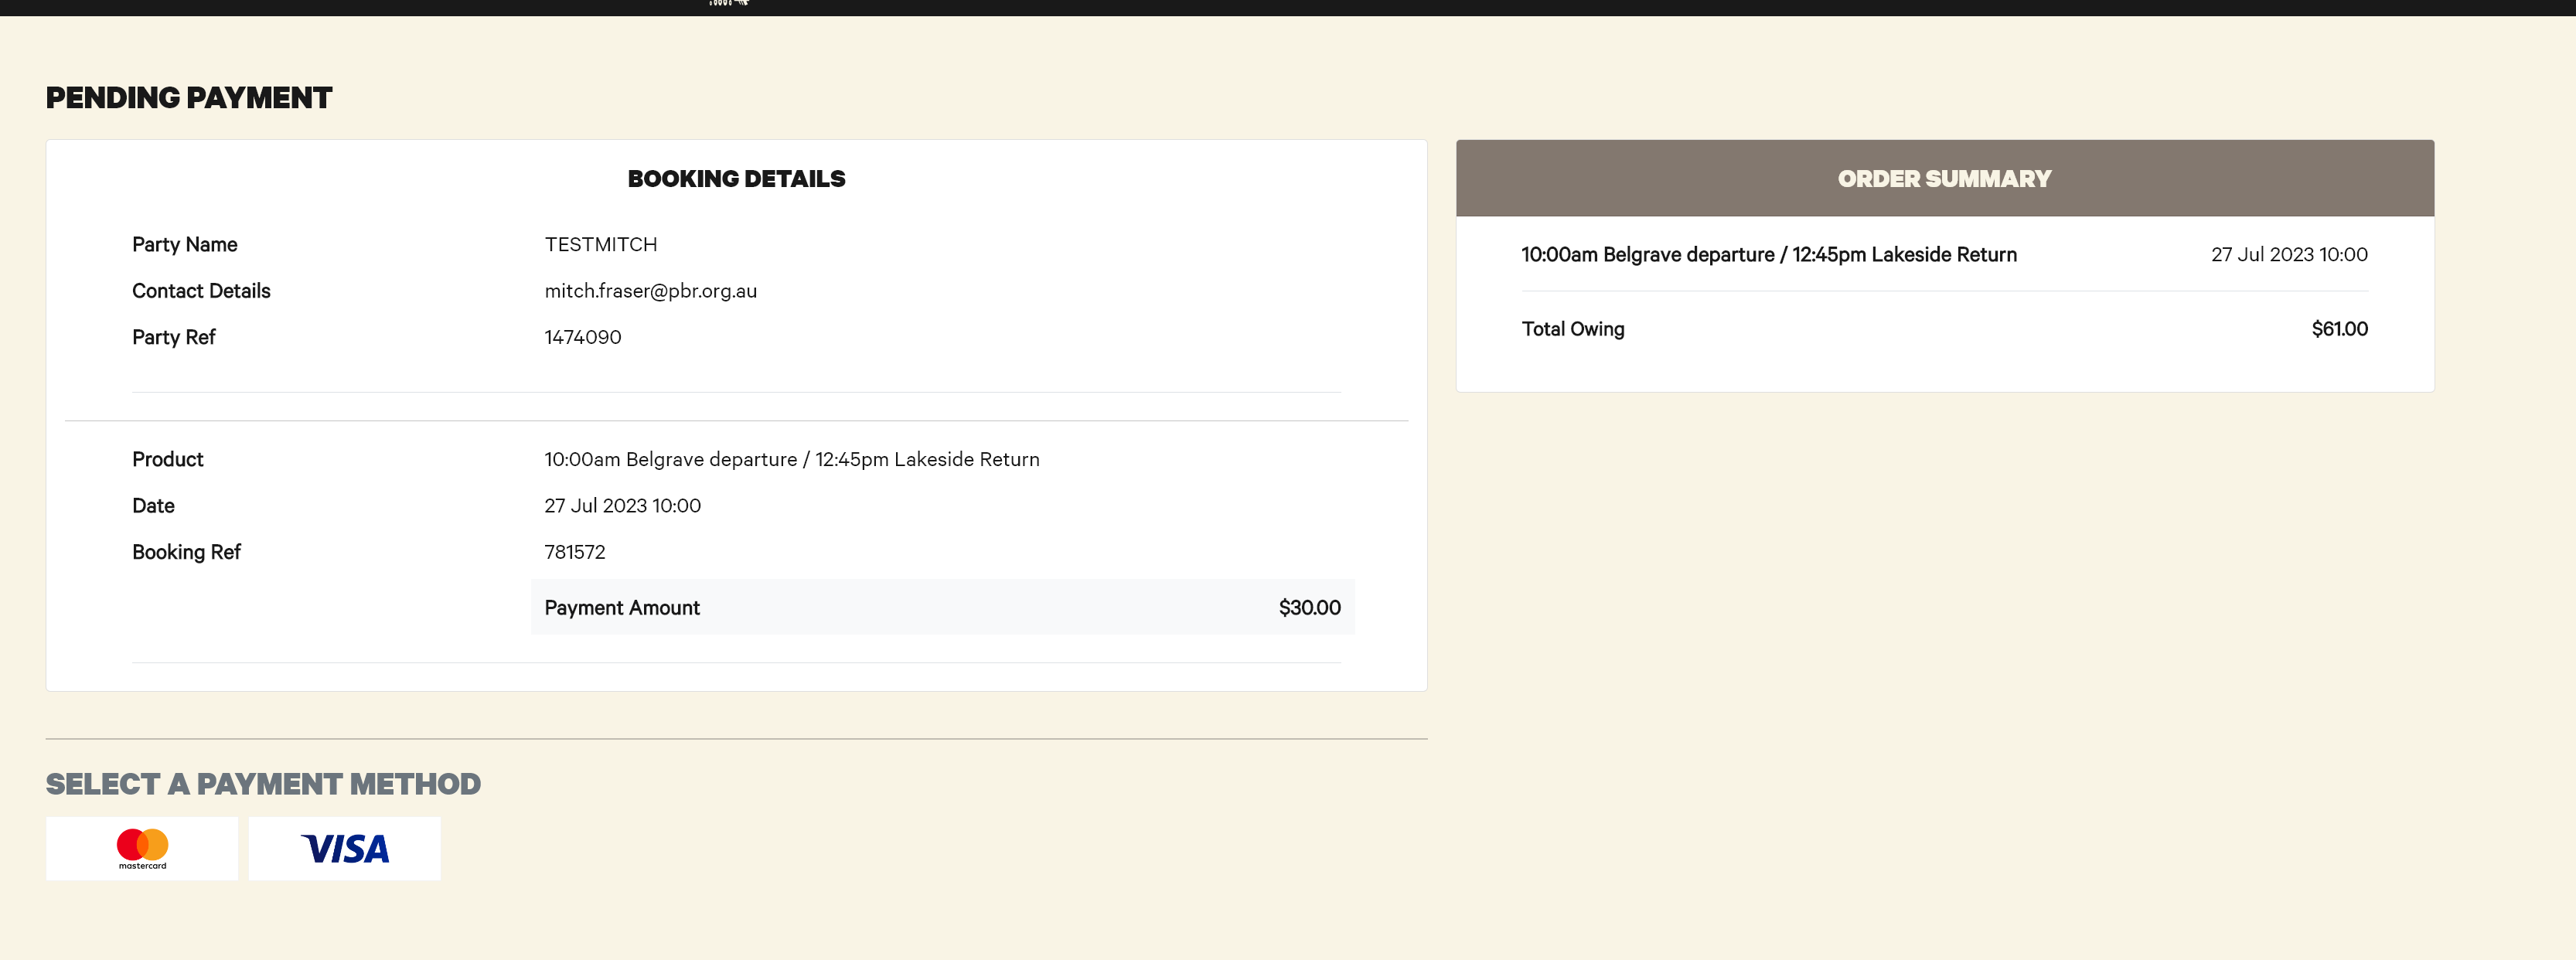
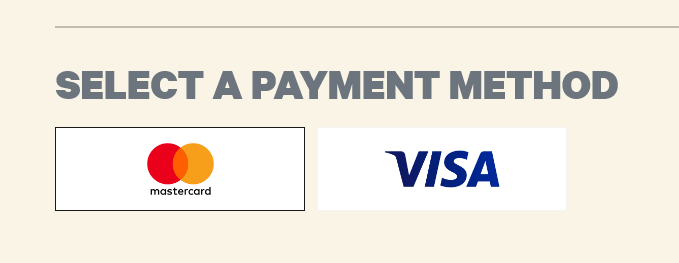
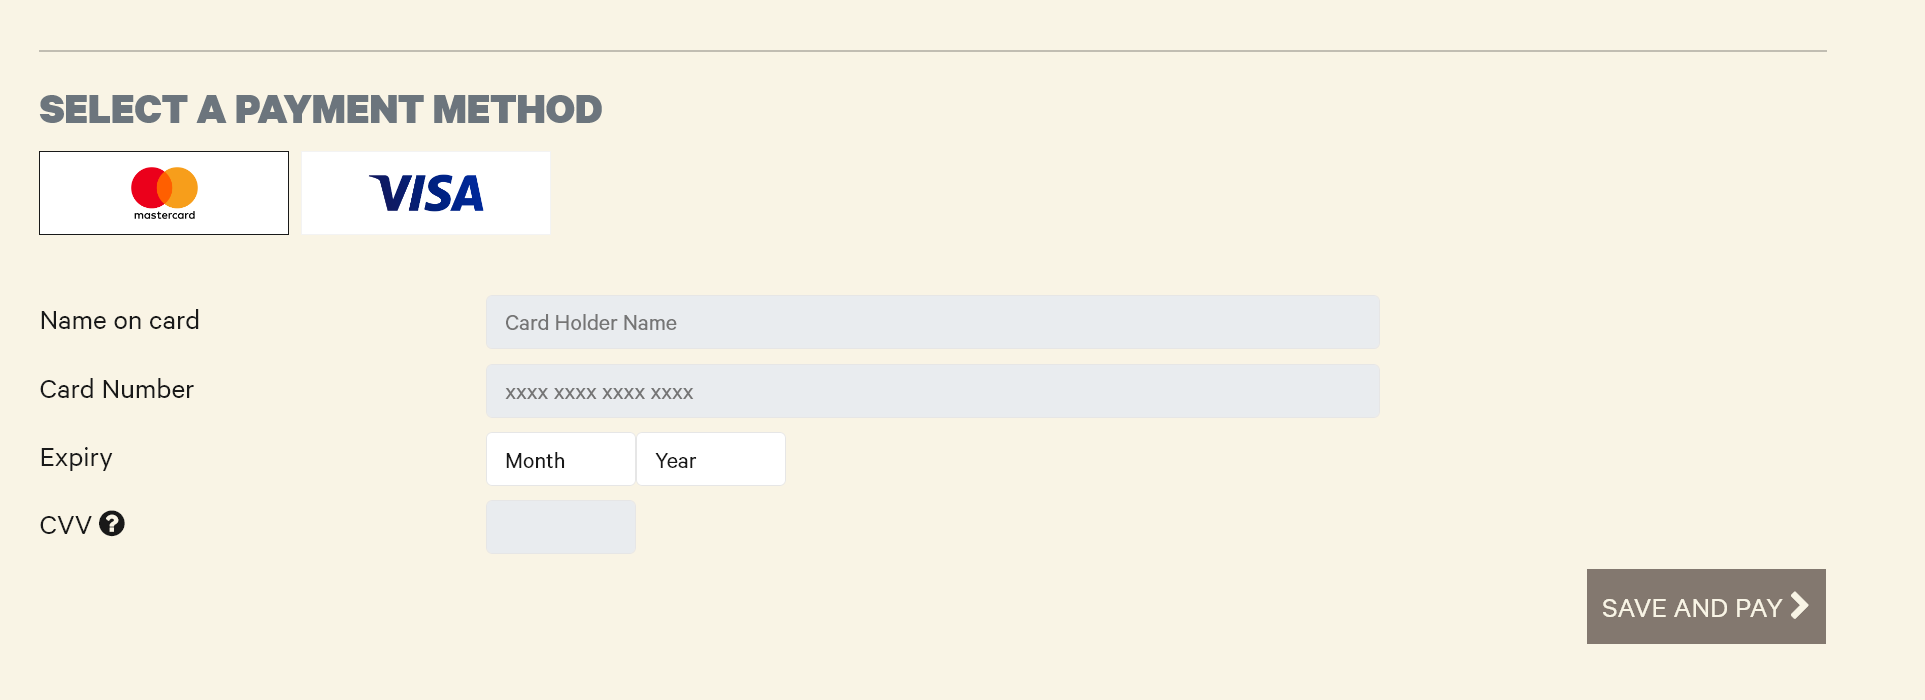
Select the Payment Method, being Mastercard or Visa
Then enter card details and select Save and Pay
The screen will then update with the payment made, if partial payment this amount will be deducted. Note the $30 payment
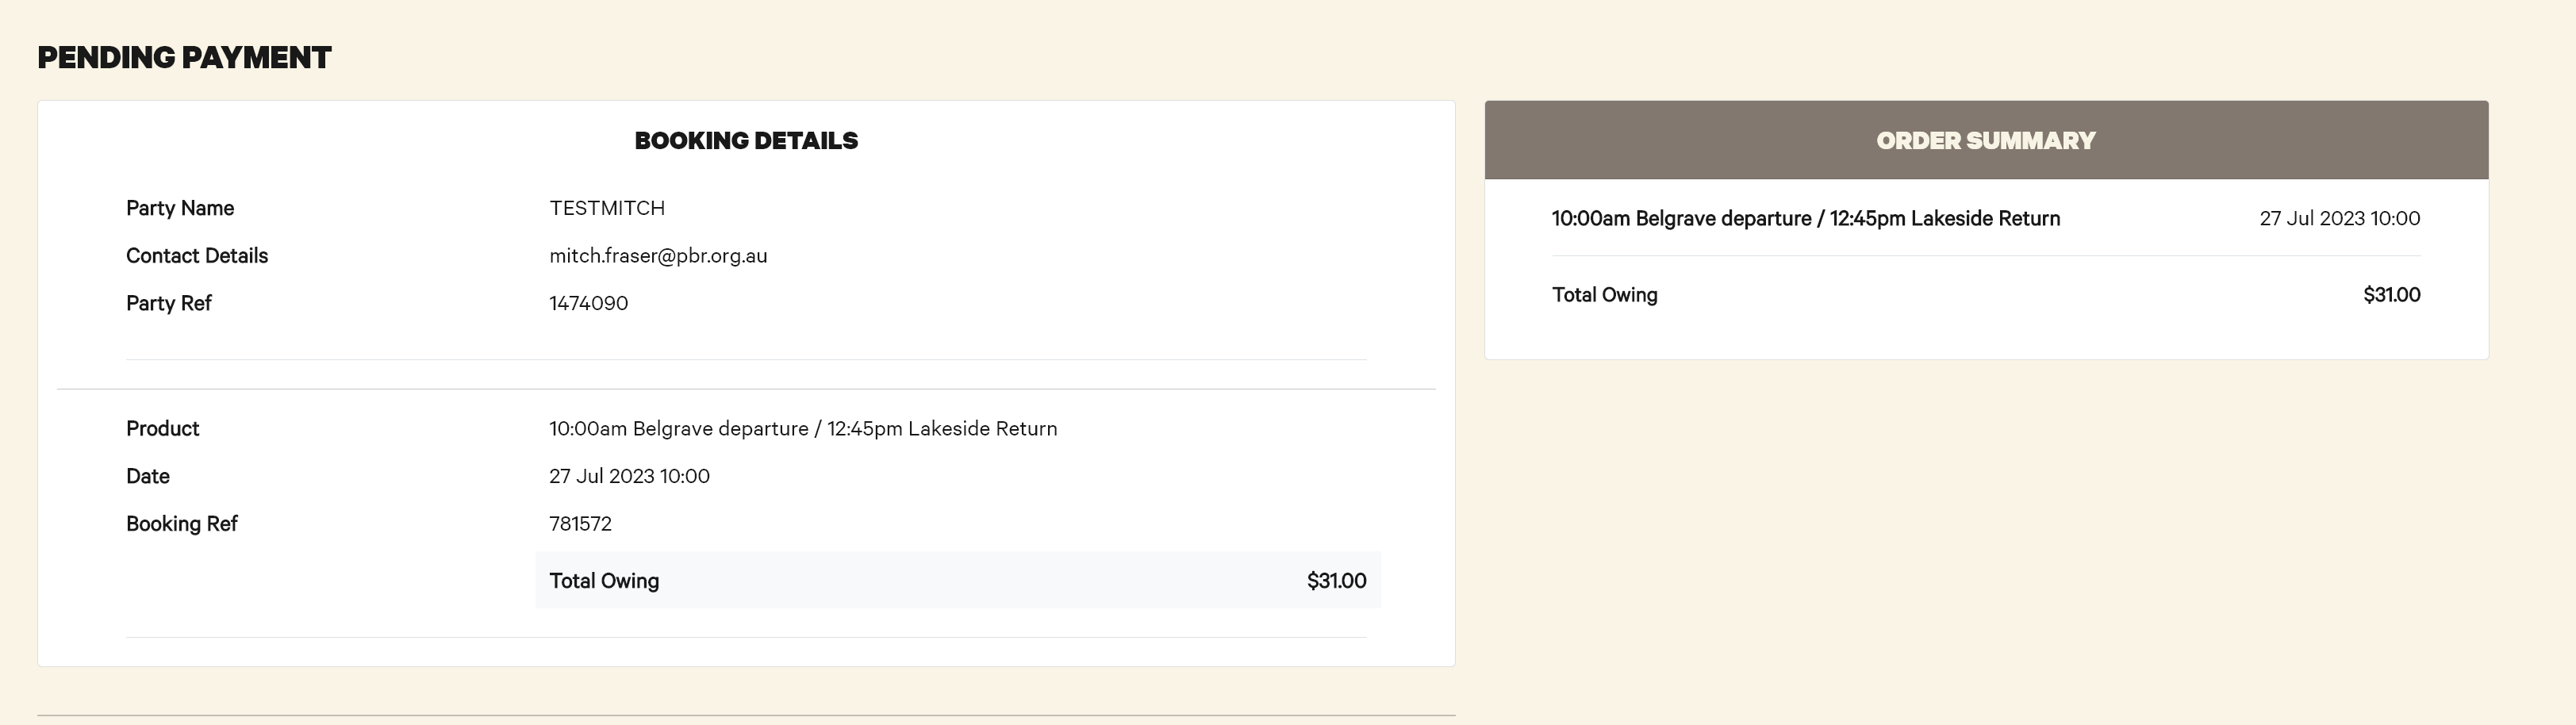
The booking will also update with the payment made

When the booking is fully paid off, the below message appears
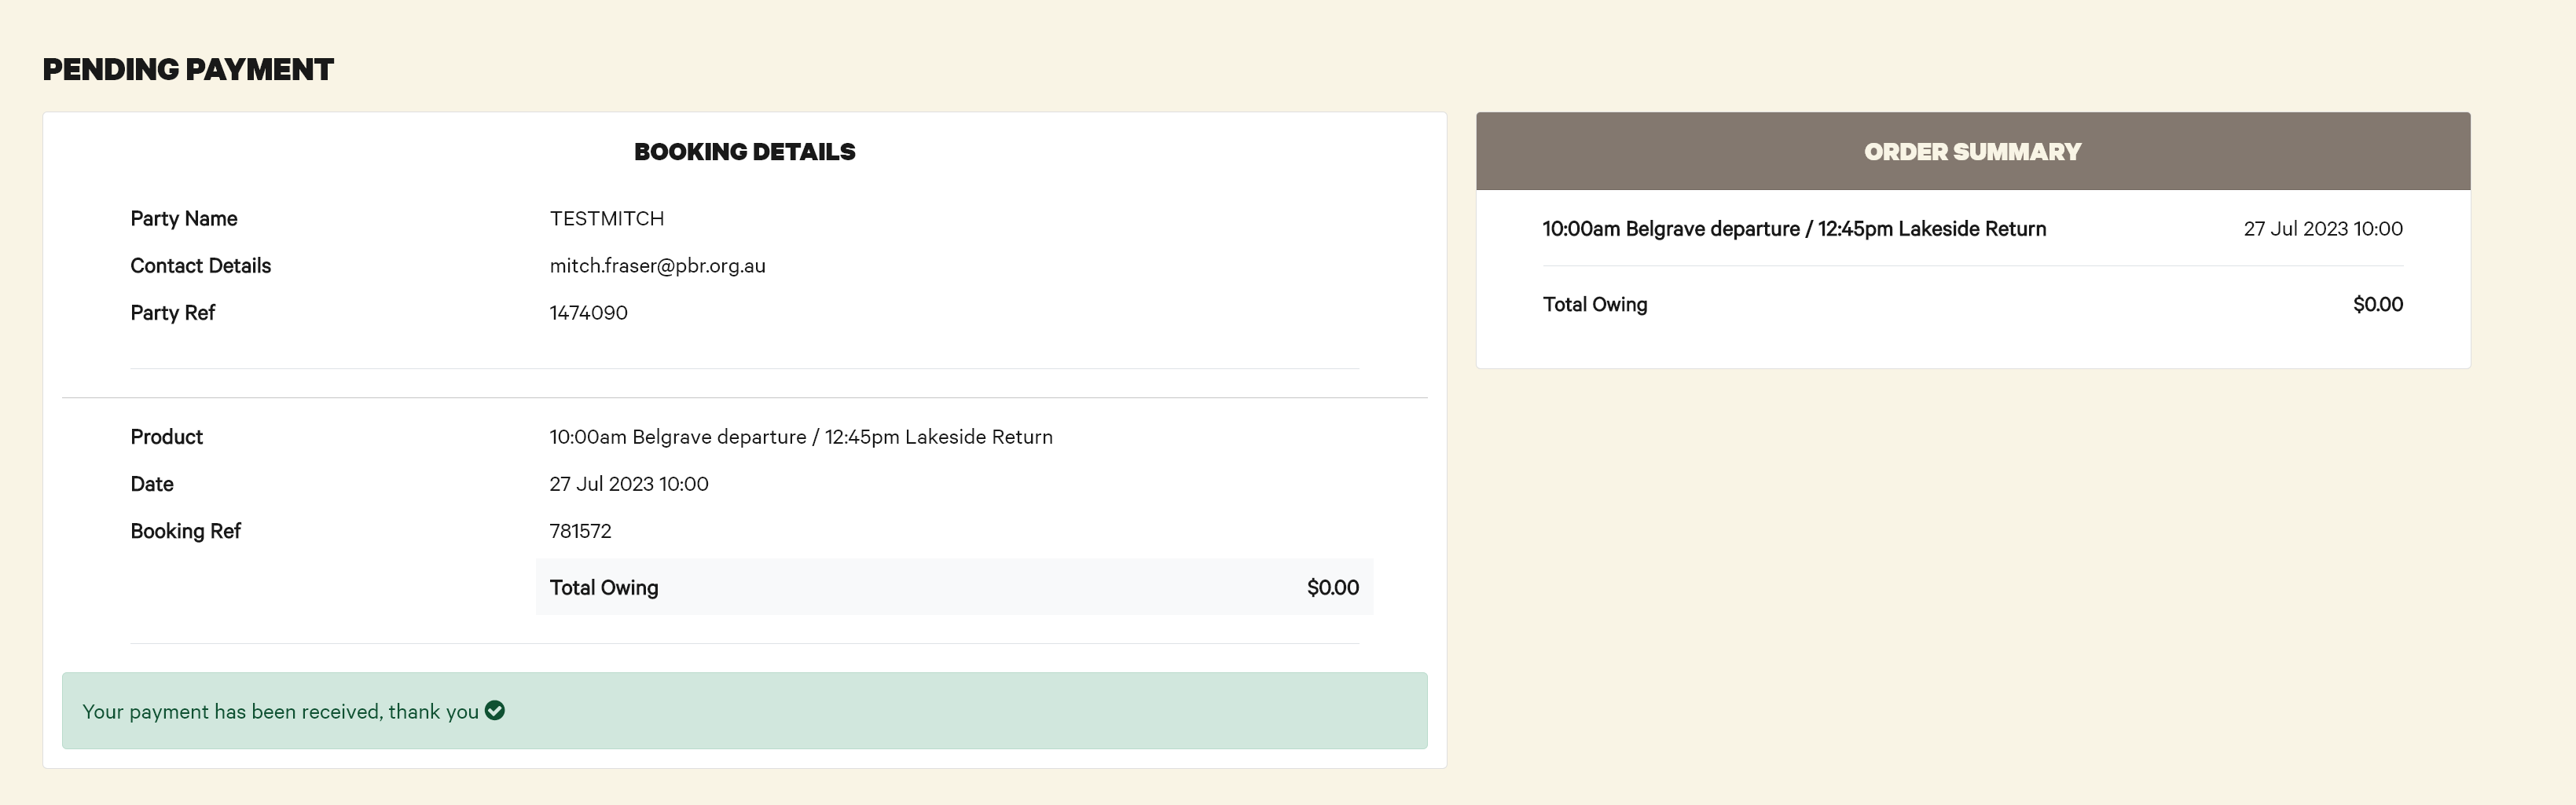
And the booking updates with the payment received

Refunds work the same as normal bookings.
All issues with this system are to be directed to the IT Helpdesk (helpdesk@pbr.org.au) in the first instance.
Annual Pass
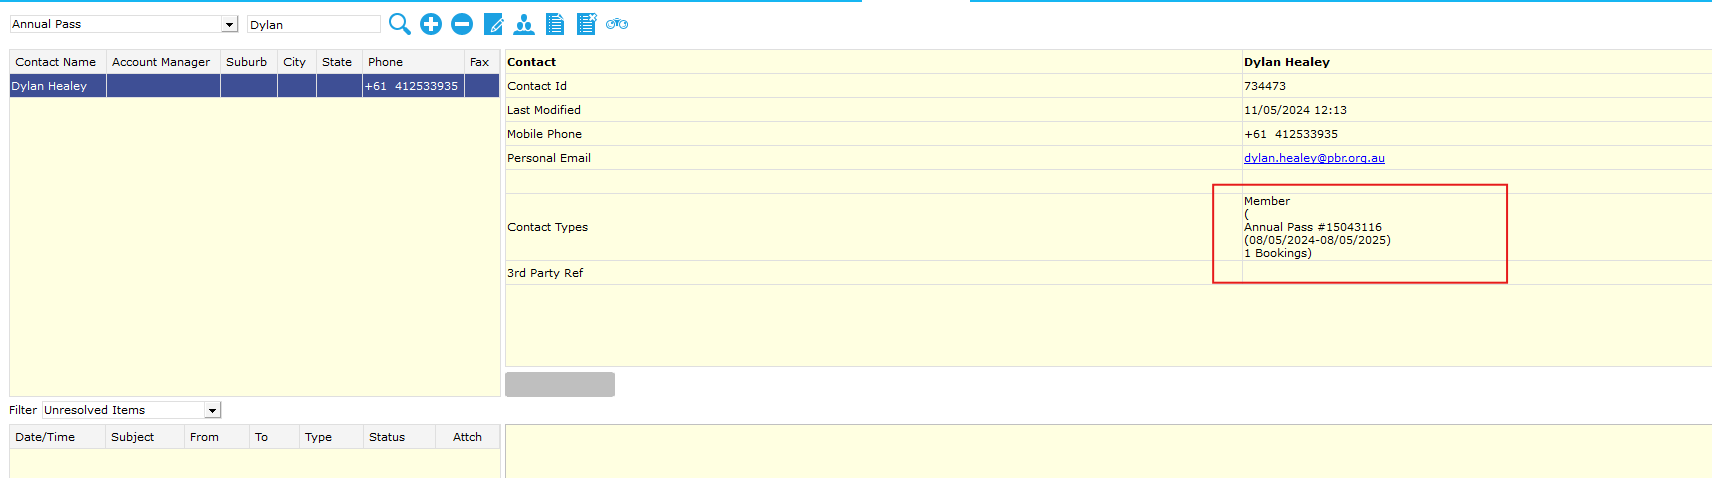
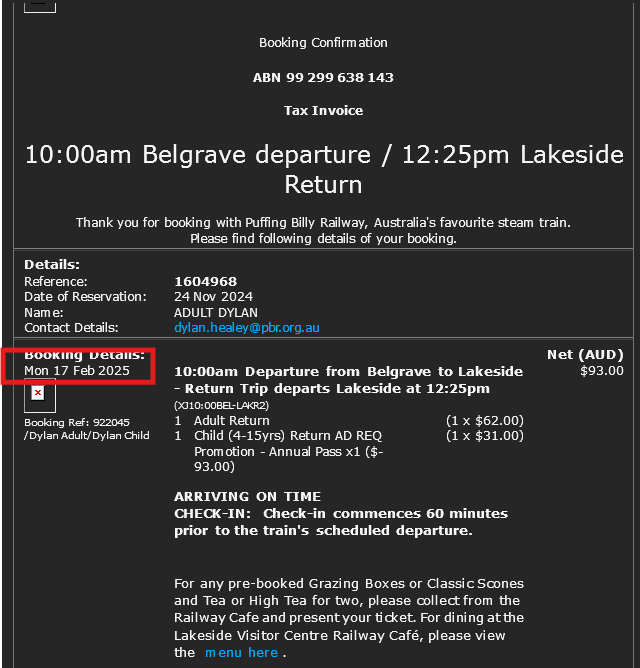
How to: Send or re-send a Sign up/Confirmation Email for Annual Pass Customer
If the customer can provide their booking reference number, you can search for the booking as normal
- Click on Contact Search

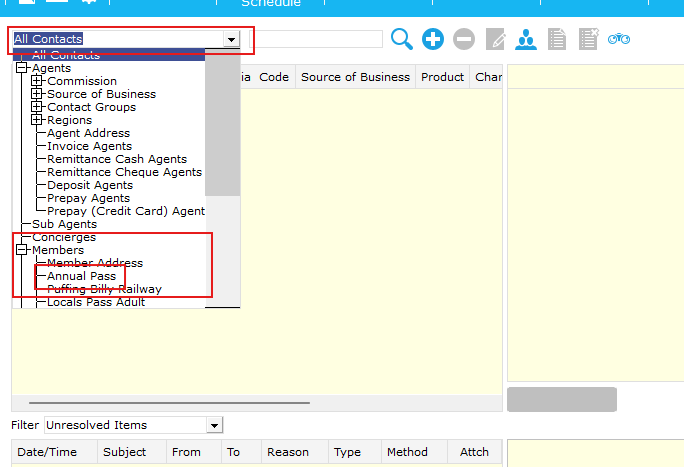
- Bring down the dropdown menu and find and select the option Members > Annual Pass

- Search for the users name that they purchased the pass with

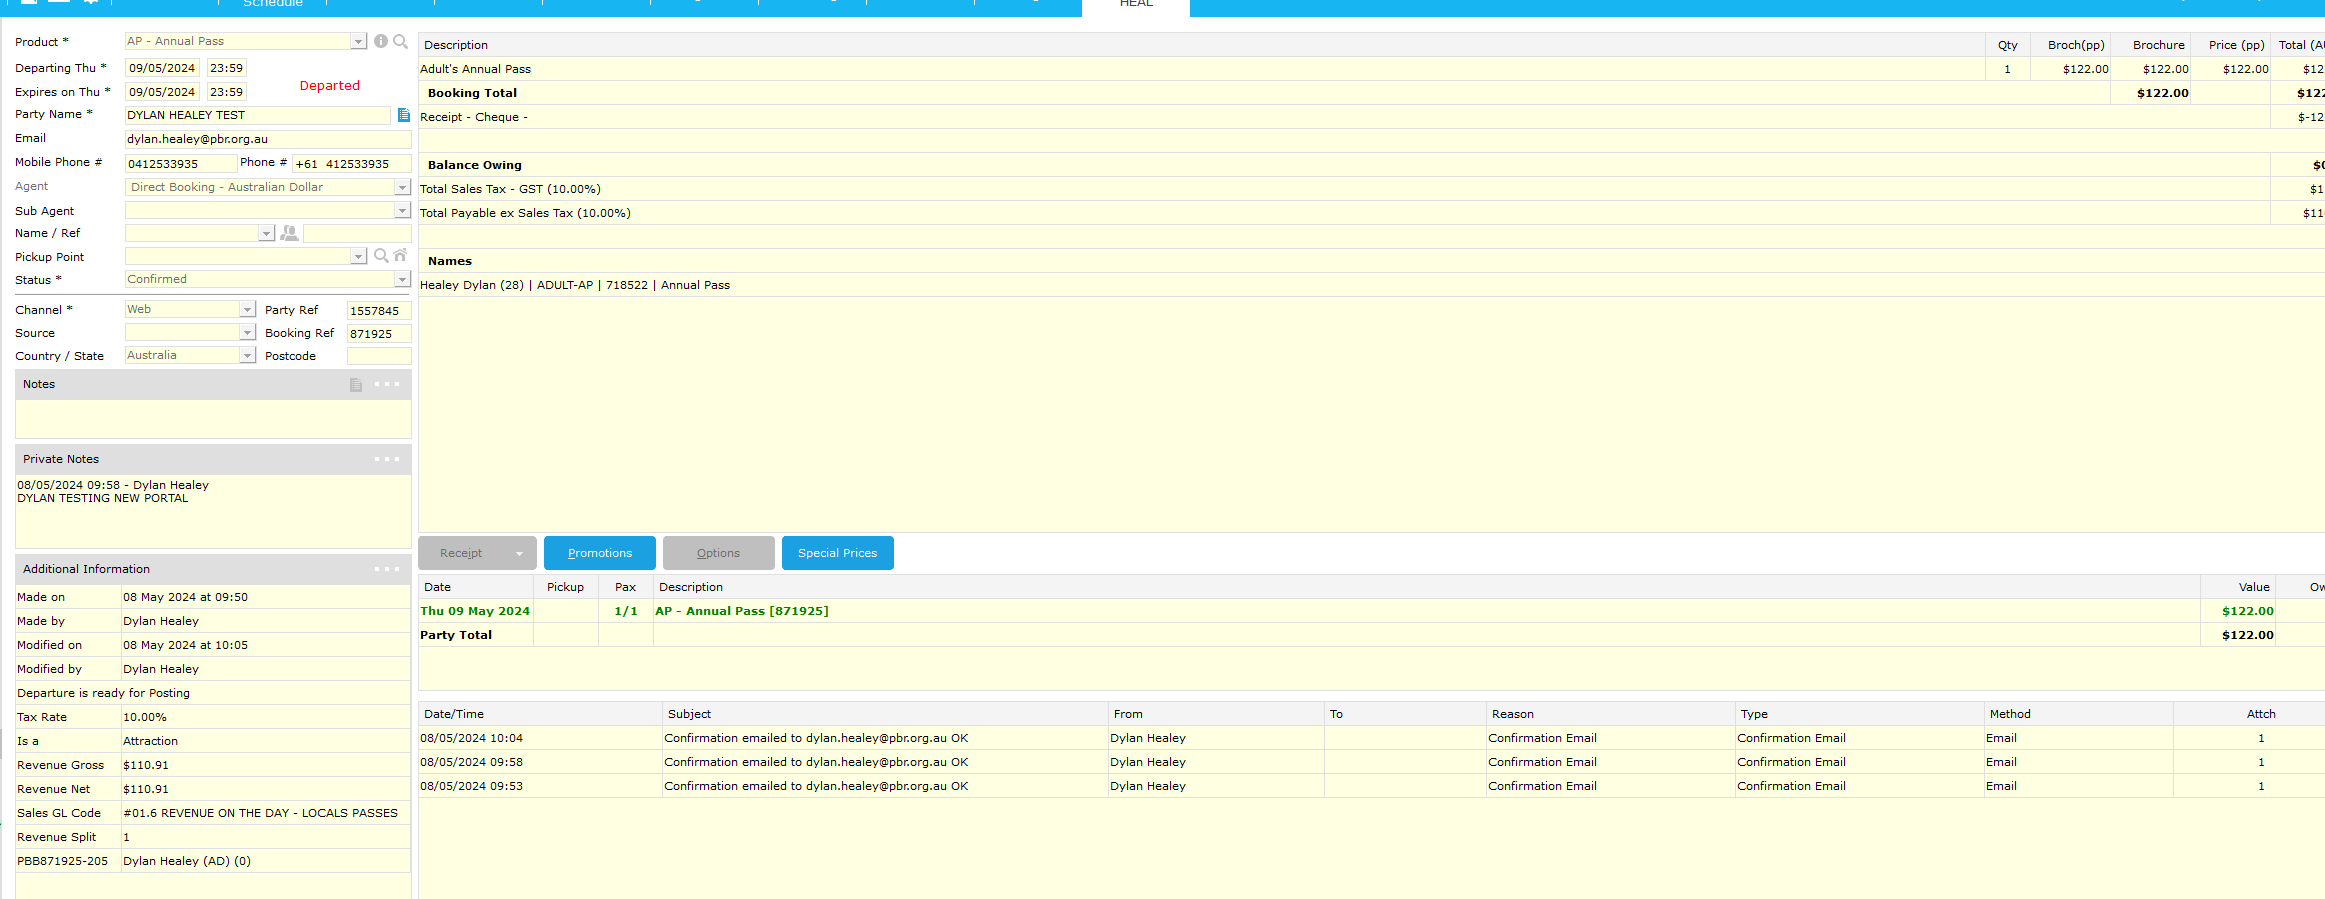
- Right click the Member details and select Properties, This will bring you to the purchase within CL.

- Double click the purchase

- Follow the normal process to send a confirmation email. Send > Confirmation to Client... > Next > Next > Finish. This will send a confirmation to the email provided in the booking.

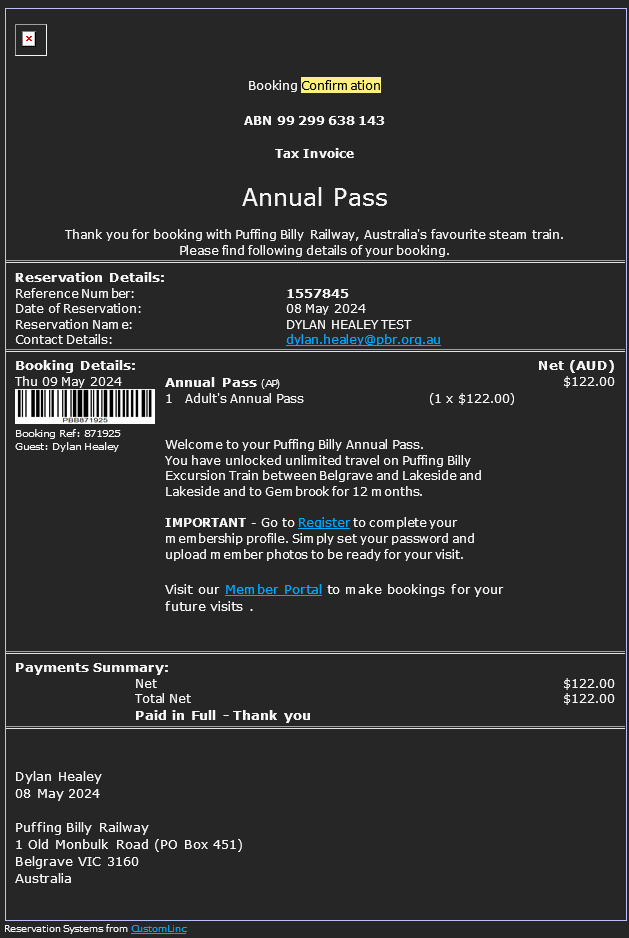
An example of the emails is below:

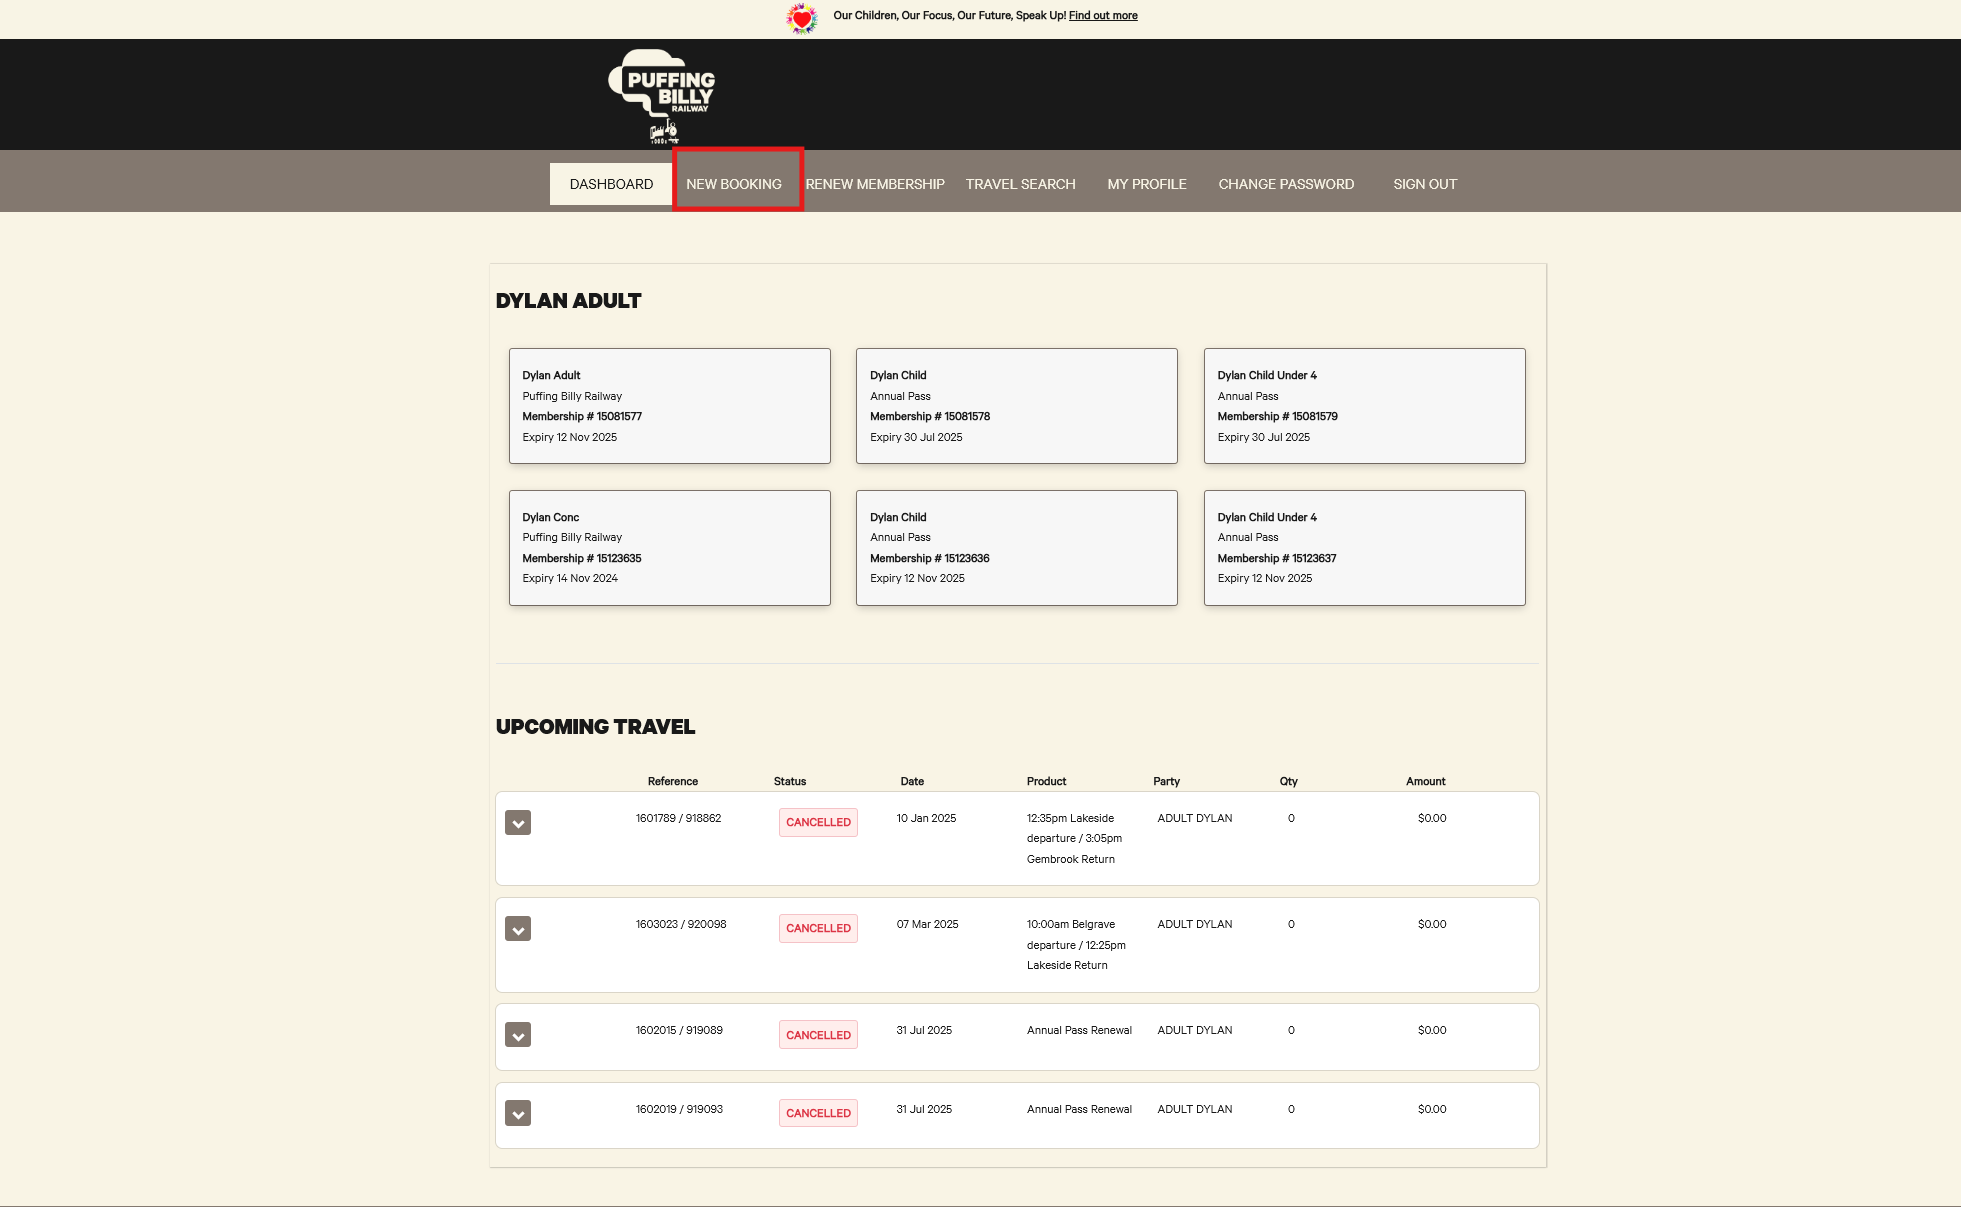
How: An Annual Pass Member can make an excursion booking themselves
- Go to the annual pass portal here: https://apps.customlinc.com.au/puffingbillyrailways/MemberPortal/Logon/
- Use your created credentials to log in. If you are unsure of your password use the I have forgotten my password option.

- If the user has not created their account you can reissue the confirmation email which has the registration details on it.
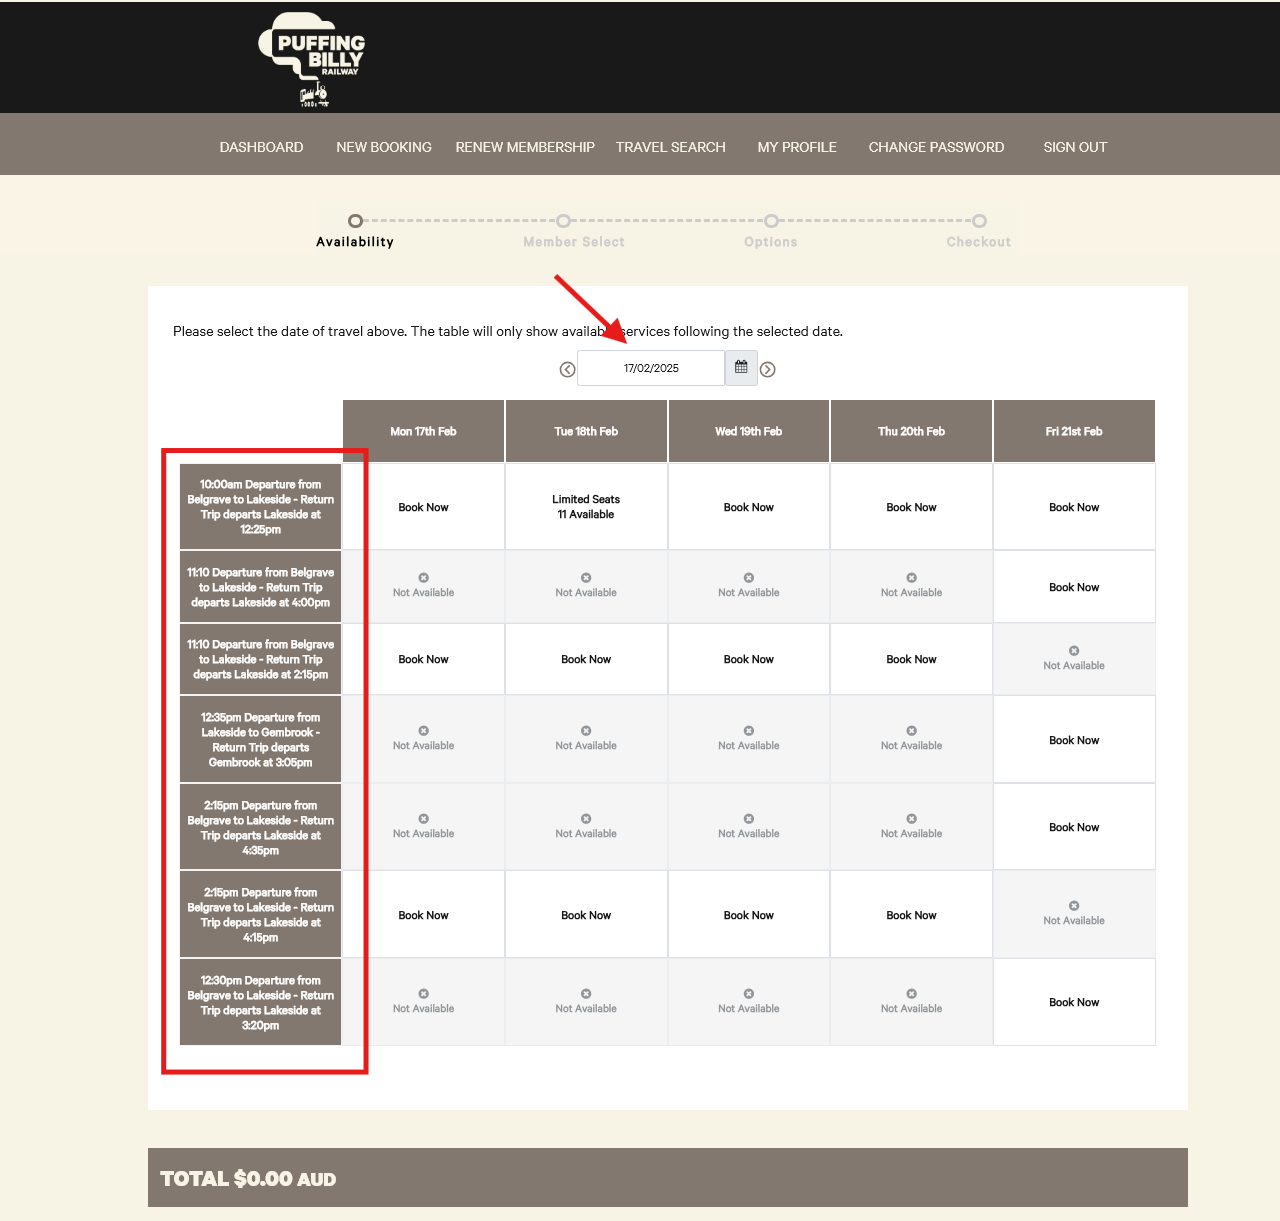
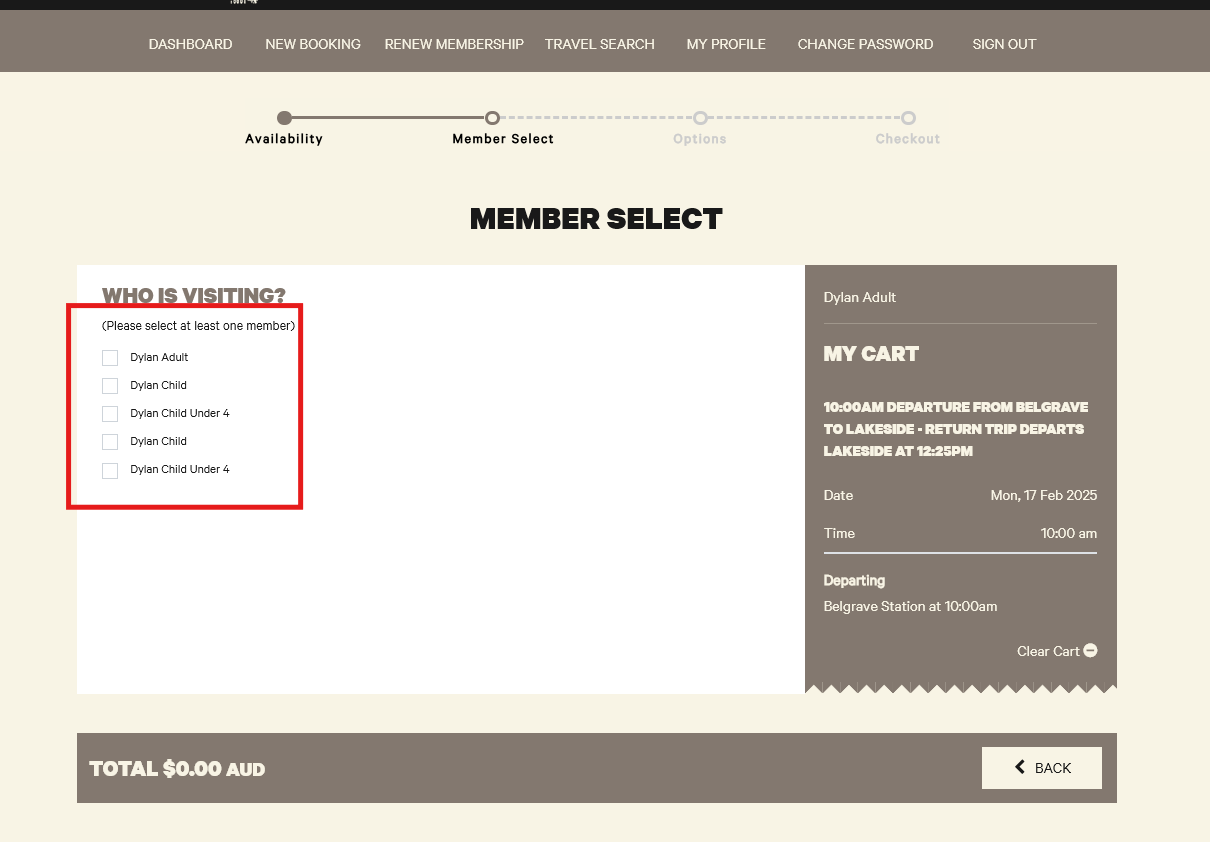
You can find a guide here. - Once logged in they should see the Dashboard, from here they need to select New Booking

- They can choose the date they wish to book. Similar to the public website.

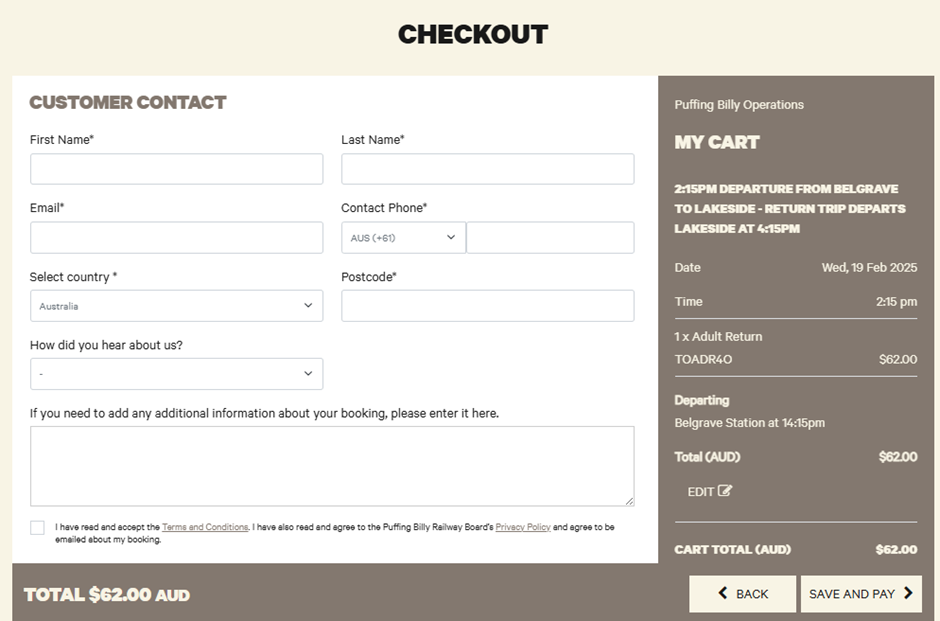
- Next they need to select who will be travelling, this will be the first and the last name of the member.
A Child, or Child under 4 member cannot travel without an Adult/Concession also selected.

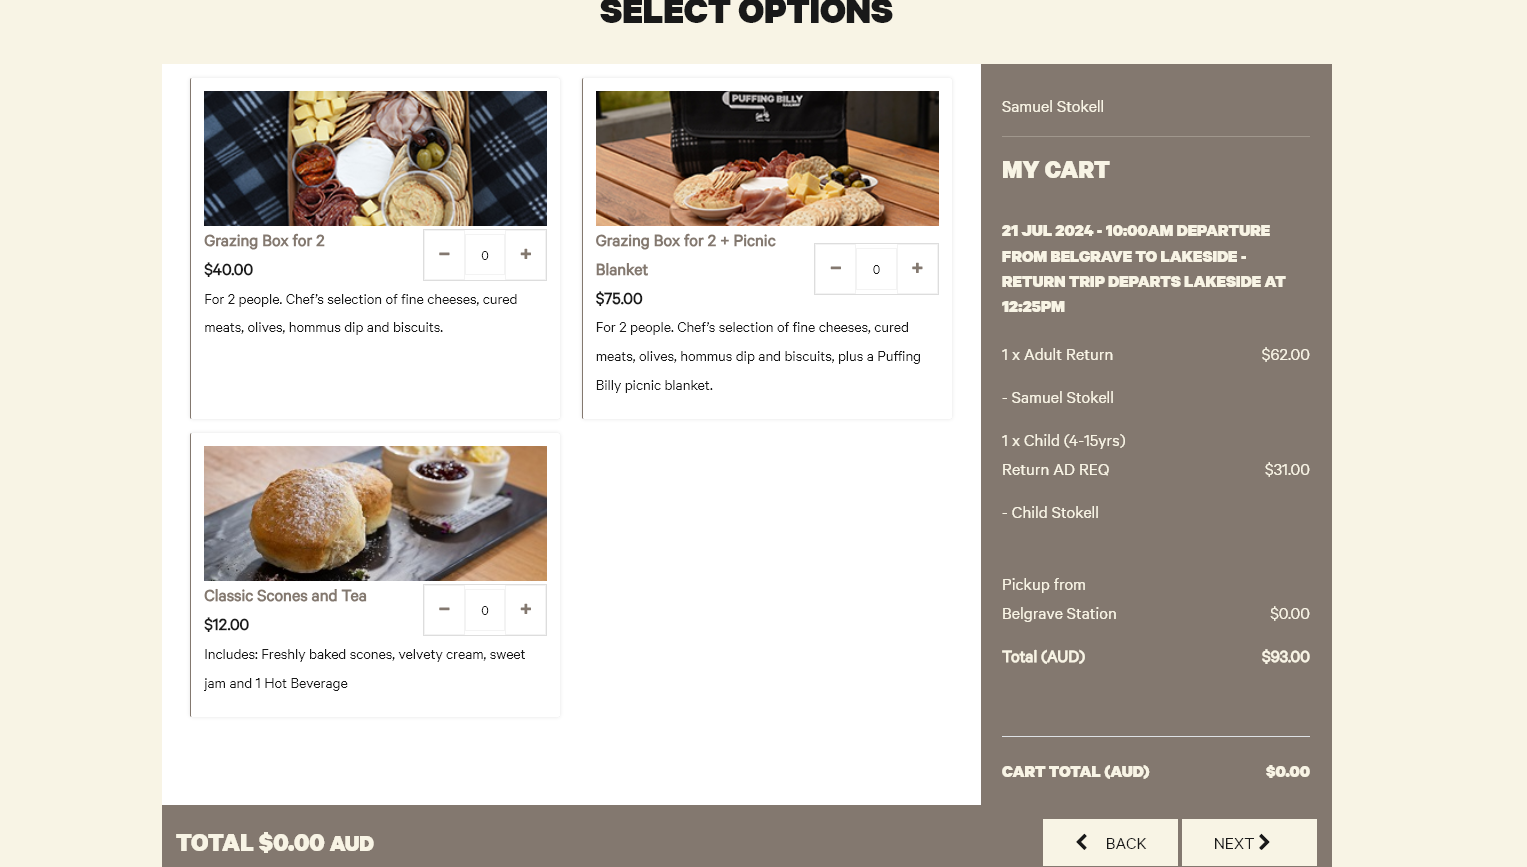
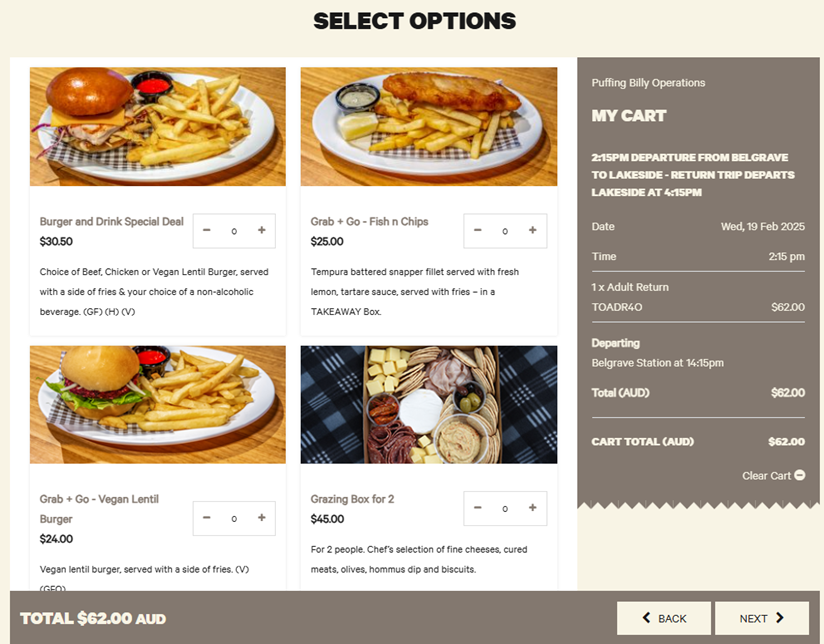
- They can select if they'd like to purchase any available options.

- The terms and conditions need to be accepted, there should also be an Annual Pass promo code showing as used.
If the code is removed it cannot be readded manually. The user will need to clear their cart (see image) and restart the booking process again.

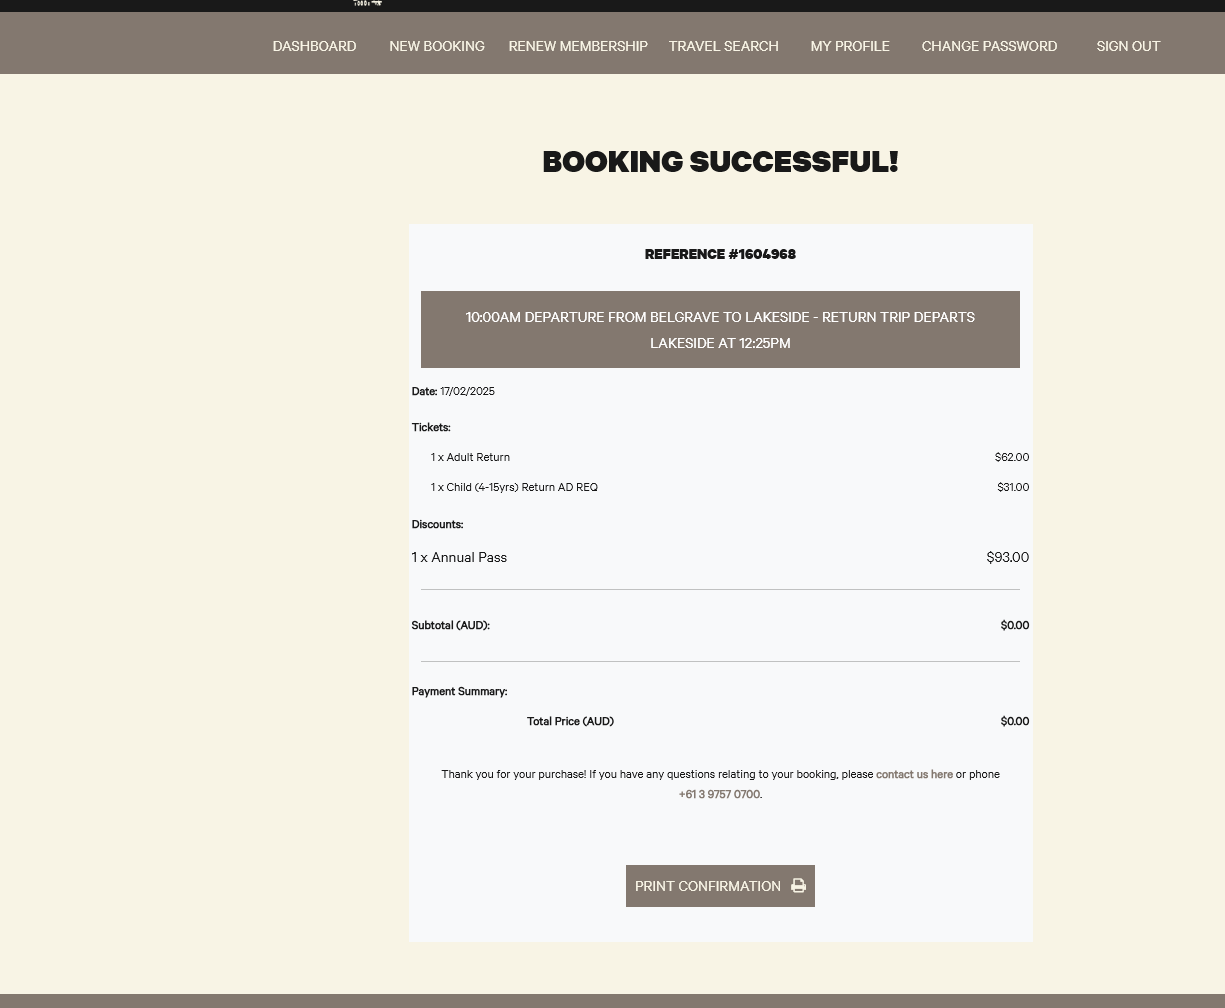
- They will then be met with a booking successful page.

- They can confirm the booking in the portal under Dashboard.

- Finally they will receive our standard booking confirmation email


How To: Cancel an Annual Pass booking
Currently this cannot be done within the portal. The user will need to contact the CSC and have the booking manually cancelled. You can search for the booking with their name or booking reference which can be found on the Annual Pass Dashboard by the user.
How to: Register your Annual Pass account
- The customer should receive a confirmation email once the purchase has been confirmed to their nominated email address. It will look like below:

- The register link will take them to https://apps.customlinc.com.au/puffingbillyrailways/MemberPortal/Register/?
-
They will need to complete the form and select Save Details.
These details MUST match what was provided during the checkout process for the Annual Pass, for the first Adult fare.
- They can login in to the portal at https://apps.customlinc.com.au/puffingbillyrailways/MemberPortal/Logon/


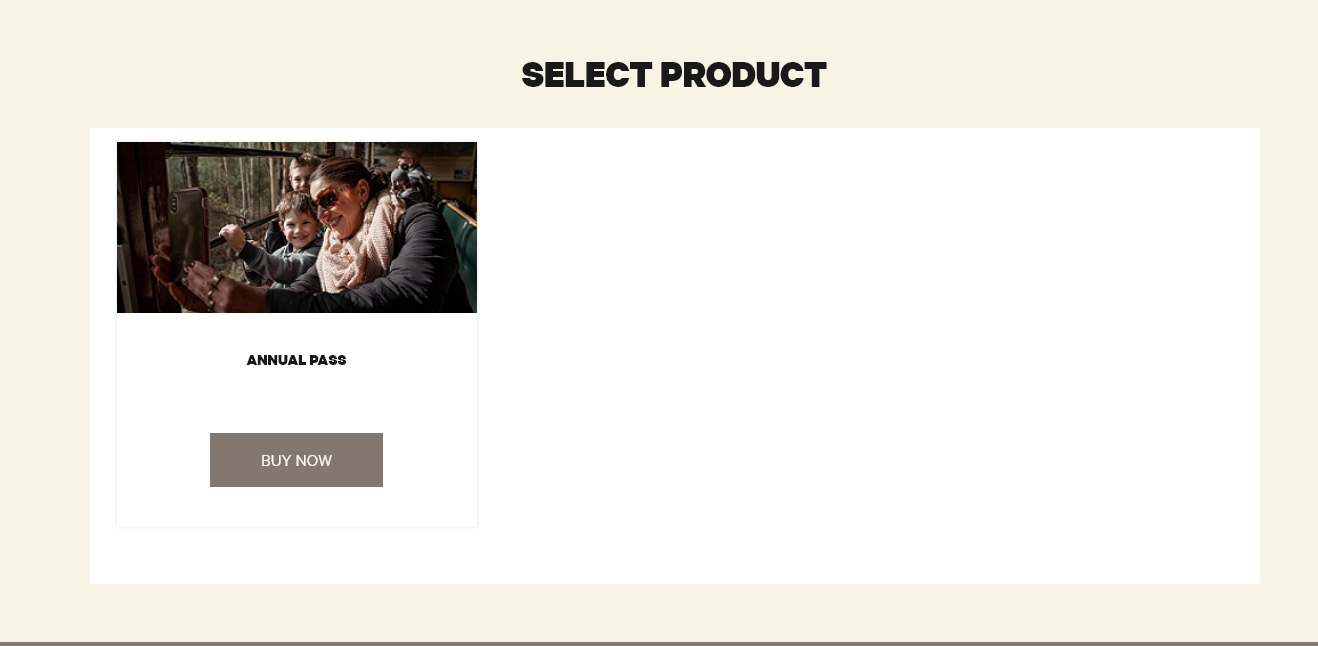
How to: Purchase an Annual Pass
This is a work in progress, details of this may change as specifics locations for products are placed in publicly accessible locations on the website.
BOOKING LINK: https://apps.customlinc.com.au/puffingbillyrailways/BookingProduct/List/?&category=AP
-
Similar to normal bookings they will see a booking frame like below.

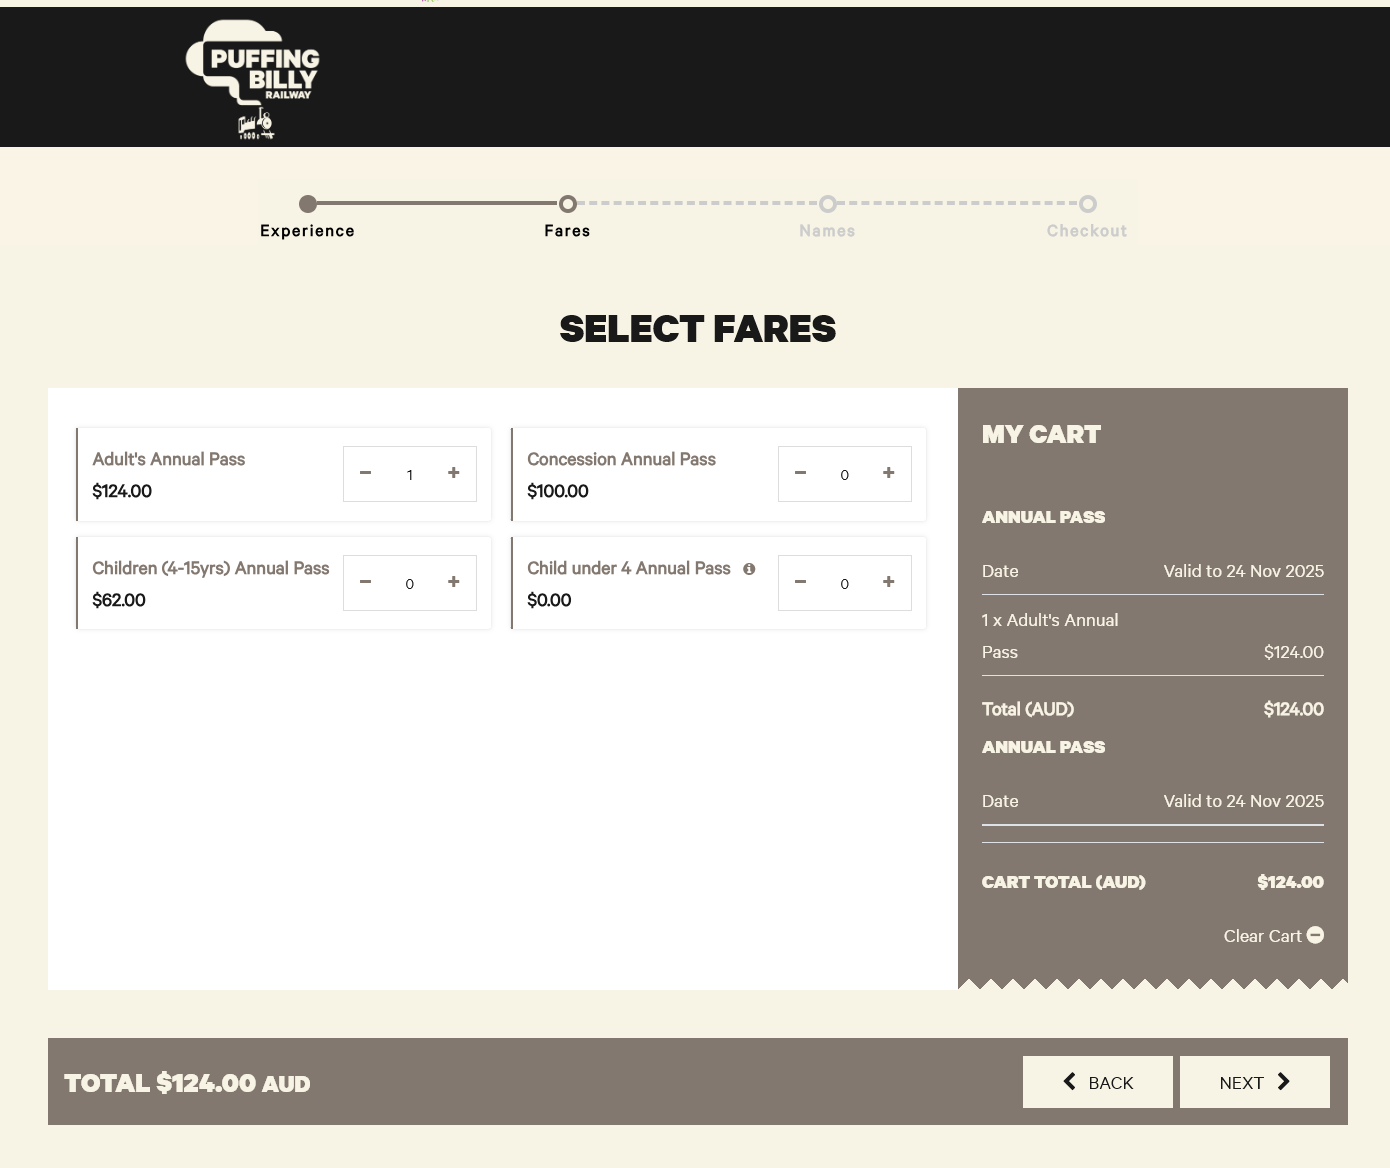
- They can then select how many annual passes they require.
Family/Group discount is currently a work in progress. This section will be updated as soon as these are configured.

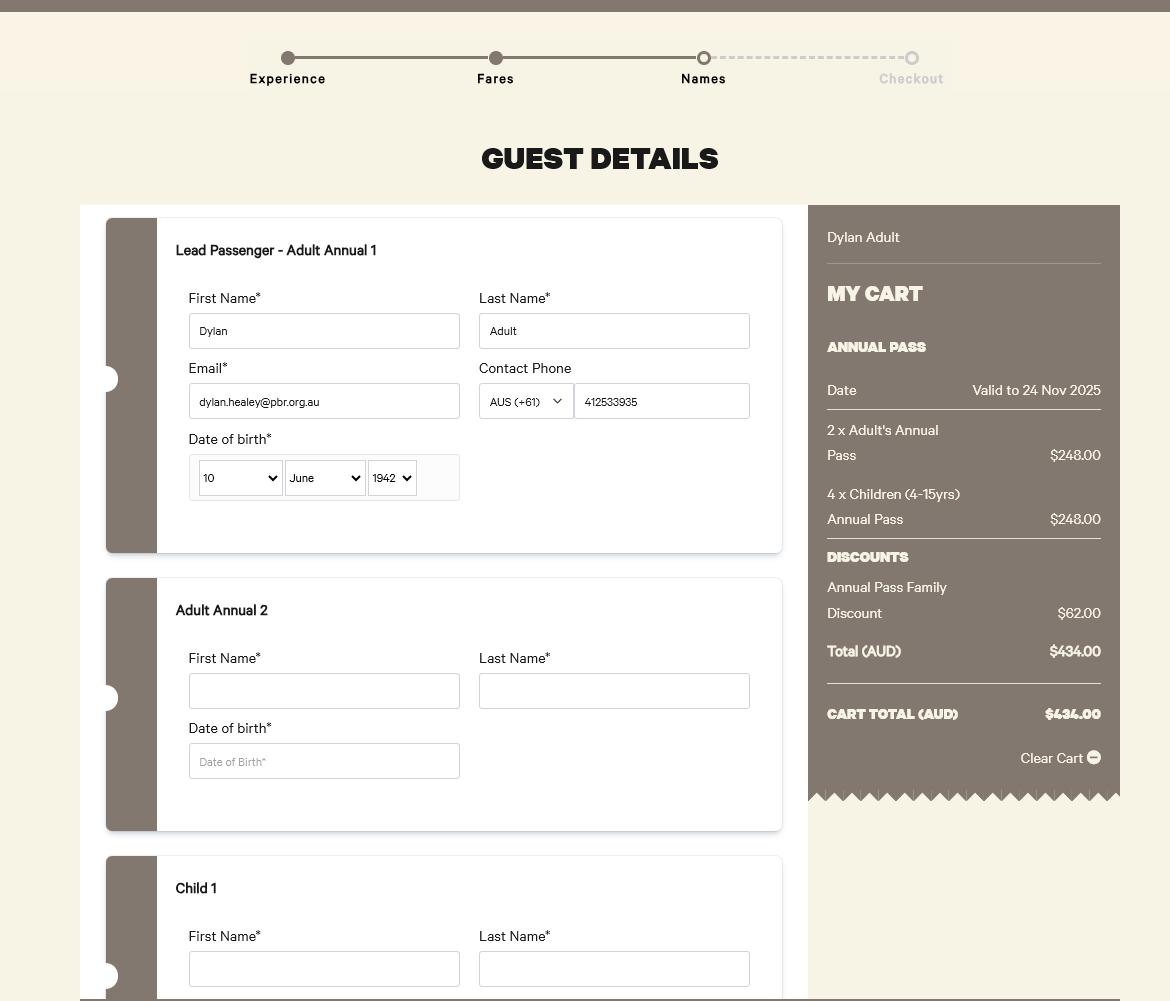
- They will then need to put full names of each pass holder & the DOB of any children.
The Lead Passenger will be Annual Pass account holder. These will be the details the user registers their account with.

- Once the transaction is complete a confirmation emails with registration details will be sent to the email provided in the billing contact information.
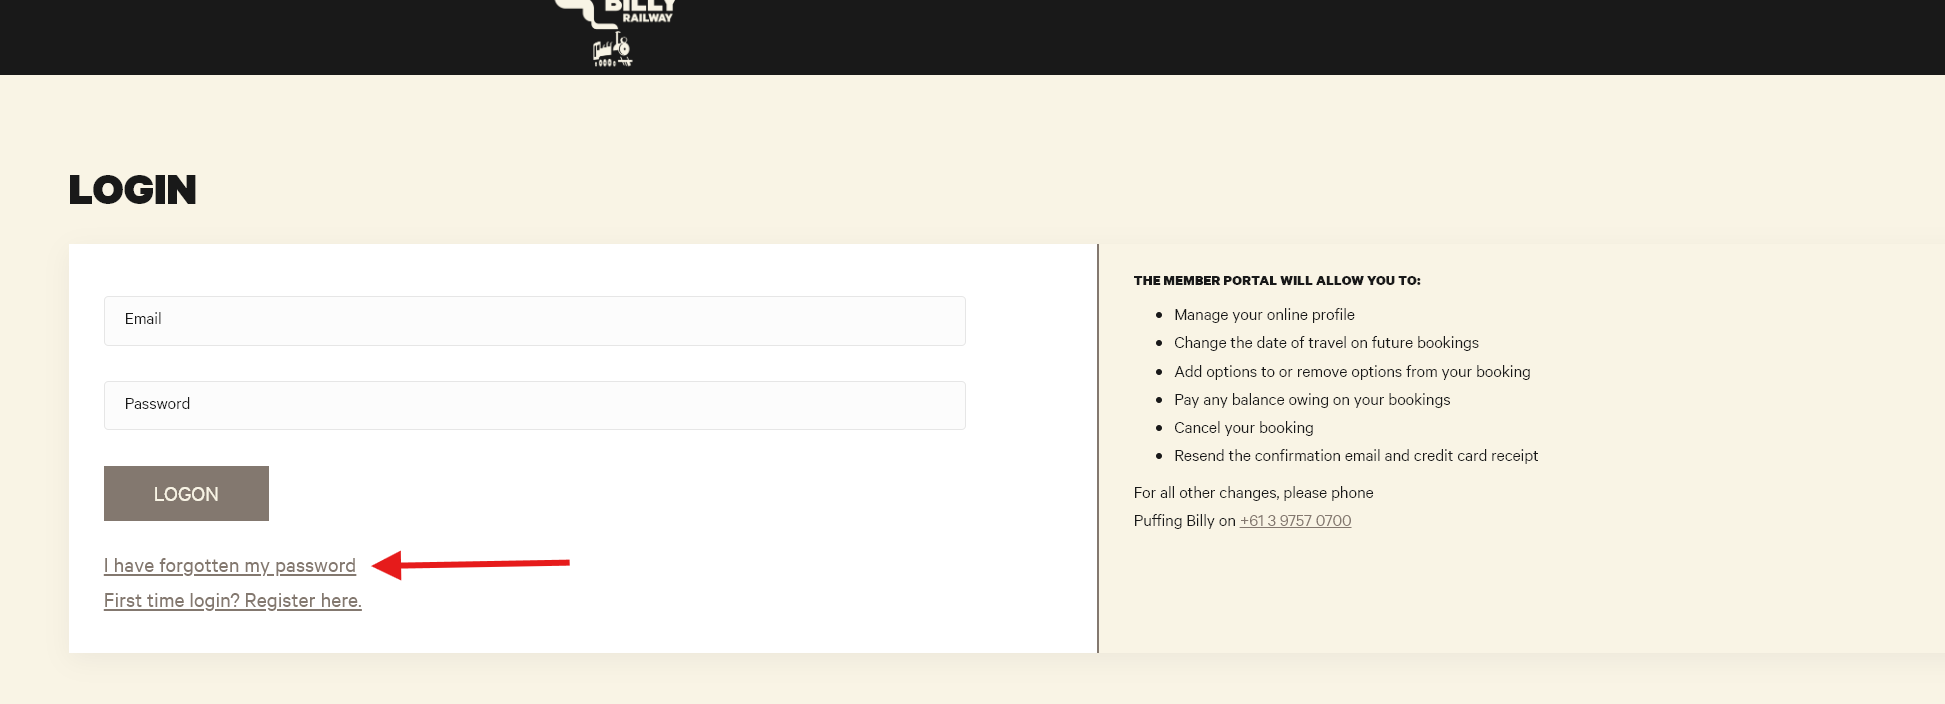
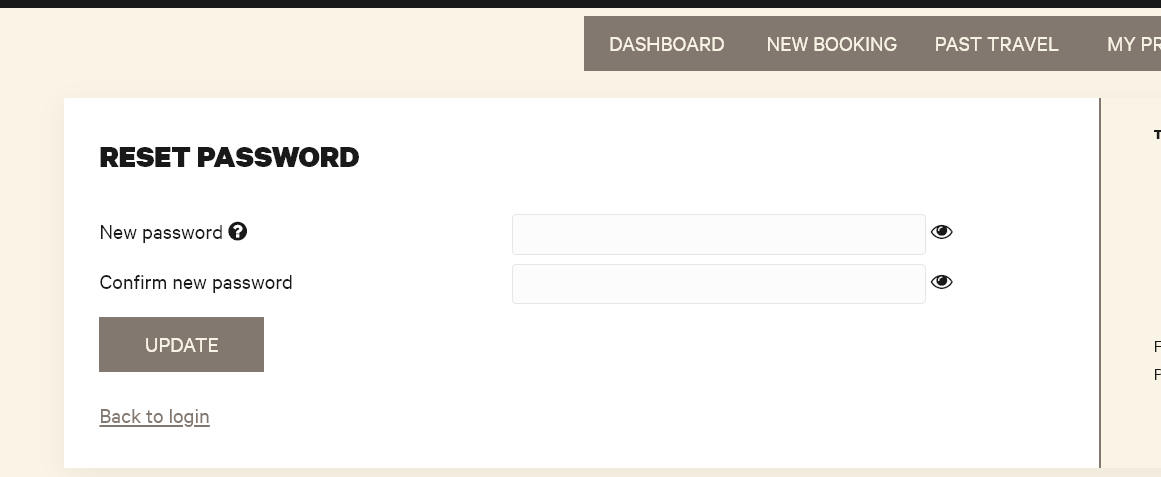
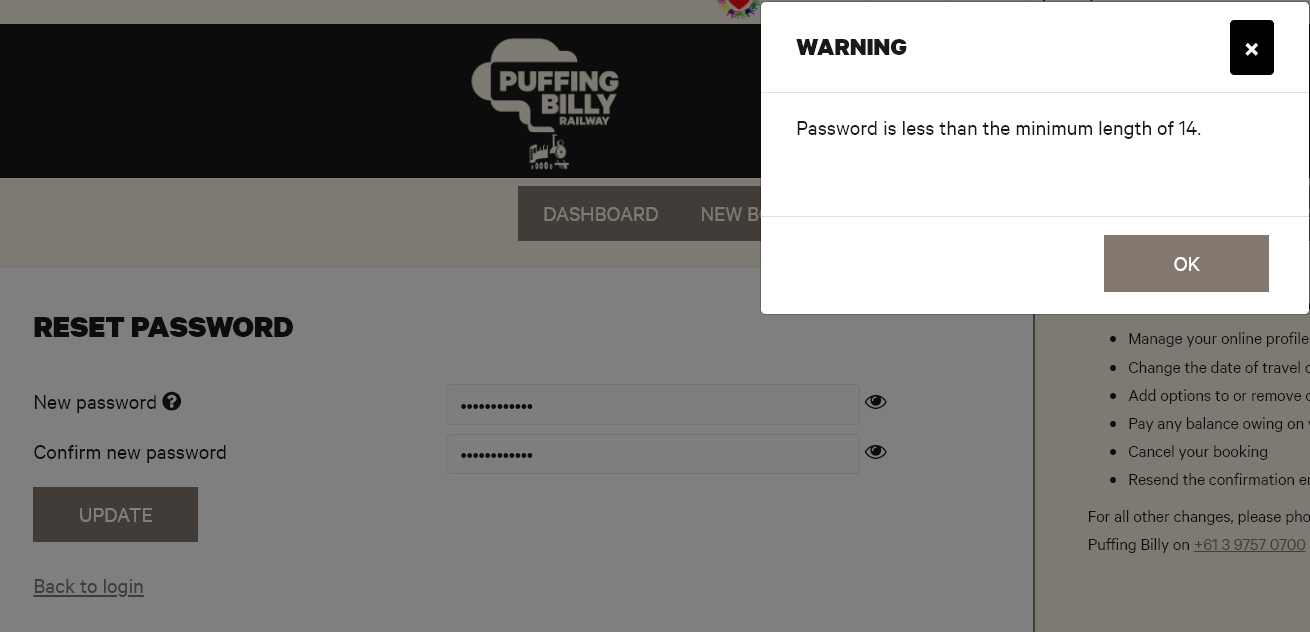
How: A User can reset their password
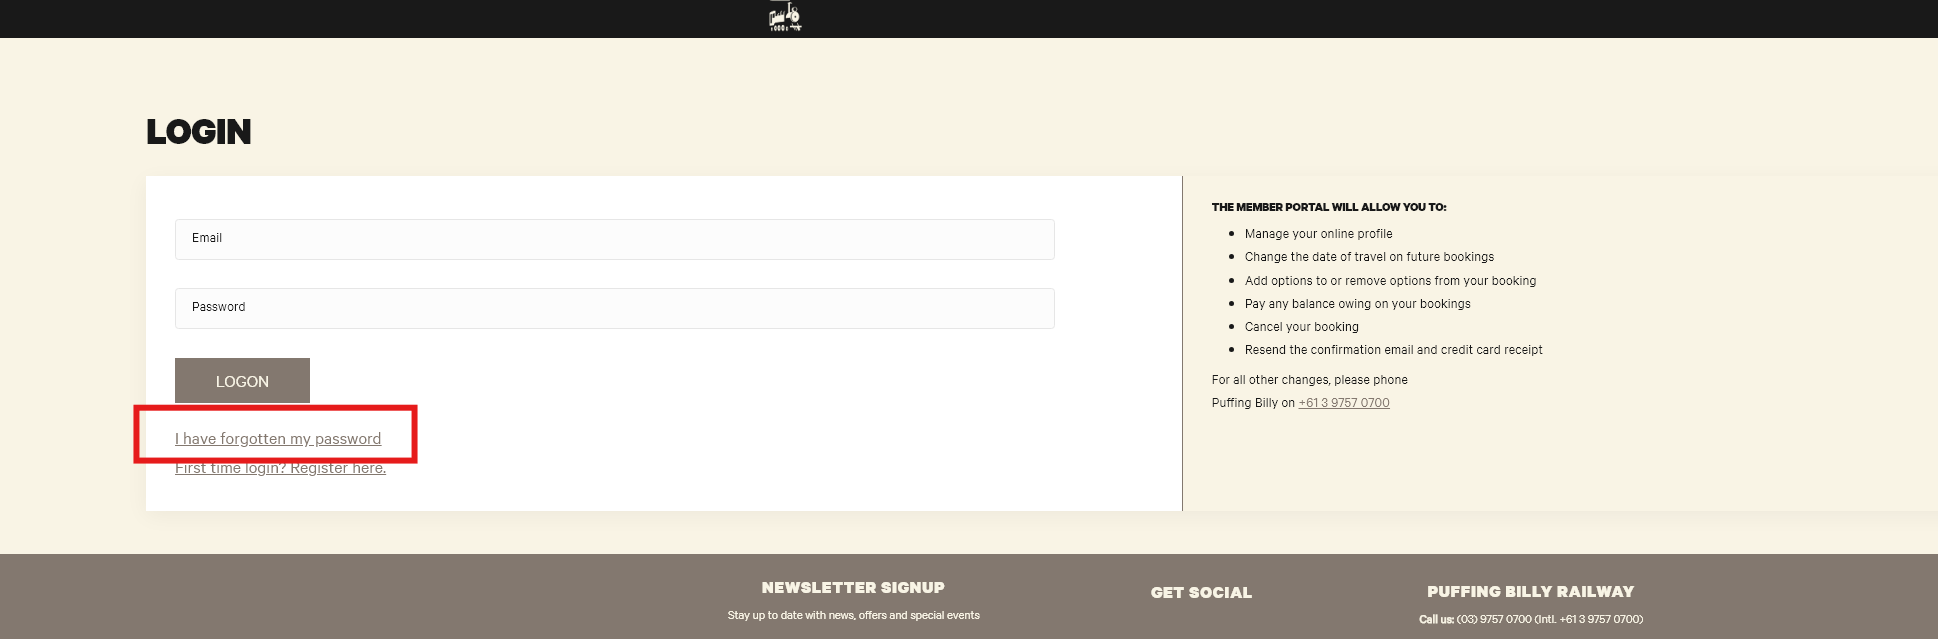
- Go to the annual pass login webpage.
- Click I have forgotten my password.

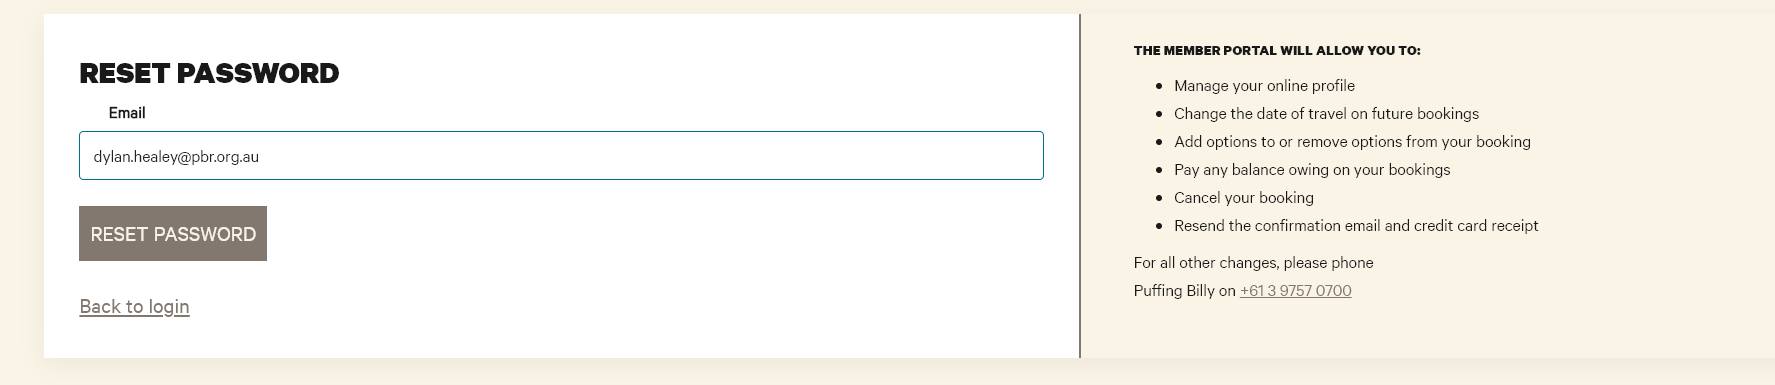
- Type in the email address for the account and click Reset Password, they will then be sent an email.

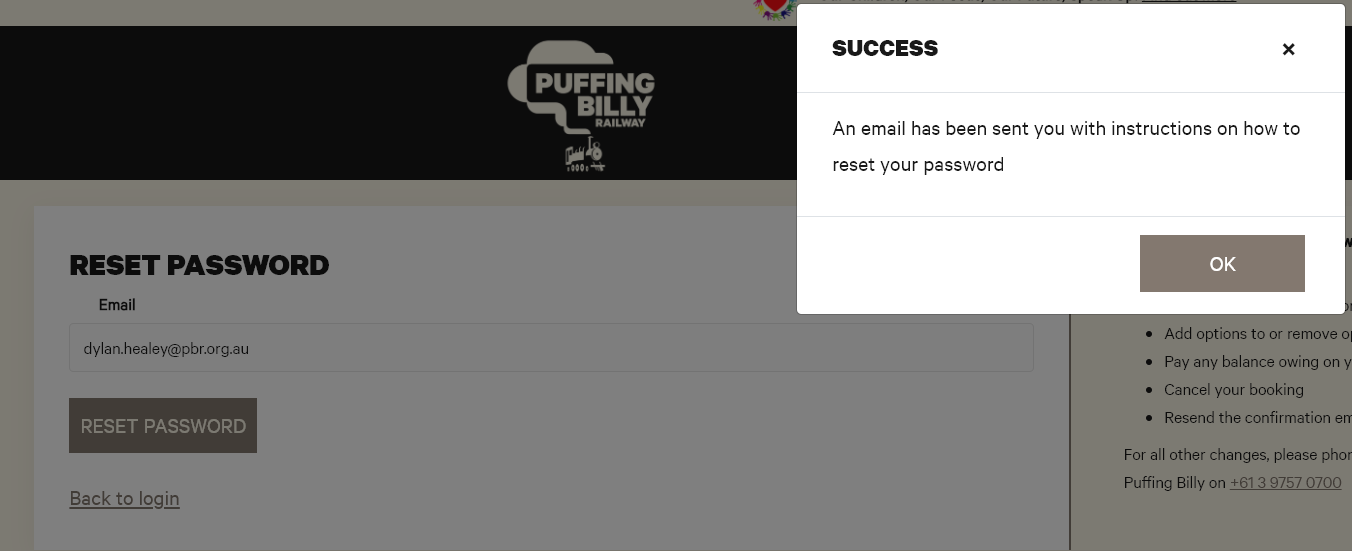
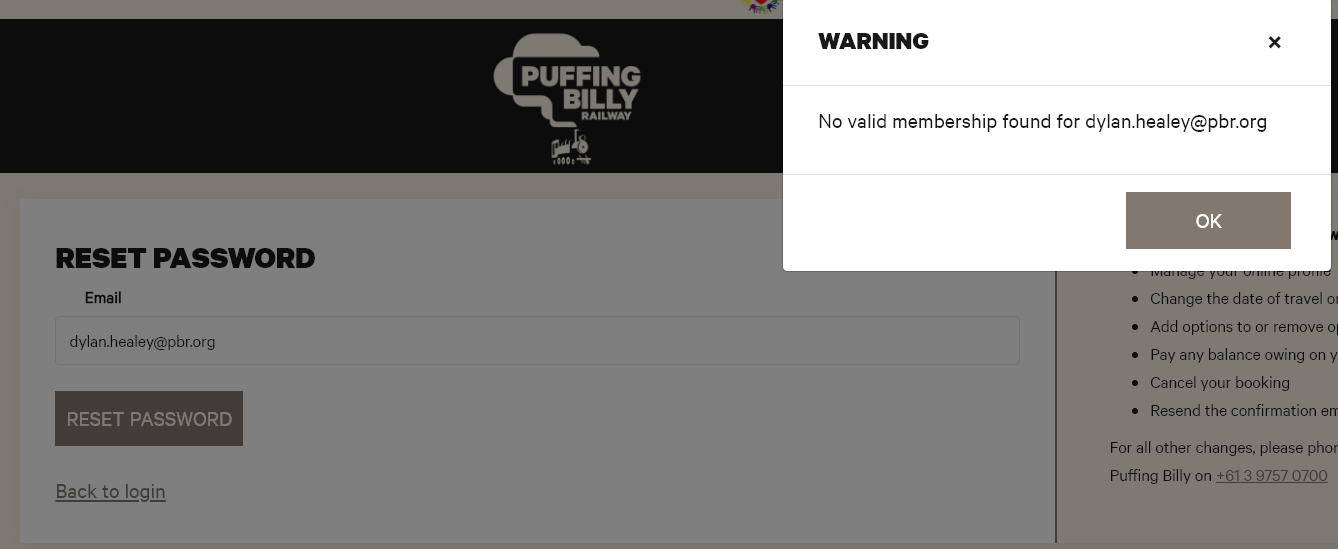
- You can see a successful reset here and an unsuccessful attempt below. This could be an incorrect email for example.


-
They can then click the link in the email.

- Type in the new password and click update

- If it does not meet minimum requirements it will prompt them to change it.

- If it does not meet minimum requirements it will prompt them to change it.
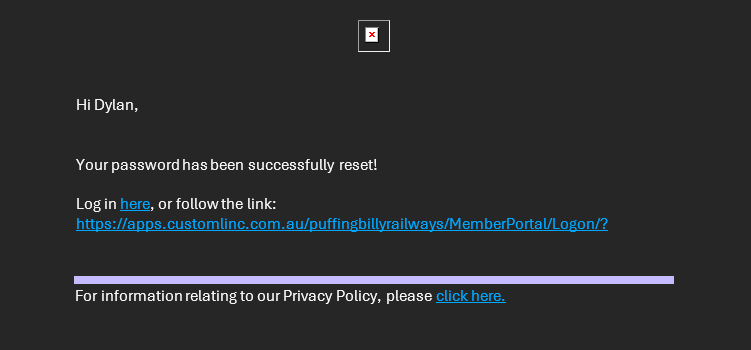
- They will then receive an email confirmation that it has been reset. From here they can click the link to login with the new password.


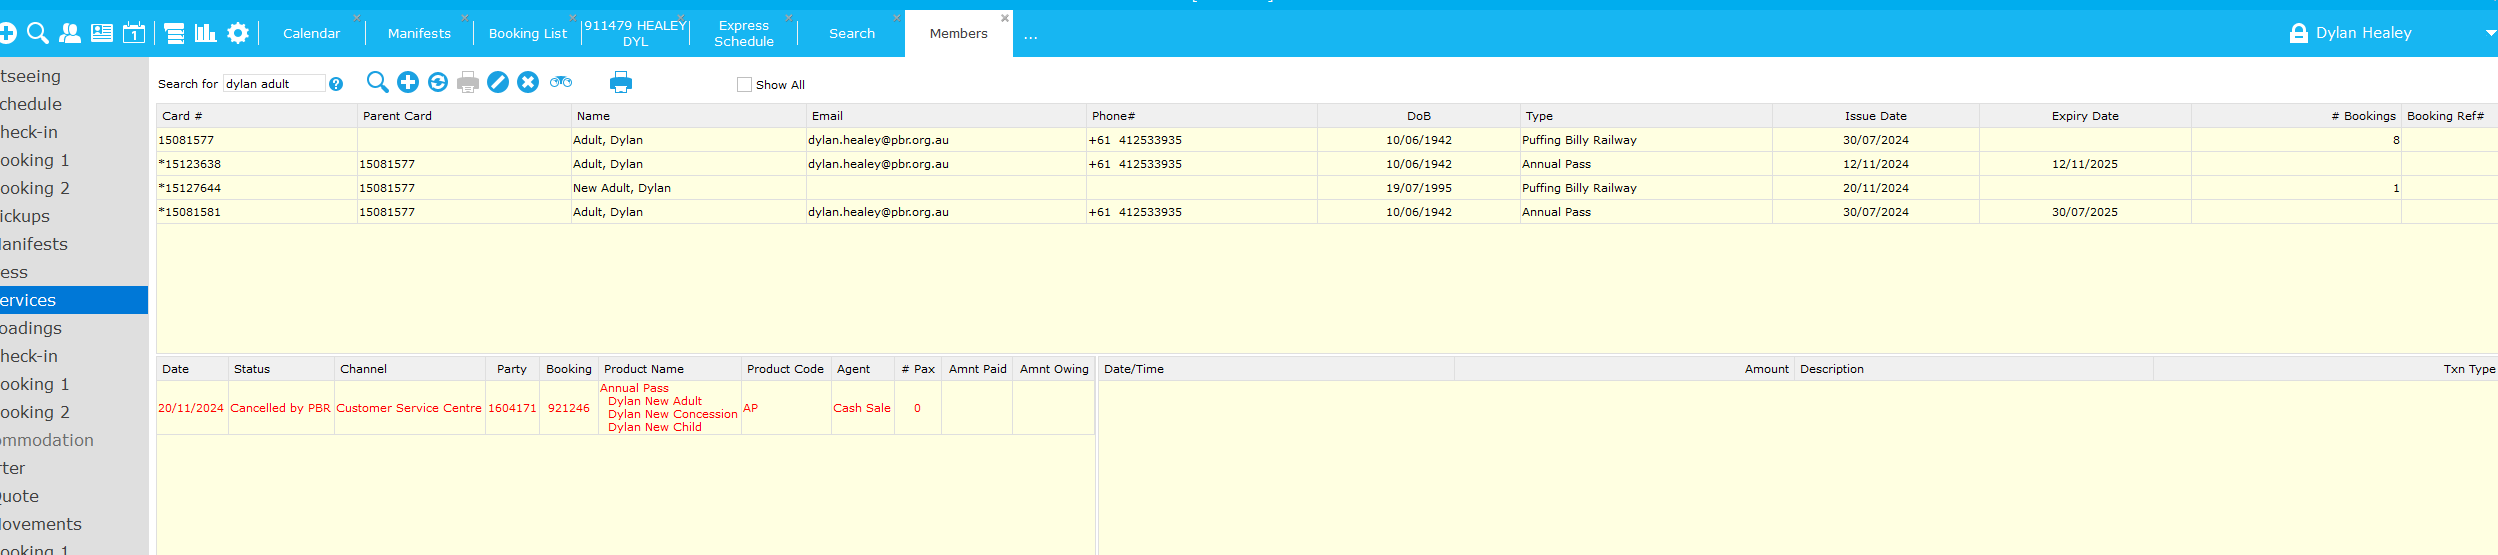
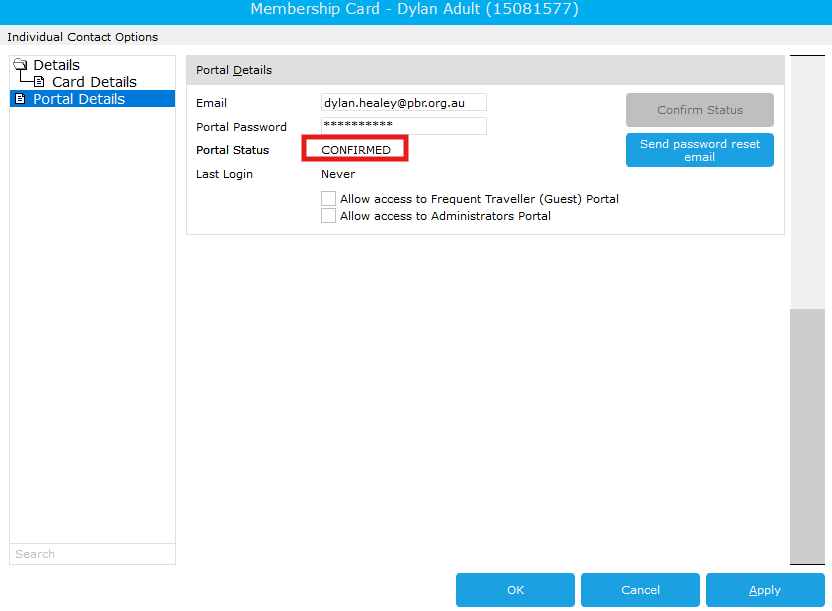
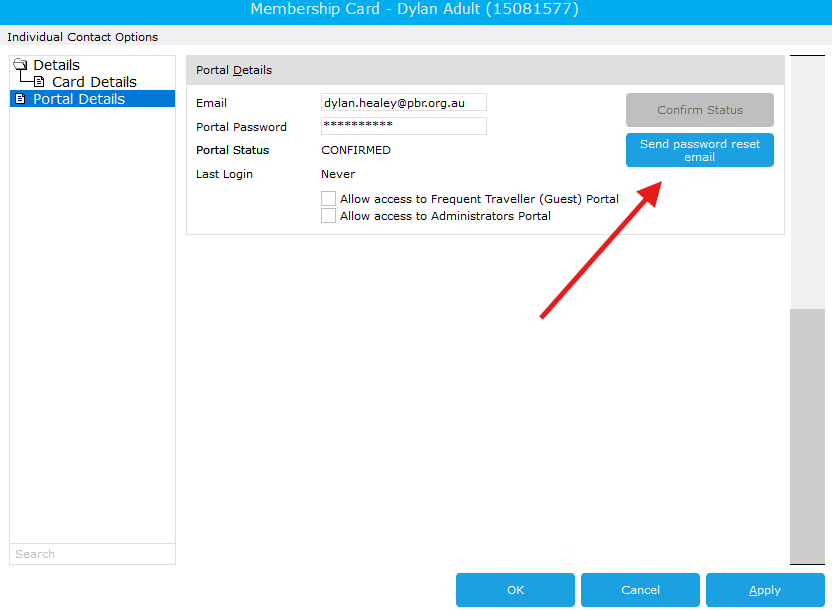
How to: Reset a Annual Pass user password
- Go to membership details

- Search for the Annual pass members full name or membership number

- You then need to find the "Parent Card". This will be the Lead Adult for the account, and where the account details are.

As you can see above, the member card # 15081577 does not have a parent, therefore it is the parent. - Right click this user and select properties

- You can confirm if the user has setup portal access with the status.

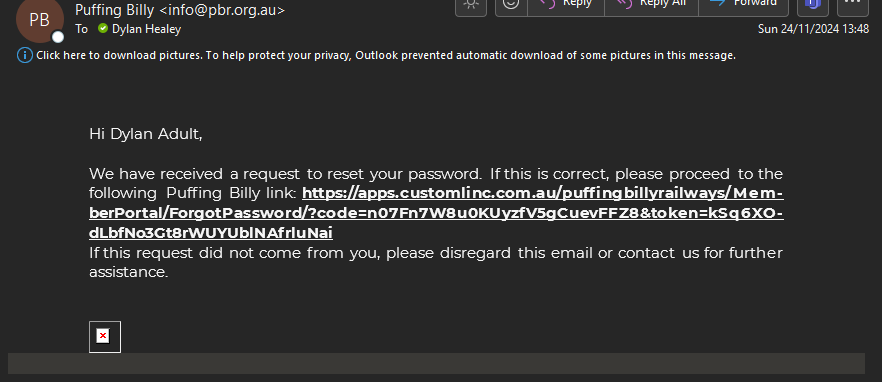
Then select Send password reset email

- The customer will receive an email to in 2-5 minutes with instructions on how to reset their password.


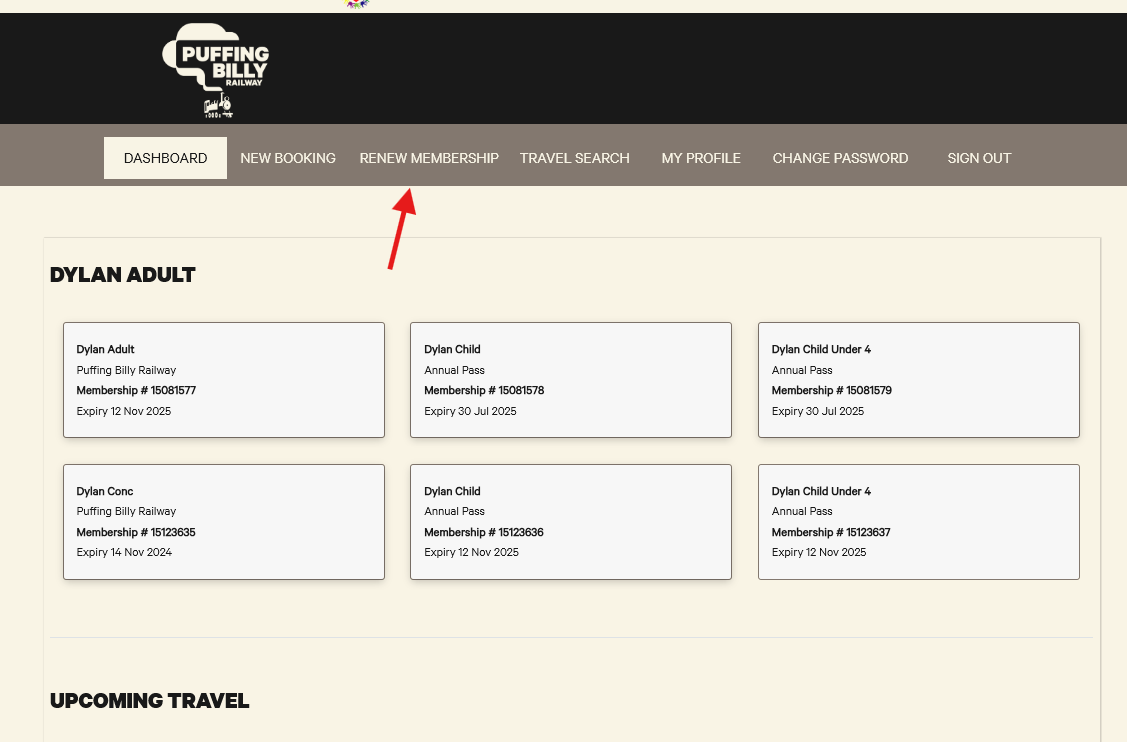
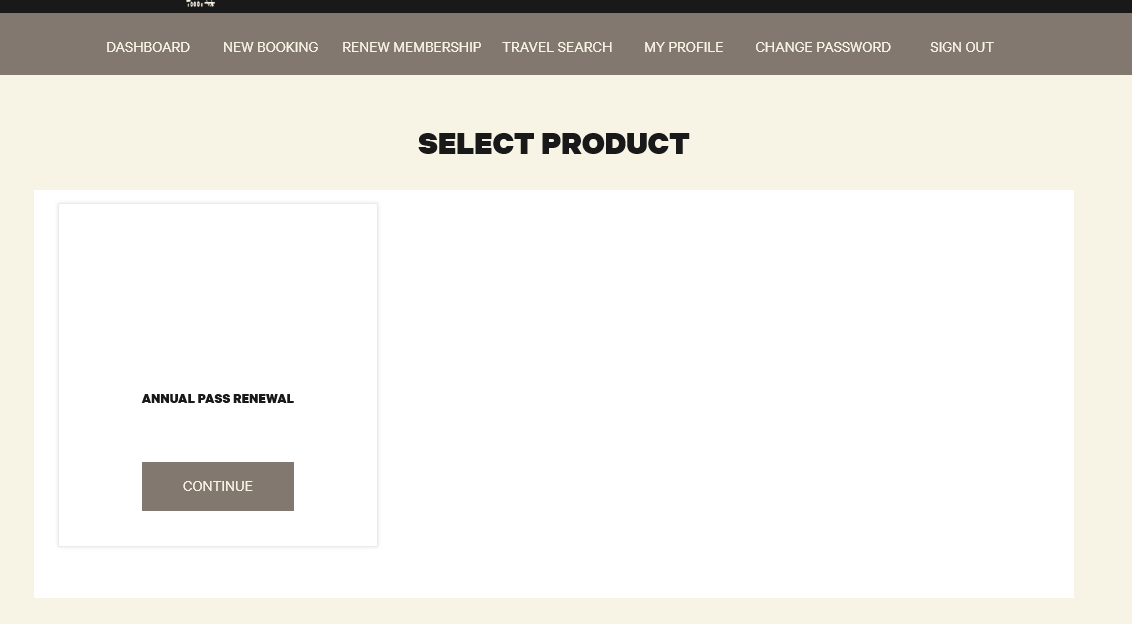
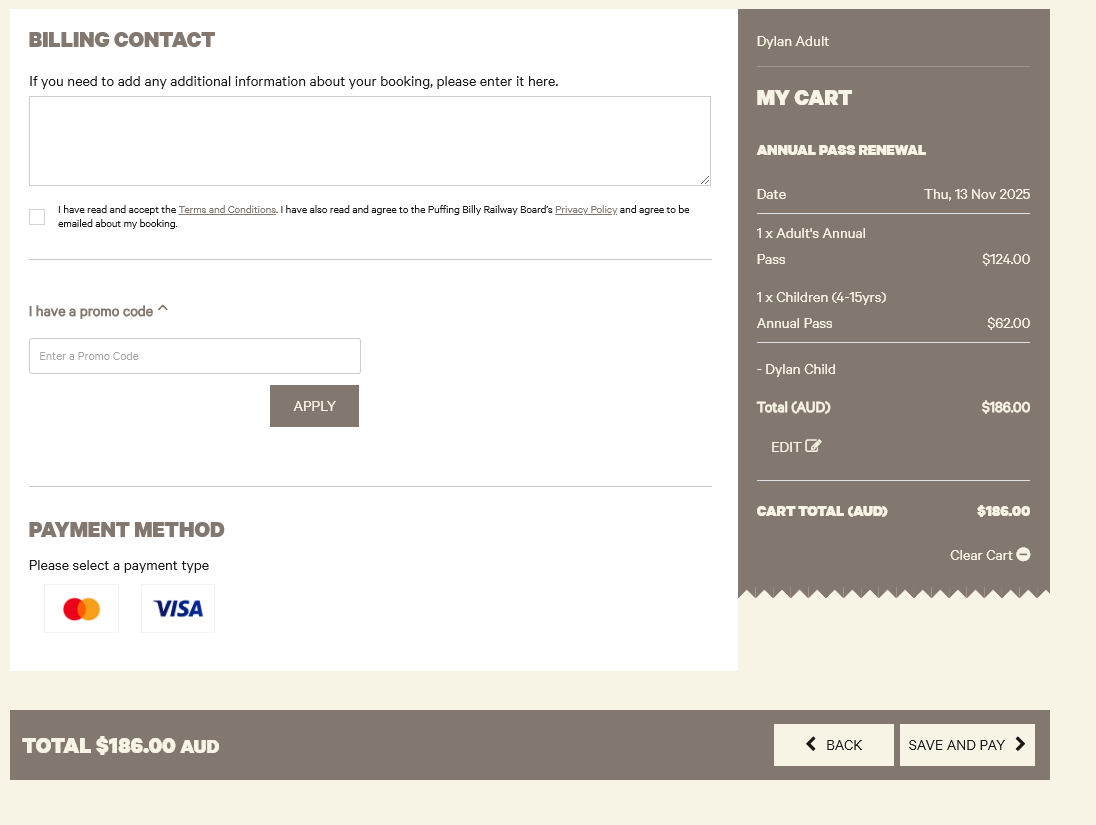
How to: Renew a membership/ Annual pass
- Inside the annual pass portal they can click the tab Renew Membership

- Click continue

- Select the users they would like to renew and click Next

- Checkout as normal.
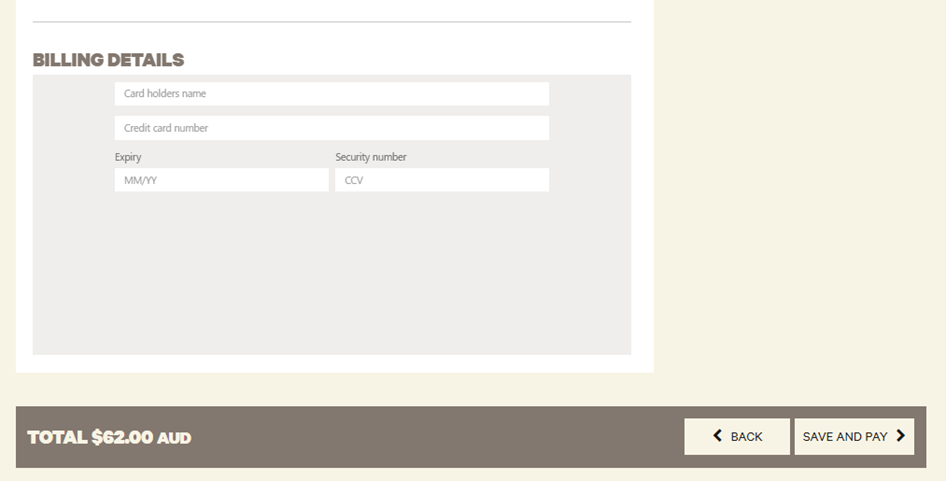
Accept terms and conditions, payment method and fill in payment details. Then select save and pay.


How: A user can edit their service booking in the Annual Pass Portal
A user can see upcoming travel dates on the Dashboard
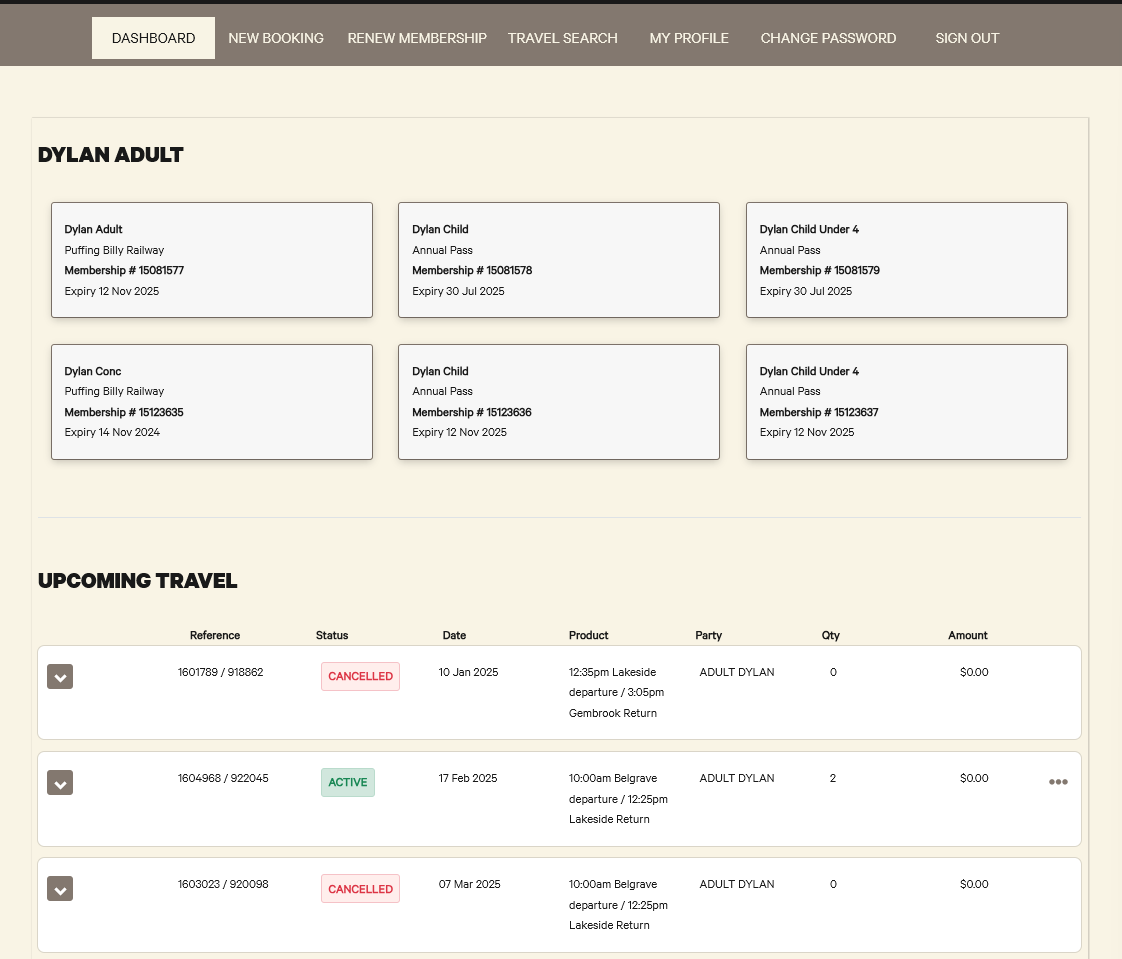
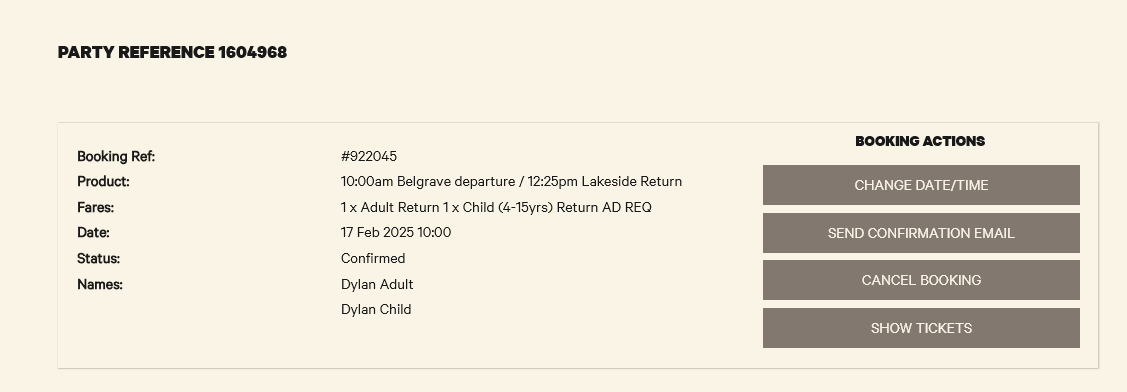
- If they want to edit their booking they can click the three dots ... on the relevant booking and click Edit
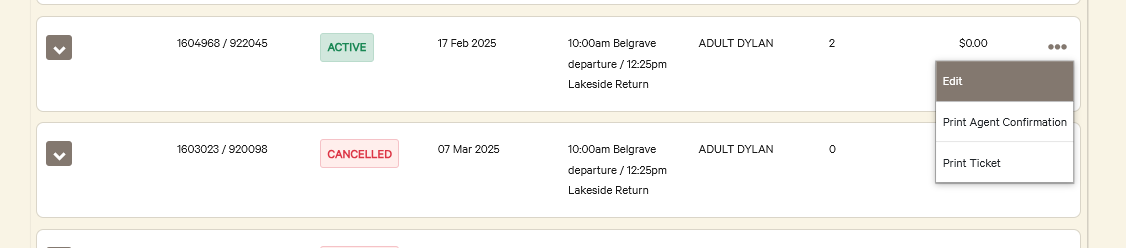
- From here they can Change Date of the booking, Cancel or Send their Confirmation Email

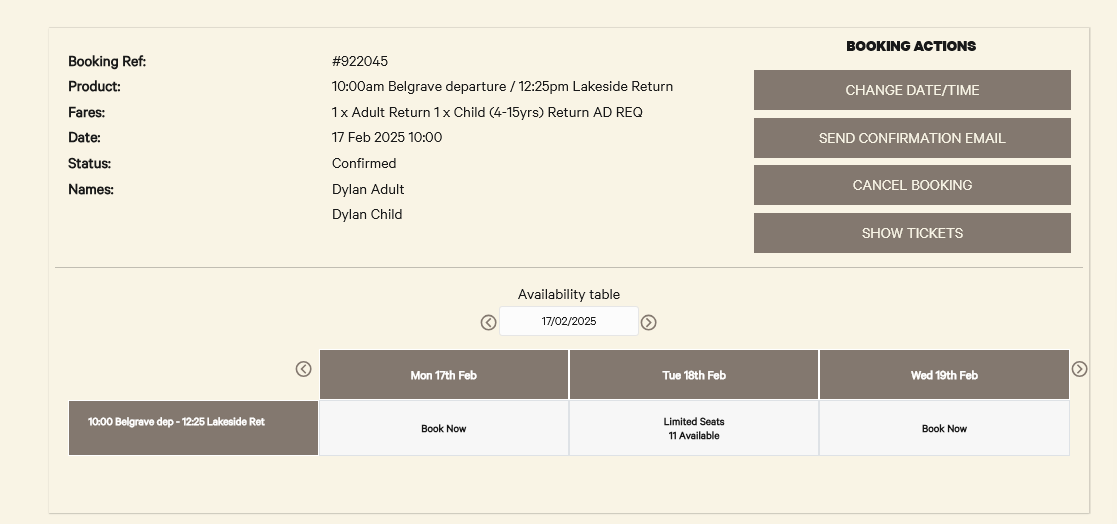
Change Date
If Change Date/Time is selected, they will only be able to move the date, due to our current CustomLinc configuration.
- Once a new date is select they MUST Save booking changes.
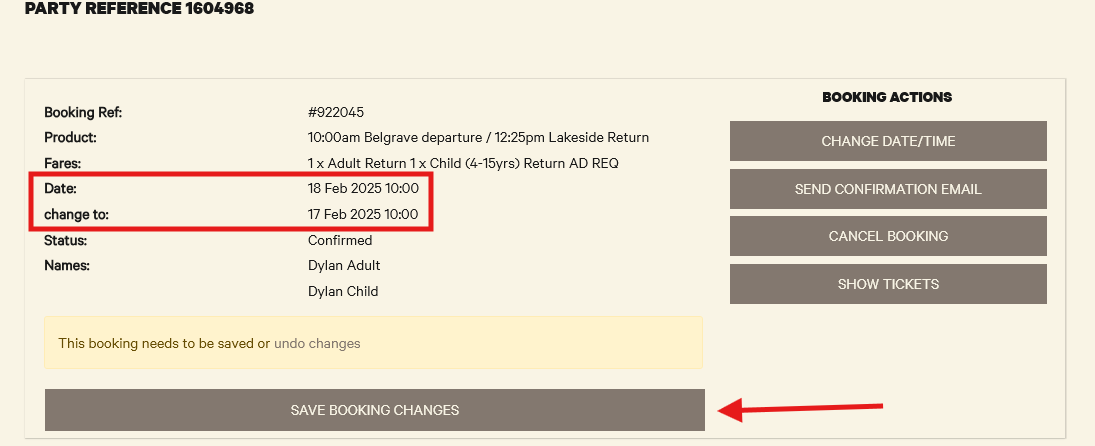
- The customer will then get a new confirmation for the new date

Cancel Booking
- If they select Cancel Booking they will be asked to confirm.


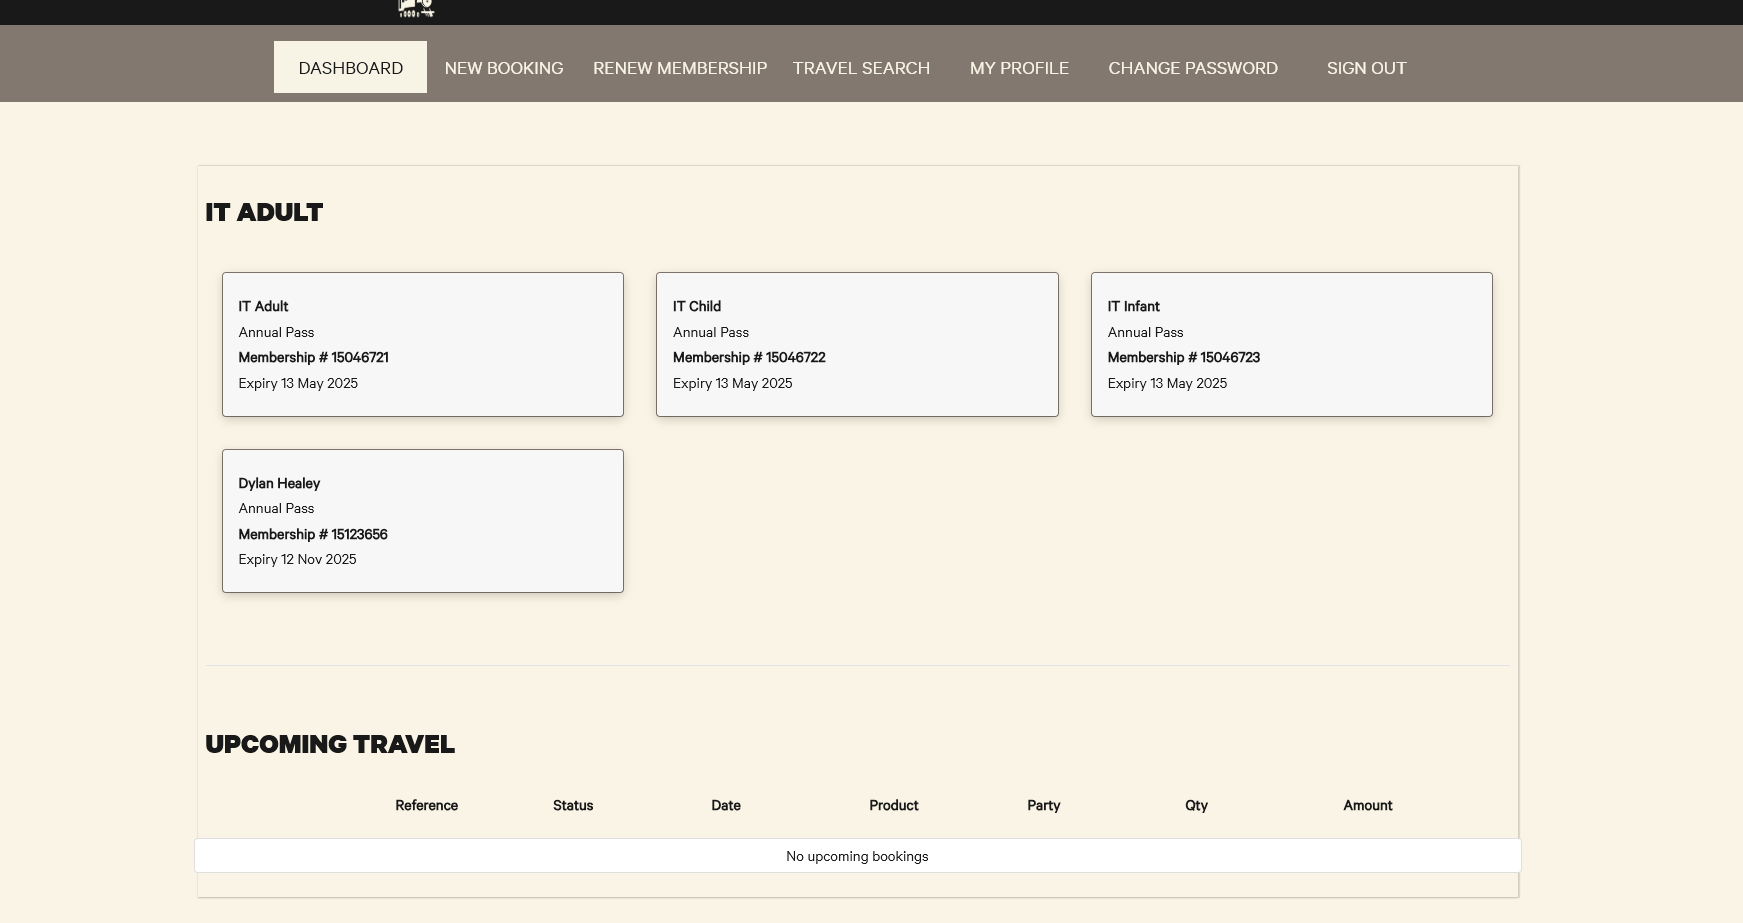
How to: Merge a Member into another Members Account
This is also the process on how to add a separately booked pass for a companion into the paid members portal.
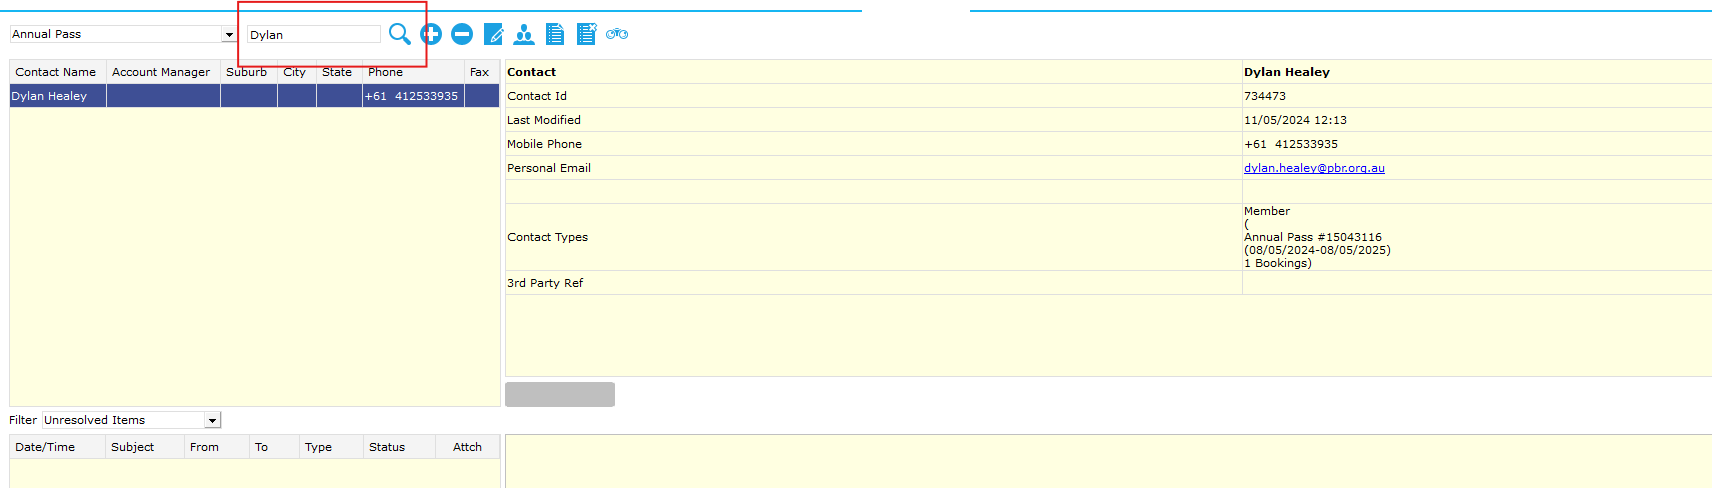
- Get the member numbers for both users. In my example, member Dylan Healey, needs to be added to IT Adult's (15046721) account.
If they are unable to provide their member number you can search by the other fields, though it may be more difficult to find the user. - Search for the member who needs to add the other member. Each user should have two entries, an Annual Pass type and a Puffing Billy Railway type
If there are more than two entries because a member # was not used, you can use the ParentCard number under an Annual Pass type to match the Member # of the online account.

- Right click the member that has a type of Puffing Billy Railway and select Properties

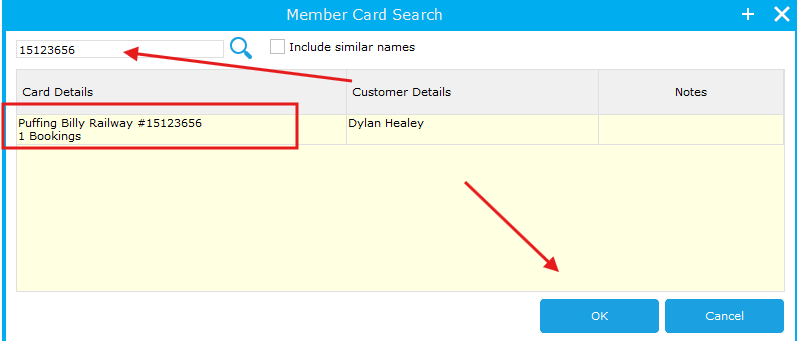
- Go to Associate Cards and select Add Family Member
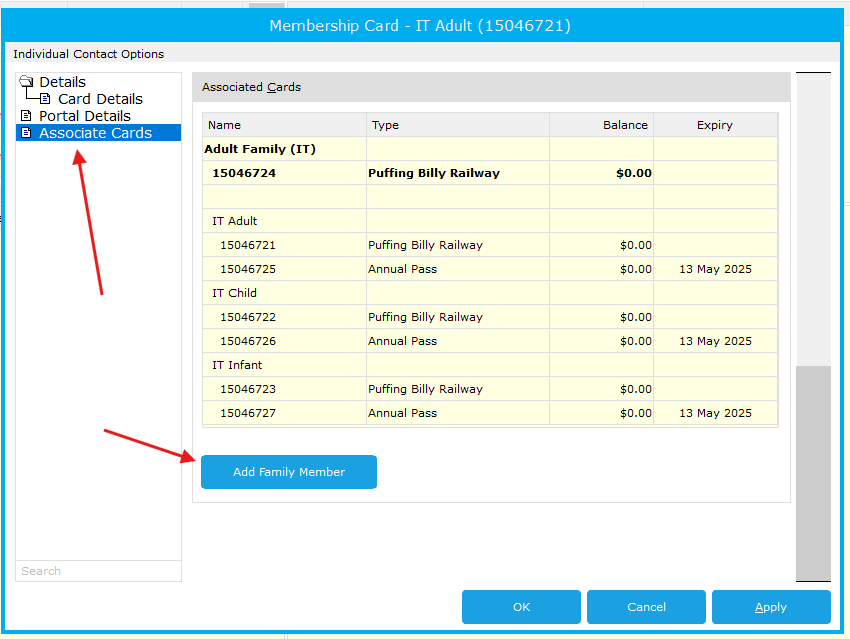
- Search for the members number you need to add and click OK

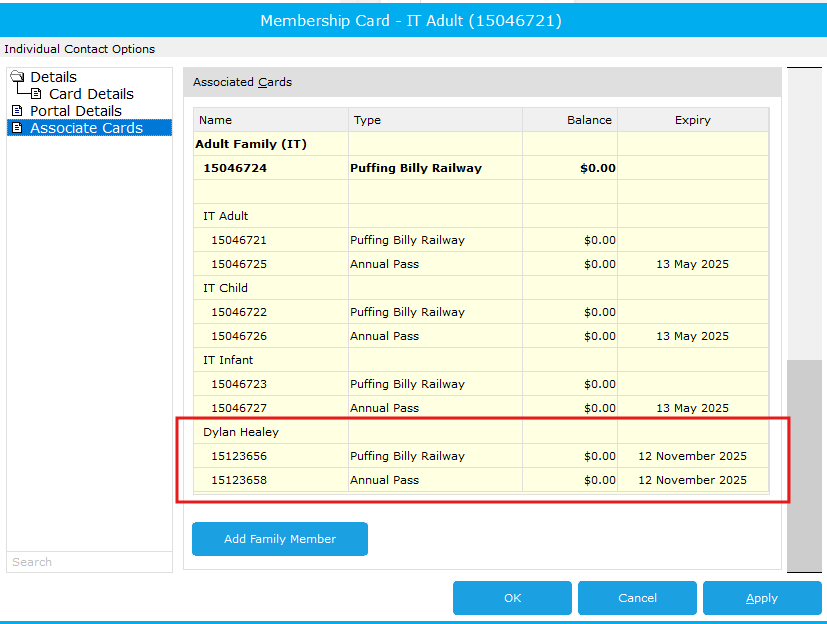
- If you go back to Associate Cards you will now see the member added to the account. Hit Apply

- When the "parent" user IT Adult logs into the portal, they can now see the new member. If the customer is already logged in and cannot see it, get them to refresh the page.


Meal Requests/Dietary Requirements
Creating a New Booking with a Meal Request or Dietary Requirement
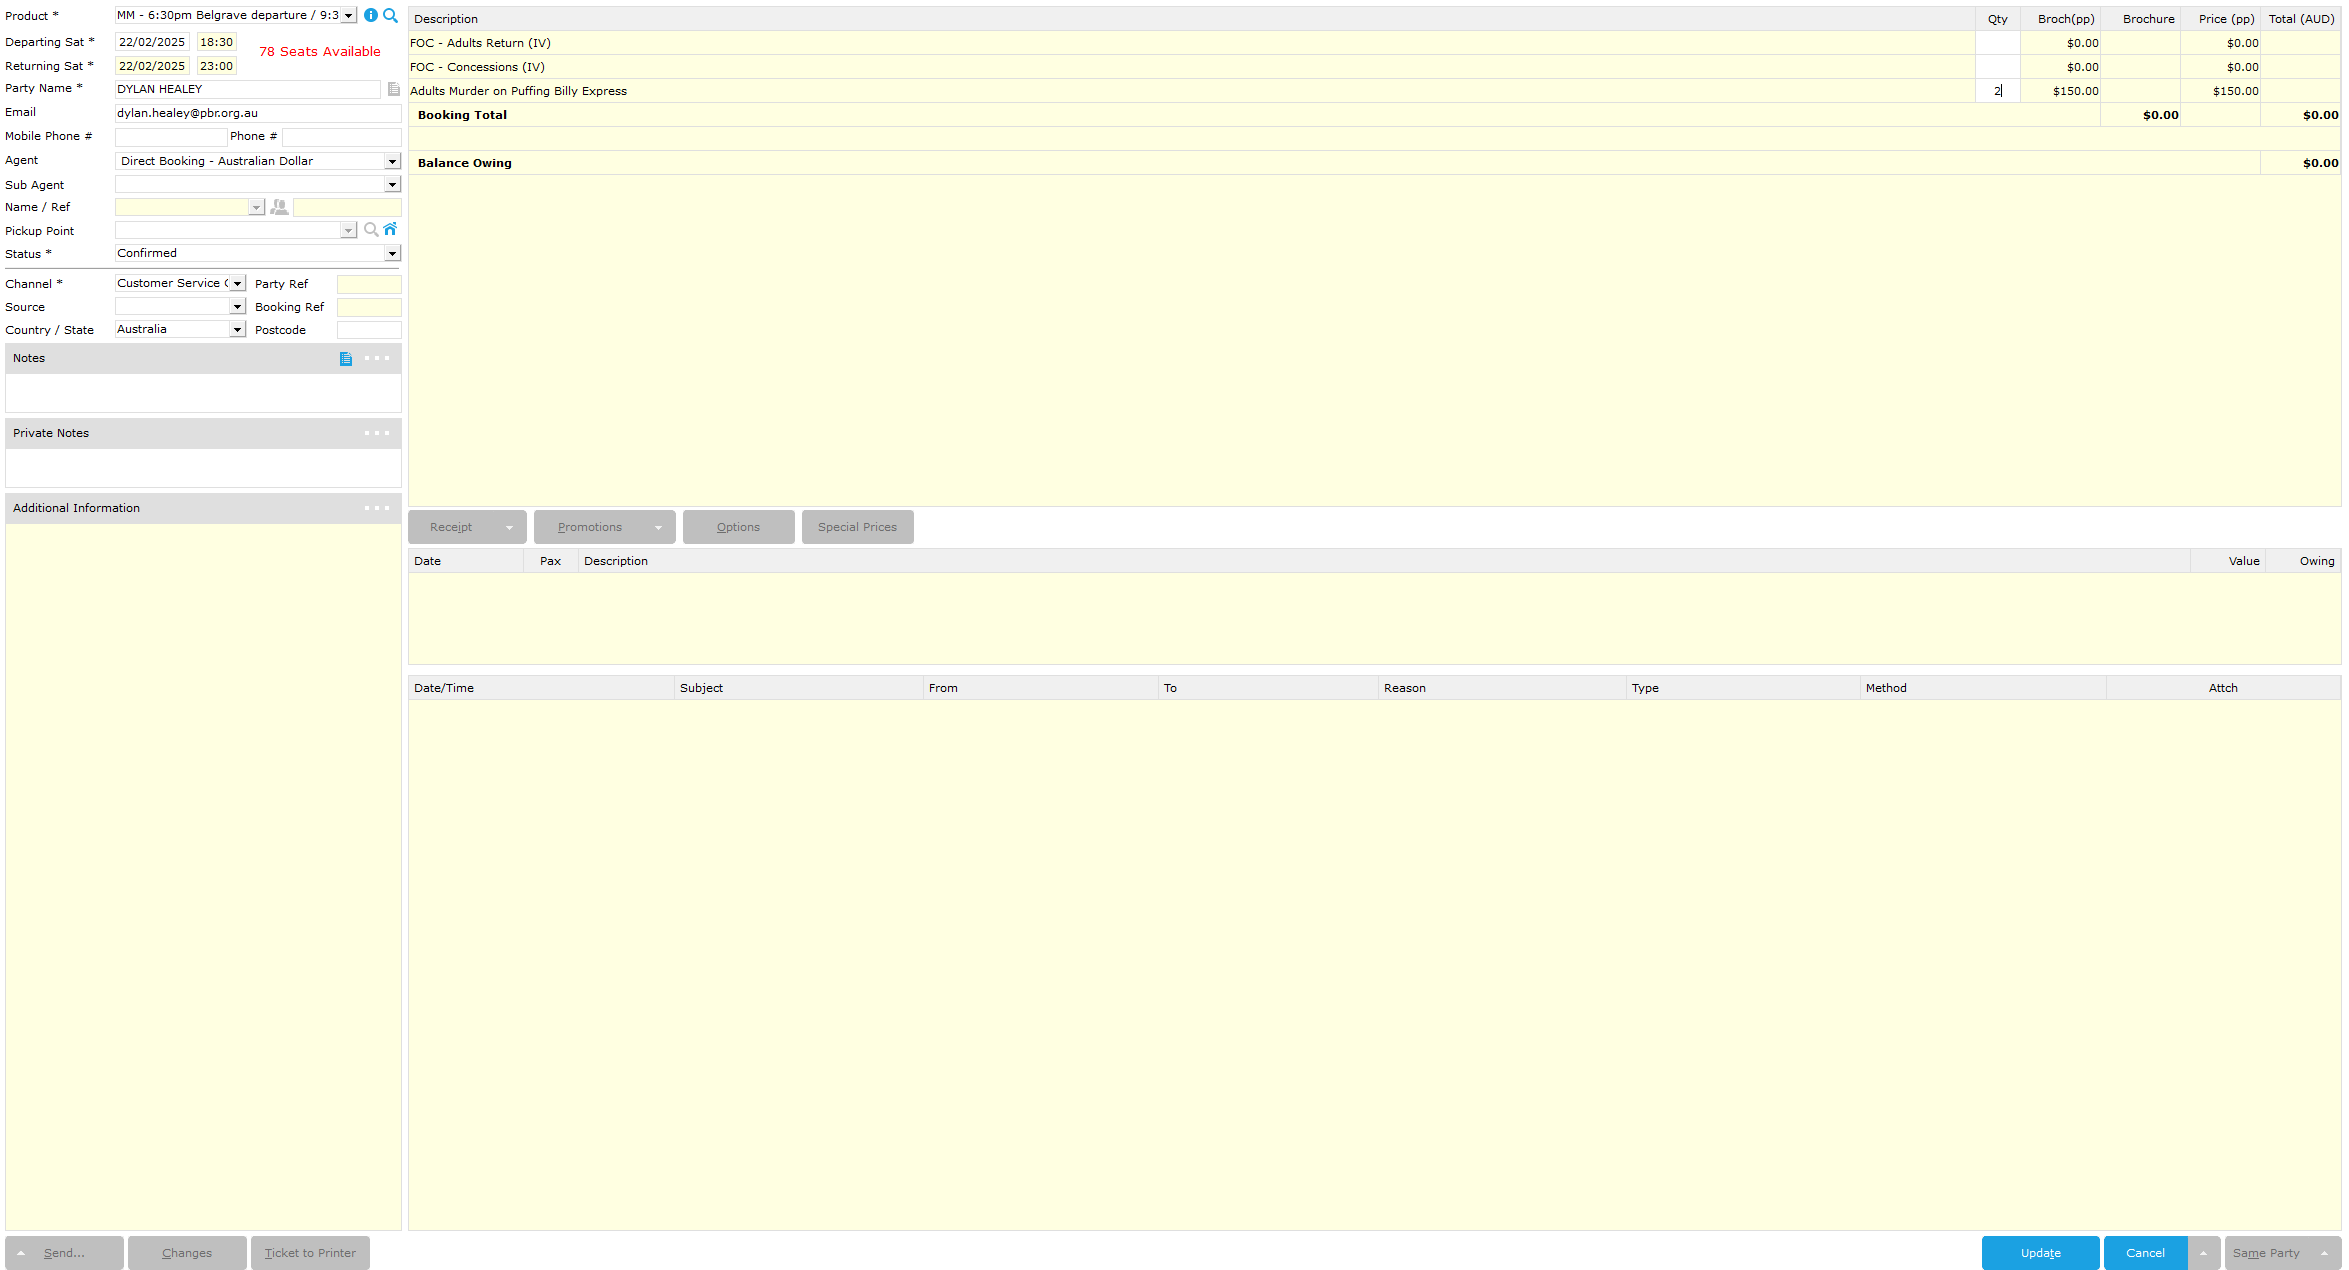
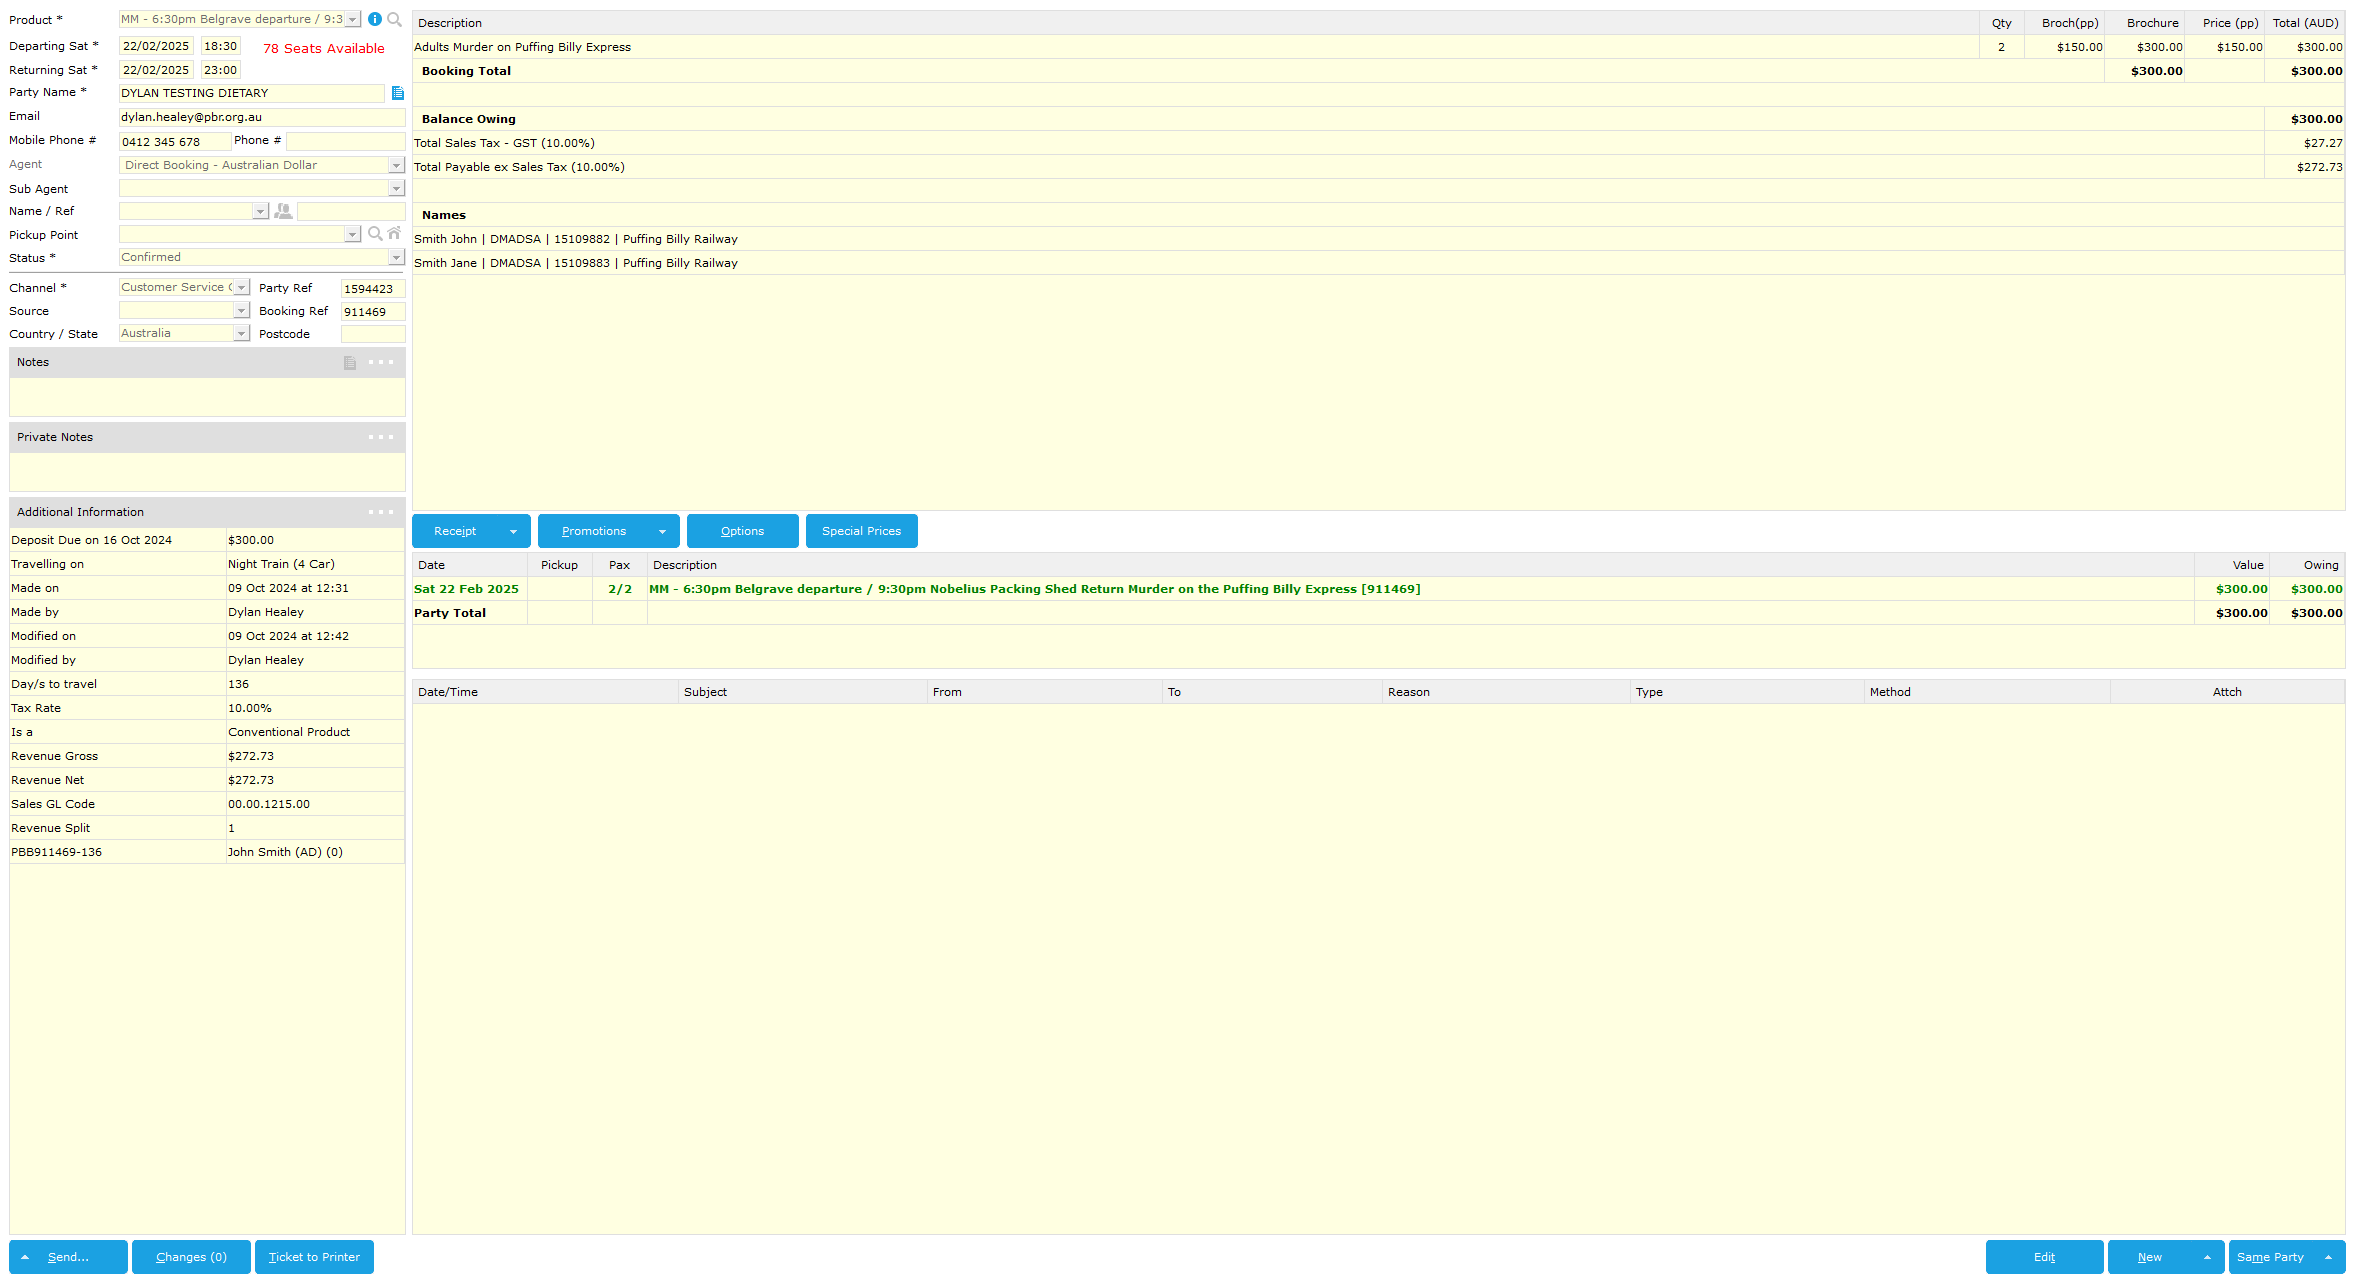
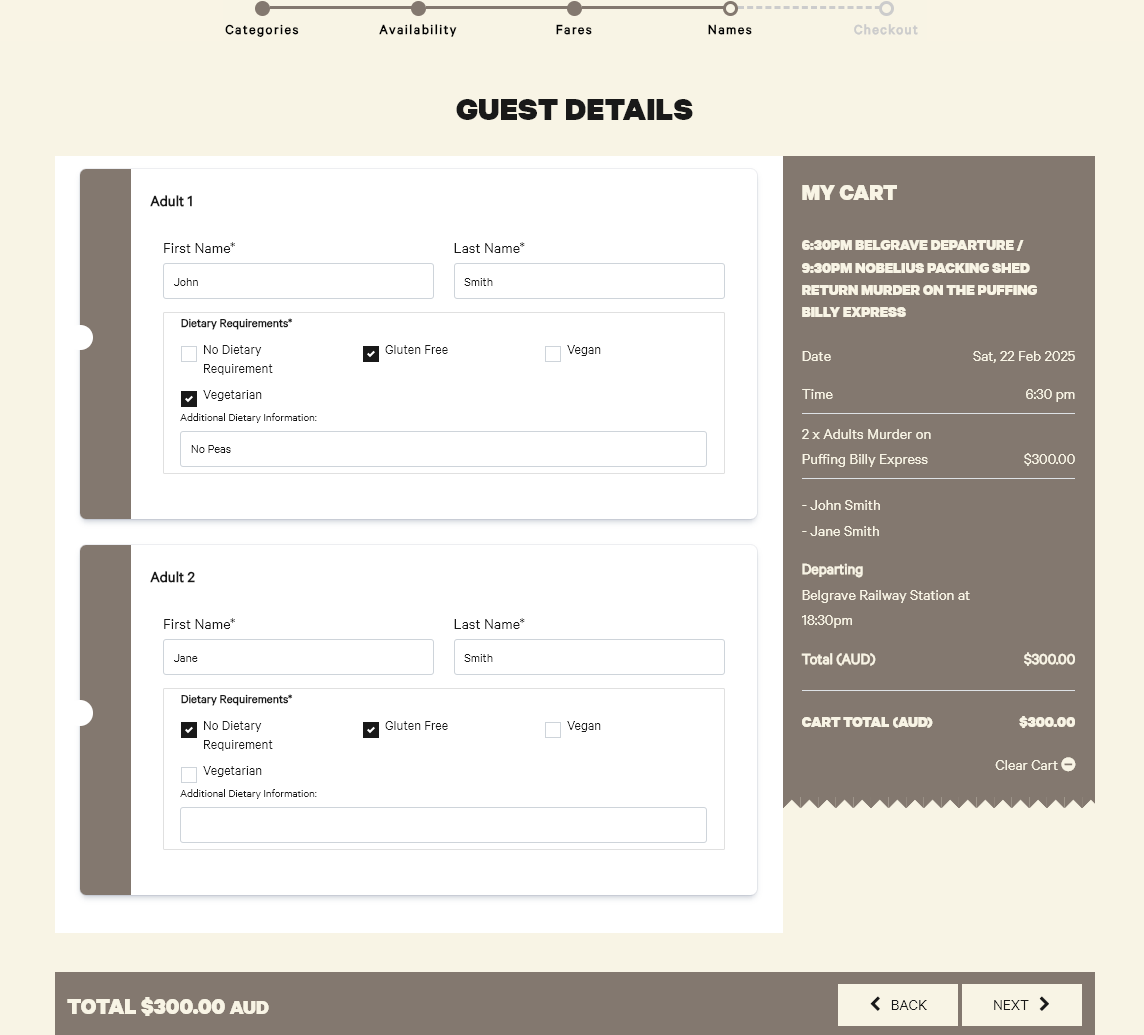
In this example I will creating a new booking for our Murder Mystery for 2 people.
If you are looking to edit an existing booking to add or change meal requests please go here.
- Firstly, make a booking for the product as you normally would by going to Standard Booking. Put in the booking details and select Update

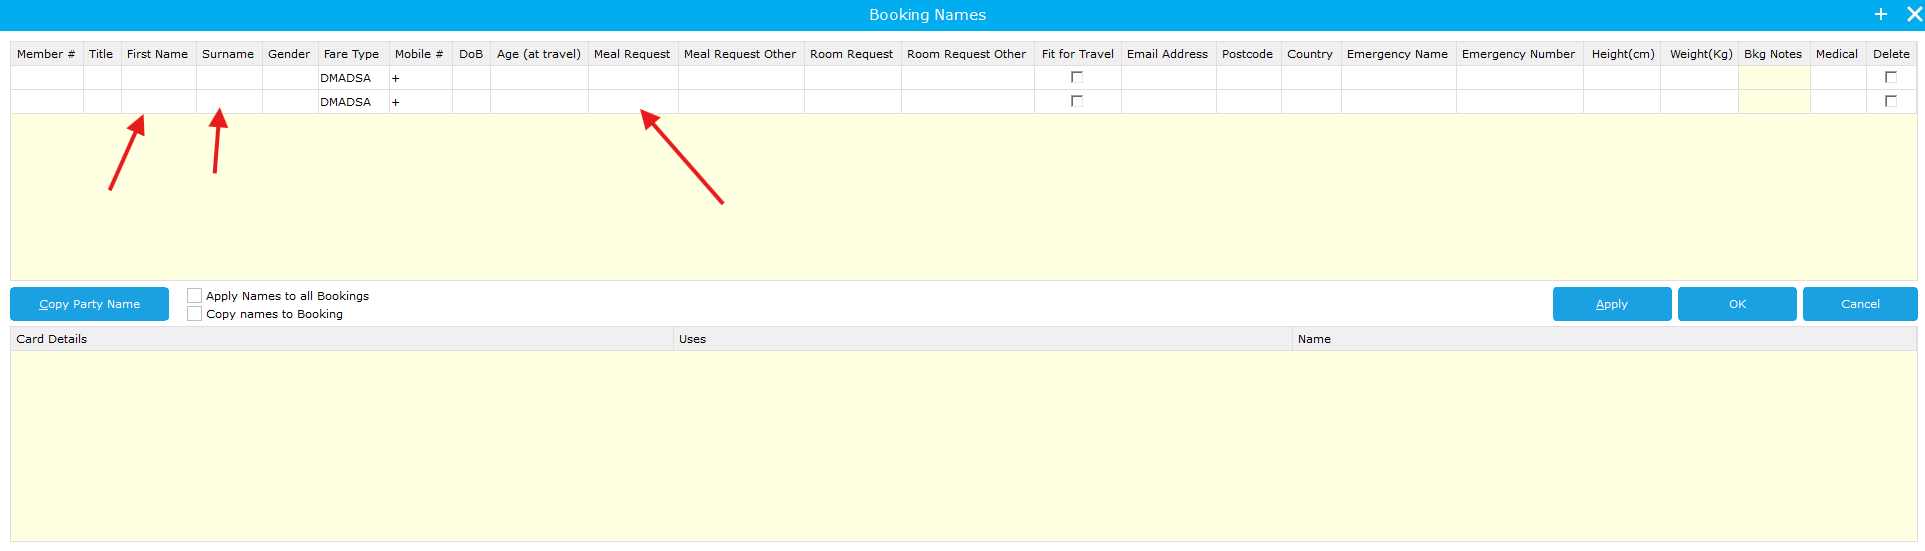
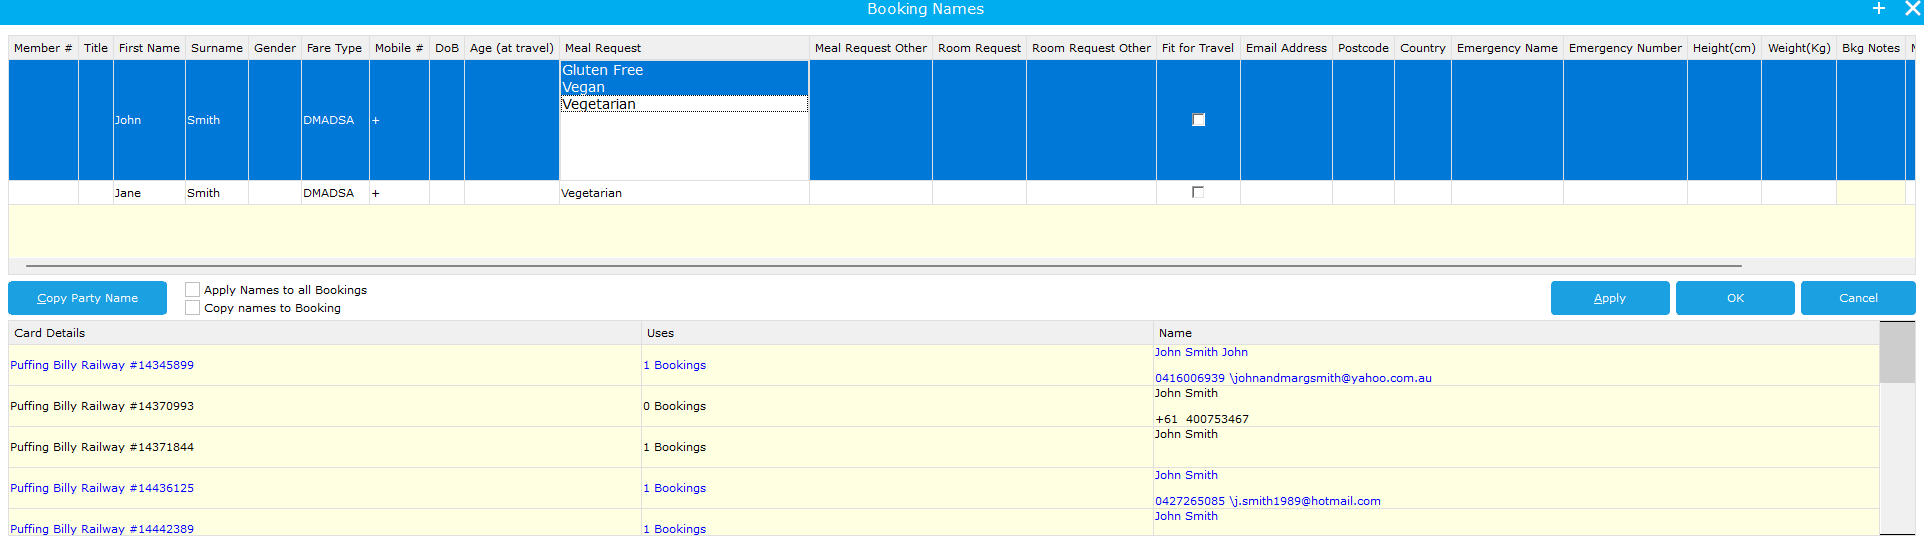
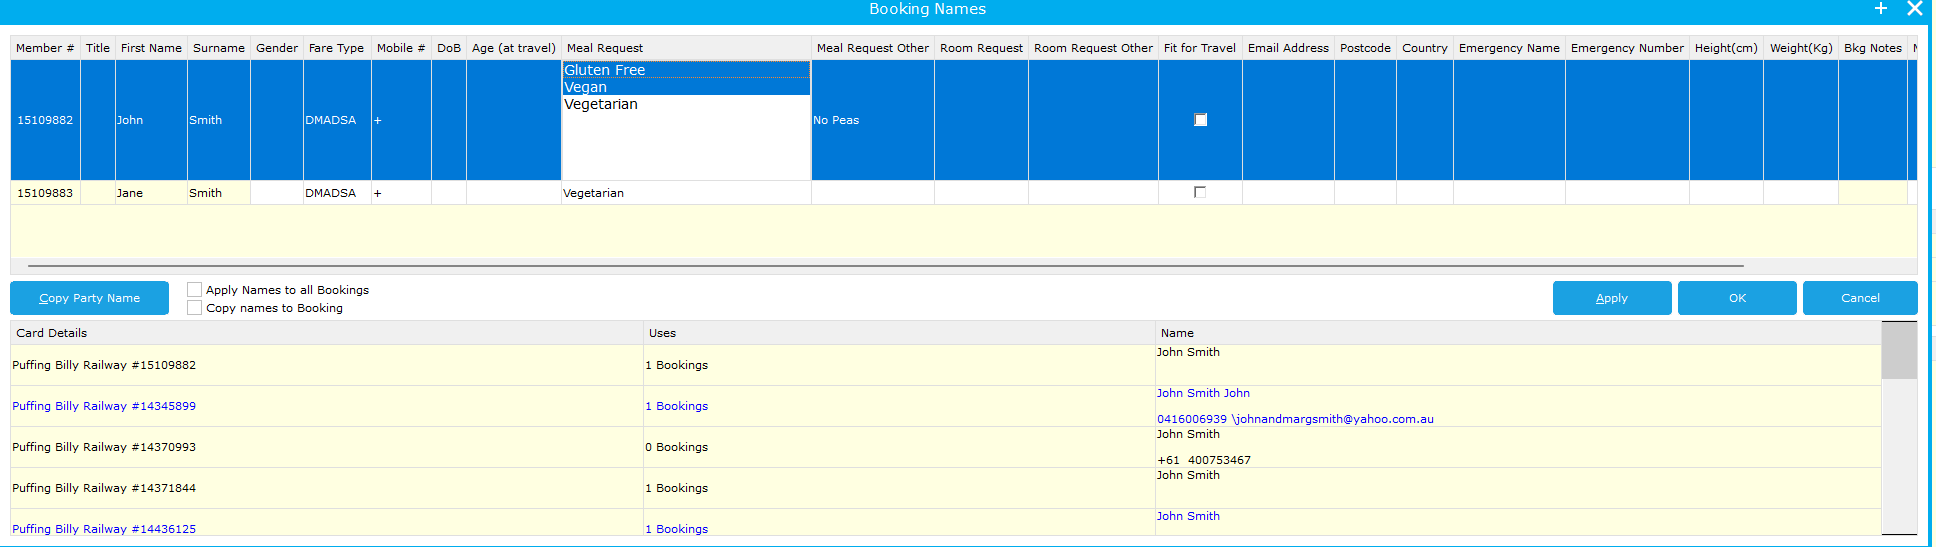
- You will then be met with the Booking Names window. You need to put in the First Name, Surname of all passengers as well as the Meal Request field if they have one.
If you do not see this screen, you can continue with the booking and edit the details later.
Please click here if you are unsure how to edit the booking Meal Request details.

- To select a meal request click on the cell and the available pre-filled options will be selectable. When selected the background of the text will be blue. Multiple requests can be selected

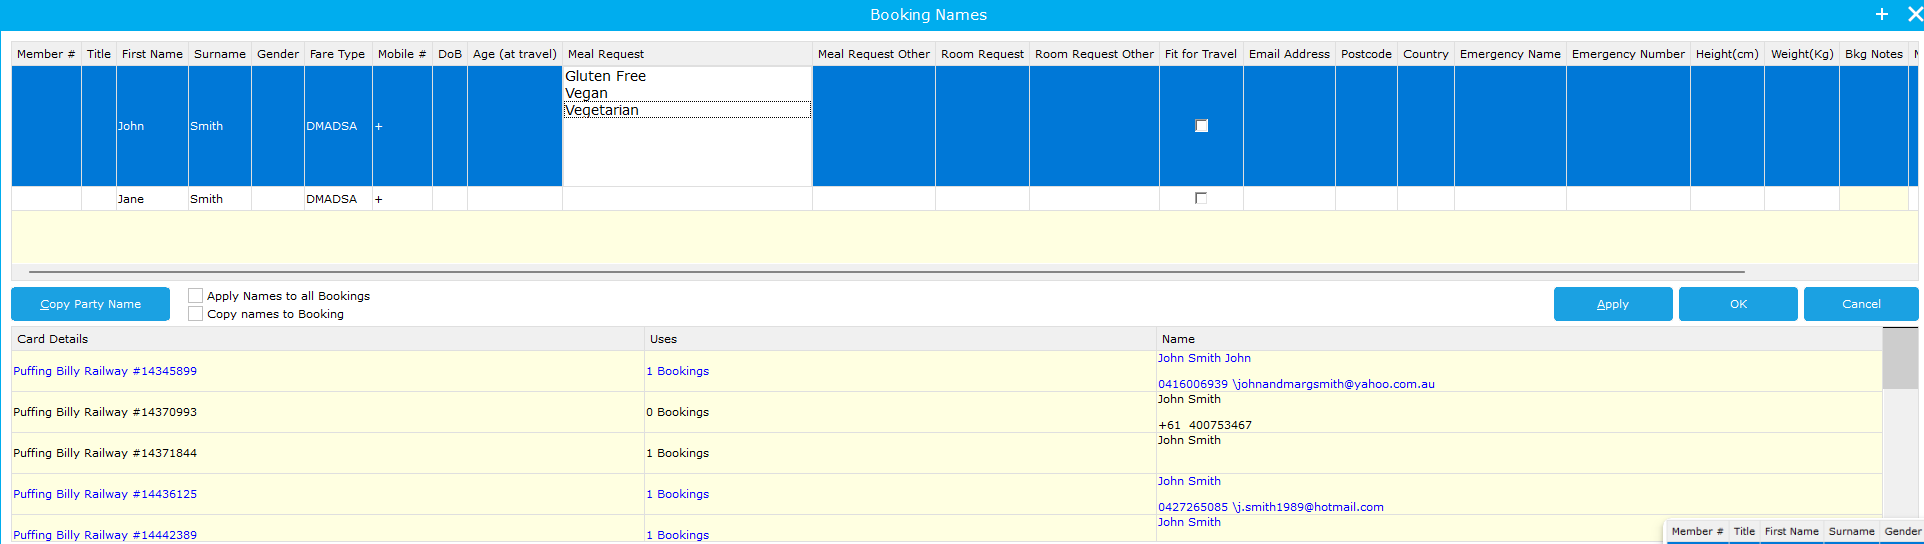
In the below example John Smith is Gluten Free and Vegan -
You also have Meal Request Other, this is a text field anything can be put into. Any additional requirements should be confirmed with Commercial management.
- You can then select Apply then OK and you will be taken to the prepayment section for the booking.
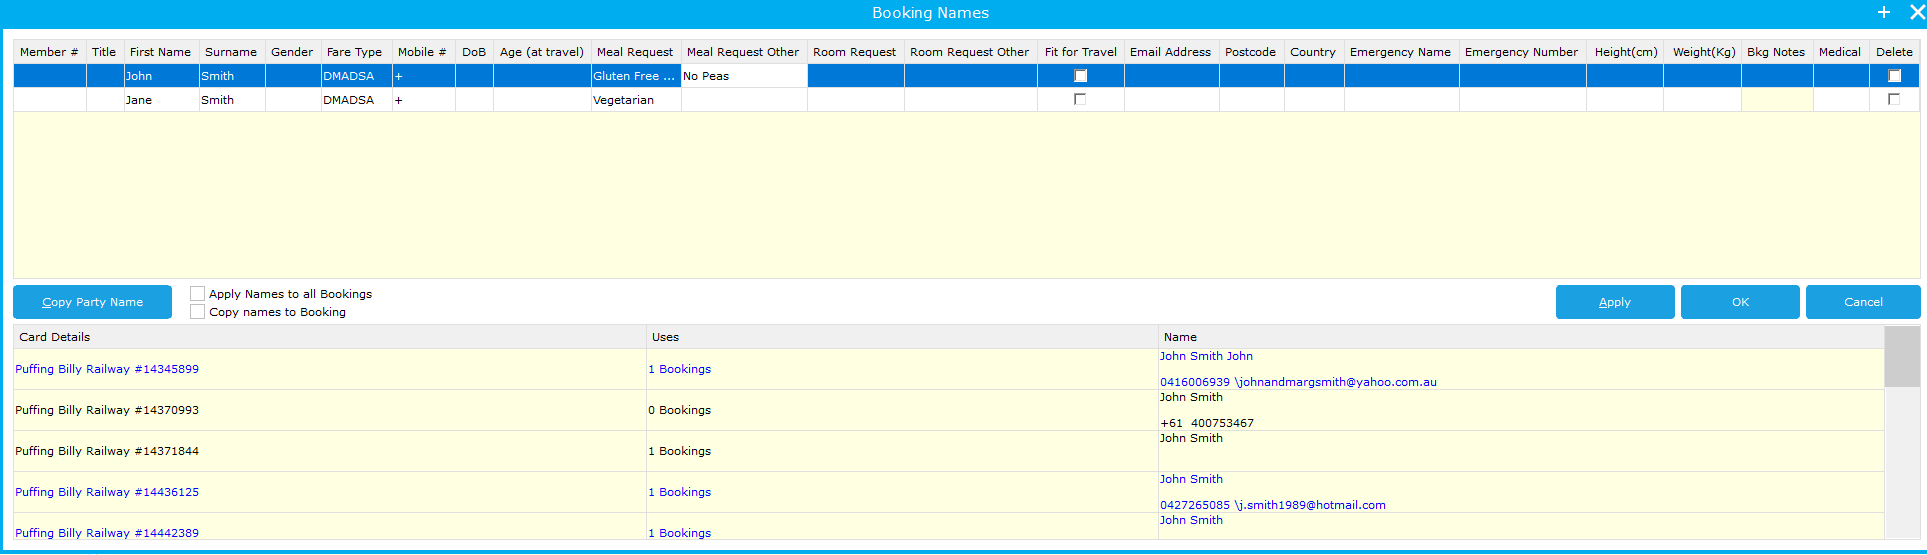
Editing or Adding a Meal Request to an existing booking
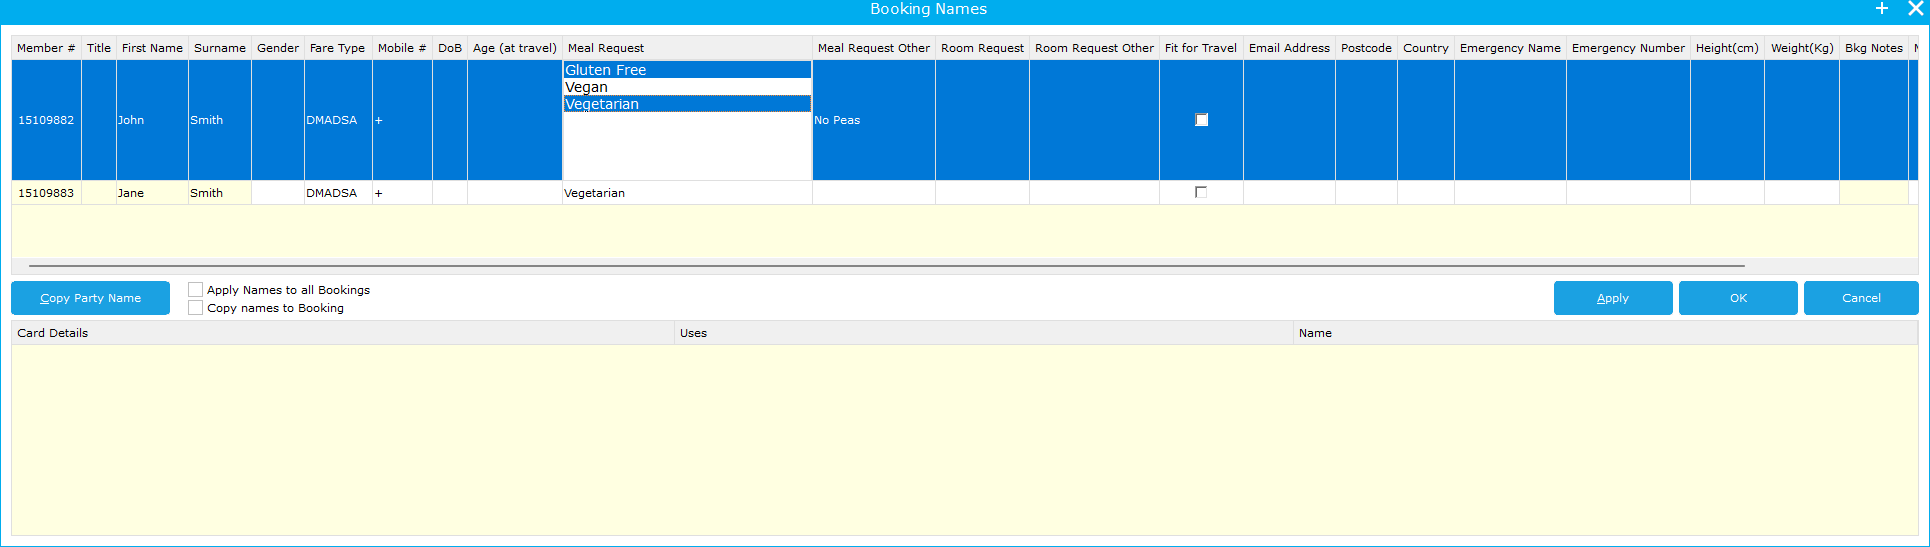
- Search for the booking and go into the booking details

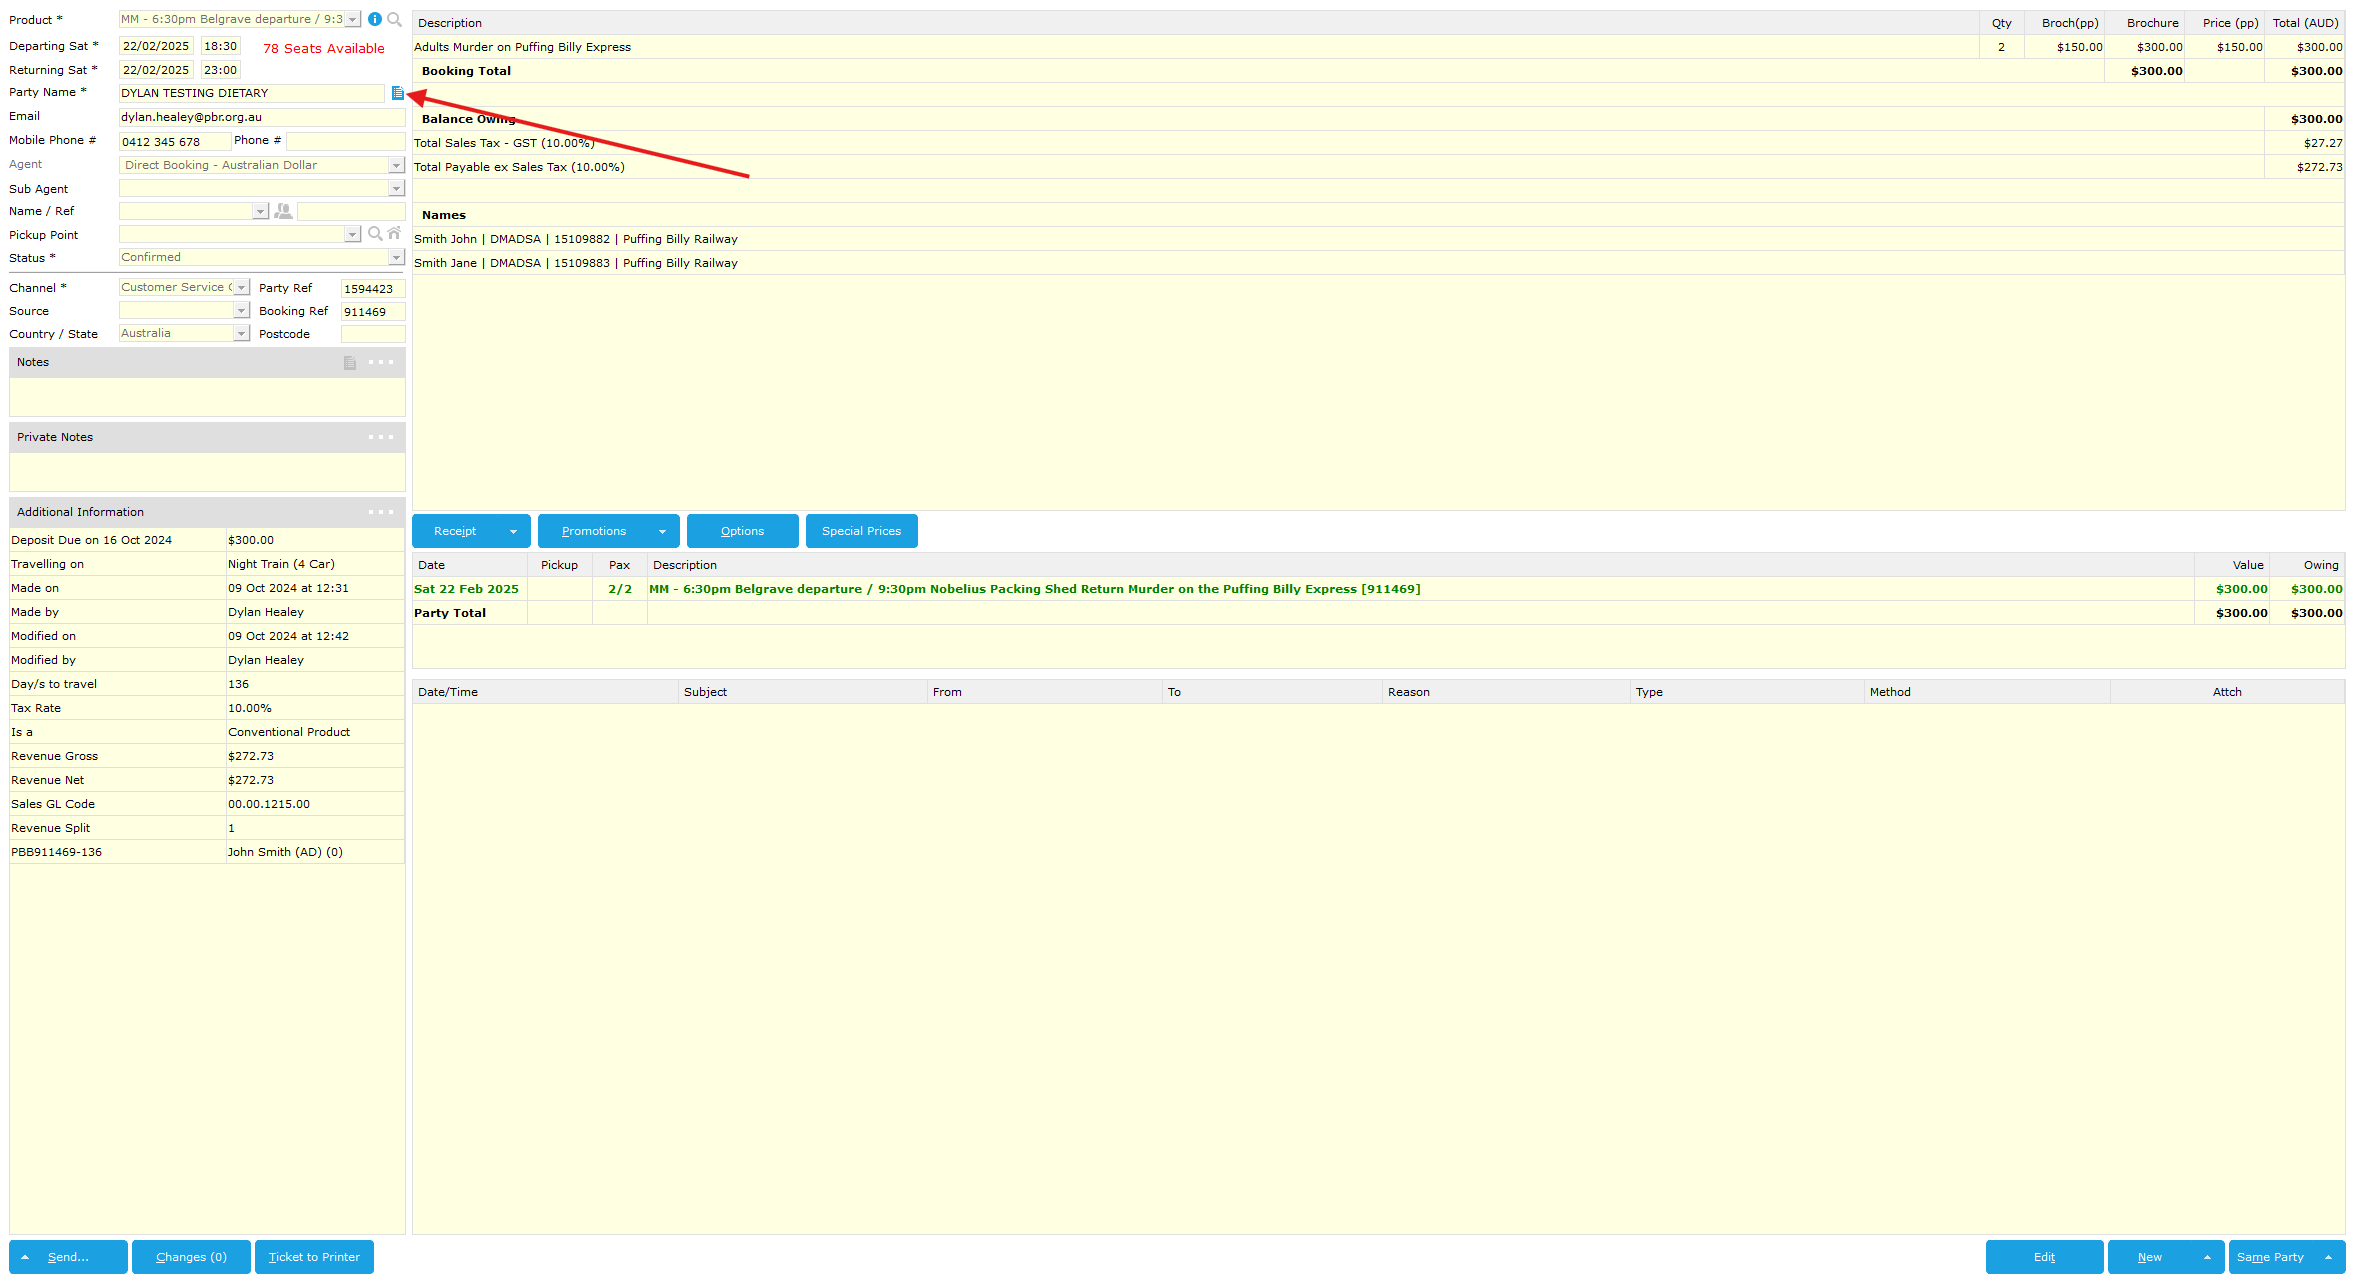
- On the right of the party name go to click the party details icon (see below)

- From here you can click into the Meal Request Cell and add a Meal Request or deselect an existing option.

- For this case I have removed Vegan from John and added Vegetarian

- You can then select OK and you have edited the Meal Request details.
How a Customer will make Meal Requests for applicable products.
As of 09/10/2024 Meal Requests are only enabled and required on Paint & Sip and Murder Mystery products
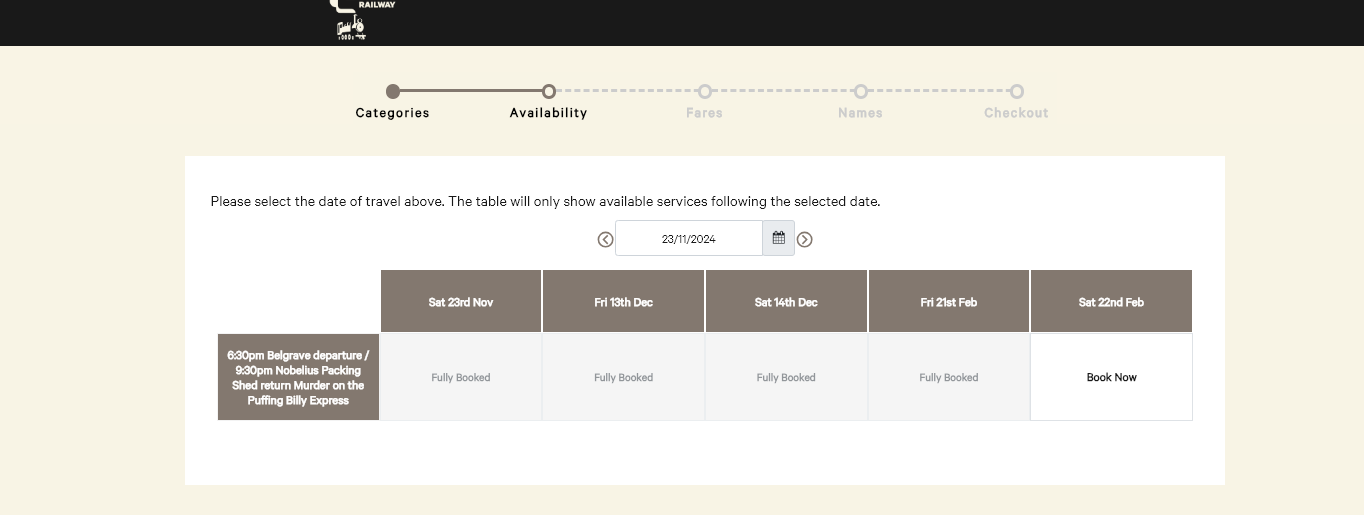
- They will go through the normal webpages and select a product, in this example Murder Mystery.

- They will then select what fares and how many they would like as usual.

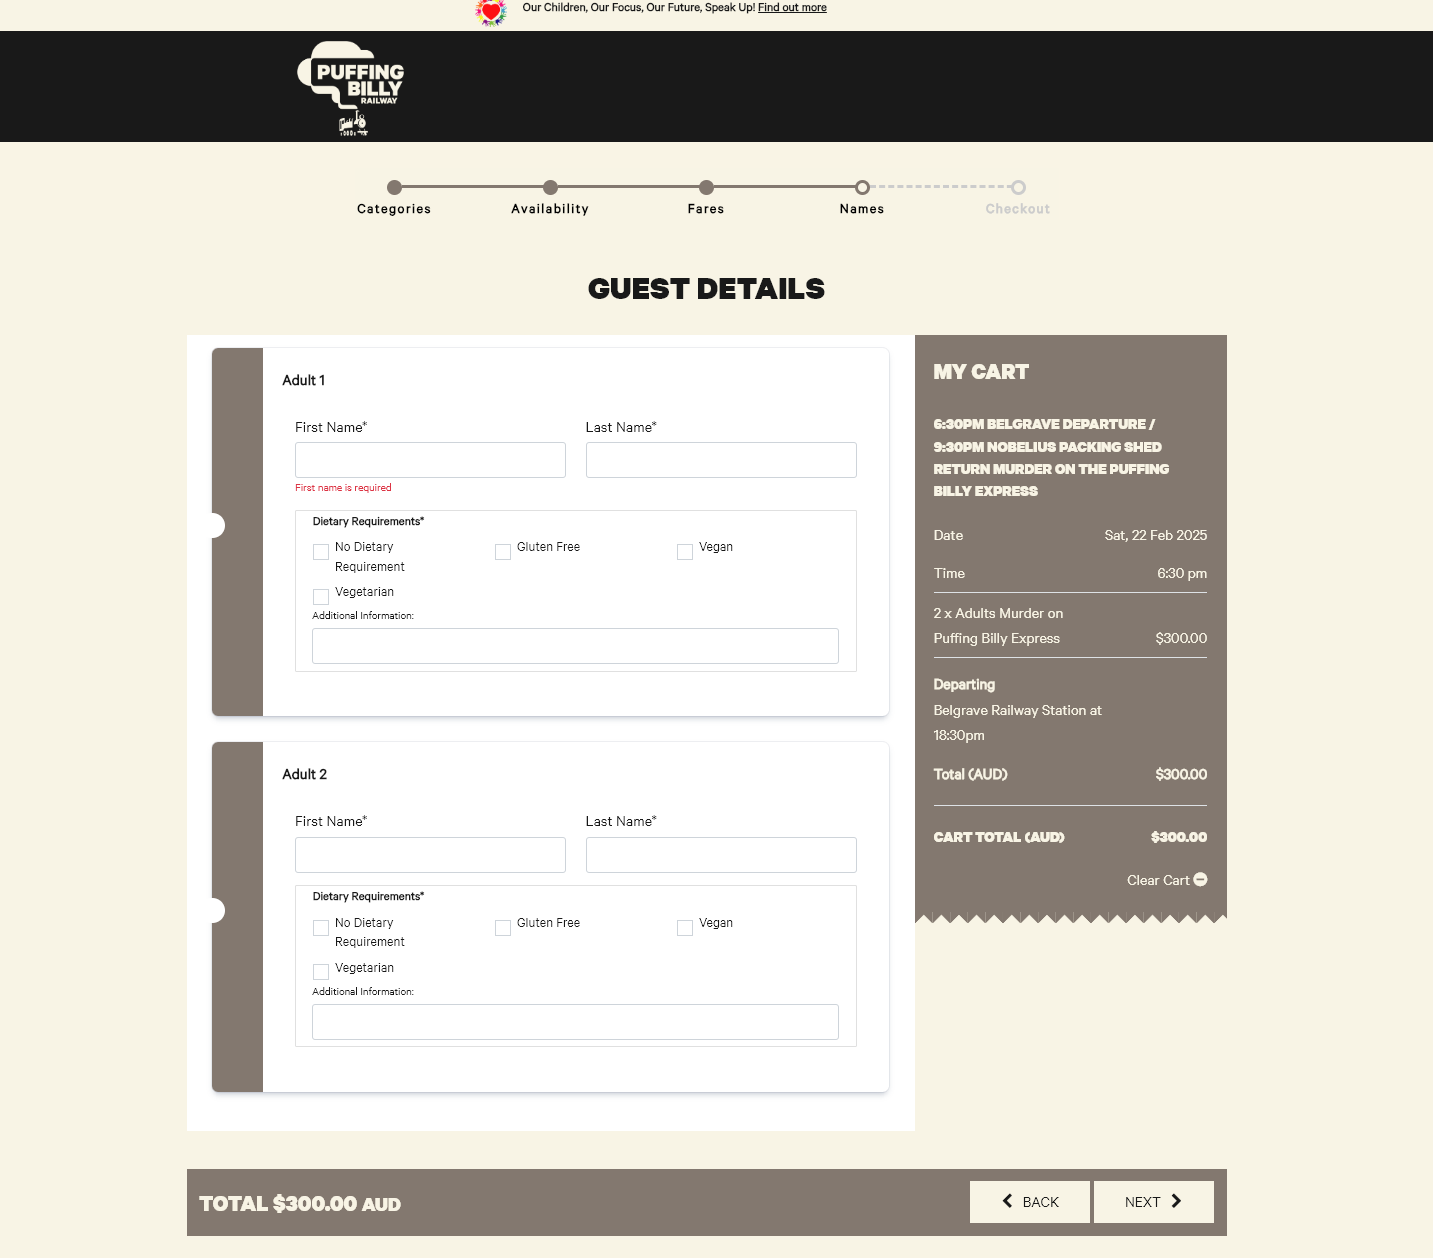
- If the product they have selected has a dietary selection they will be prompted to fill in the Name, and Dietary Request for each person they have booked for.
As of writing this document both of these fields are Mandatory.

- They have the ability to select one or multiple options AND can fill in Additional Dietary Information.

- They can then hit next and go through the normal payment process

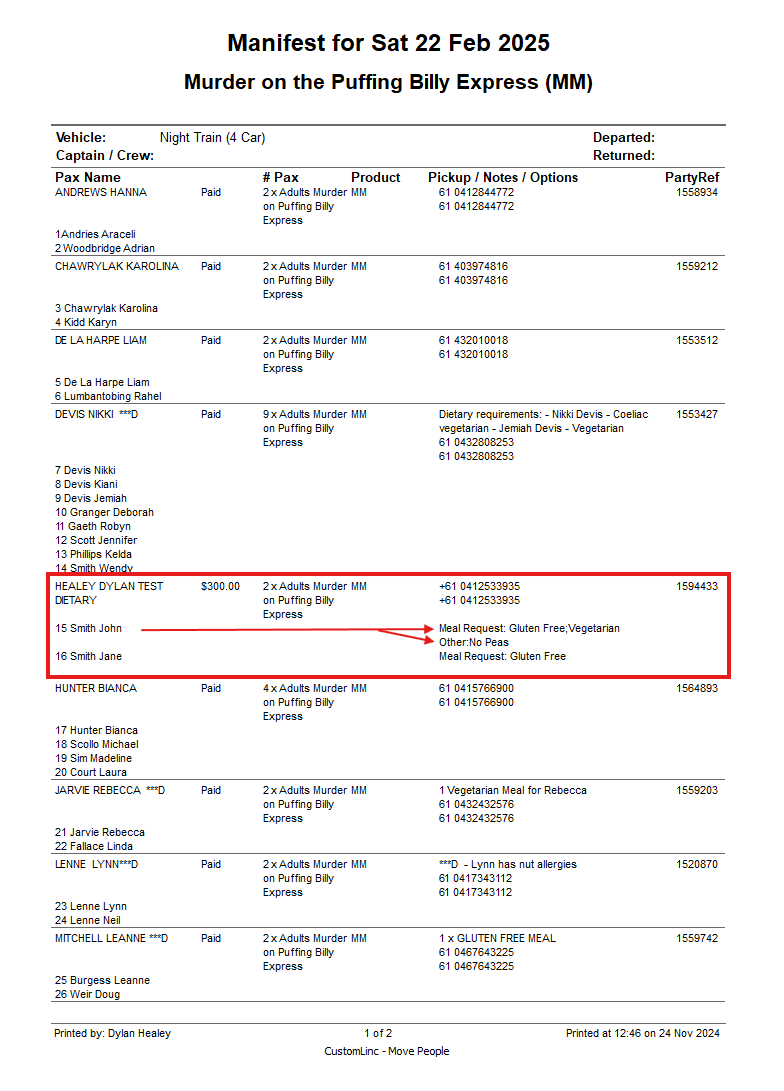
Dietary Requests on Manifests
When a meal request is filled out it shows in the manifest next to each passengers name.
In this case you can see John Smith has selected Gluten Free and Vegetarian, they have also given additional information being "No Peas".

This information is gathered during the booking process from a customer.

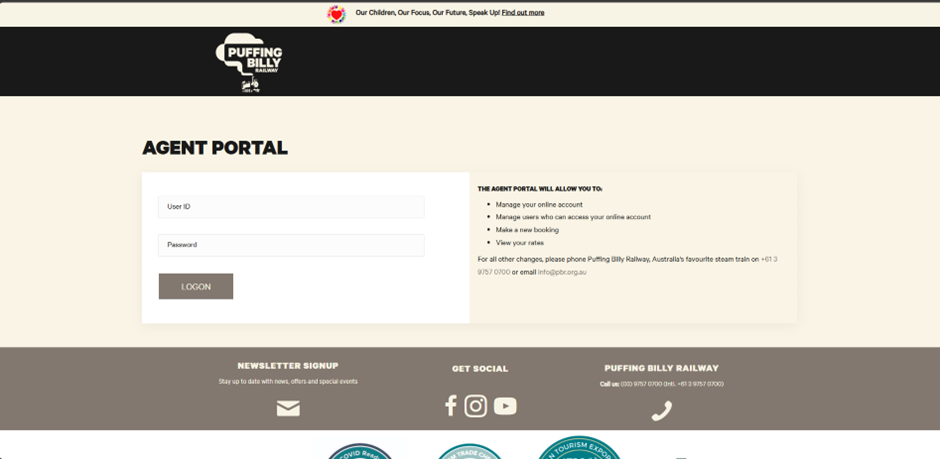
Agent Portal
Agent Portal Instructions
- Navigate to https://bookings.puffingbilly.com.au/AgentPortal/ in your chosen internet browser.
- Login with your credentials.

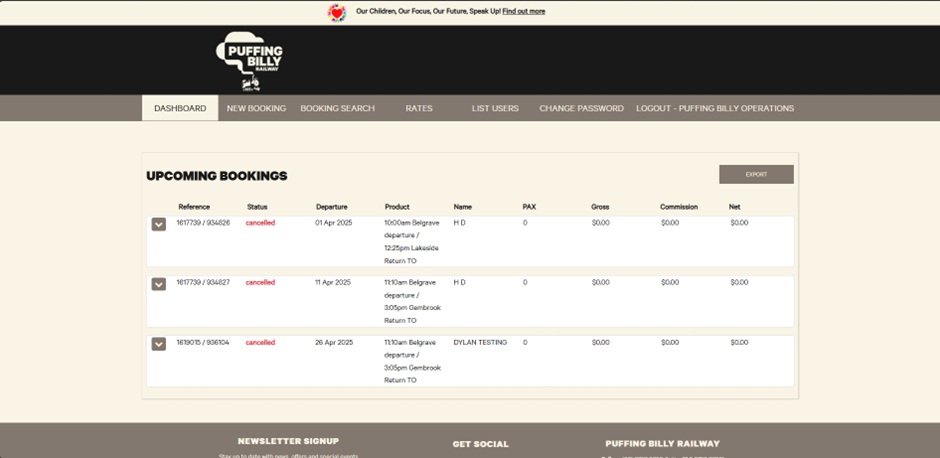
- Once logged in you will be met with your dashboard. Here you can see any future bookings.

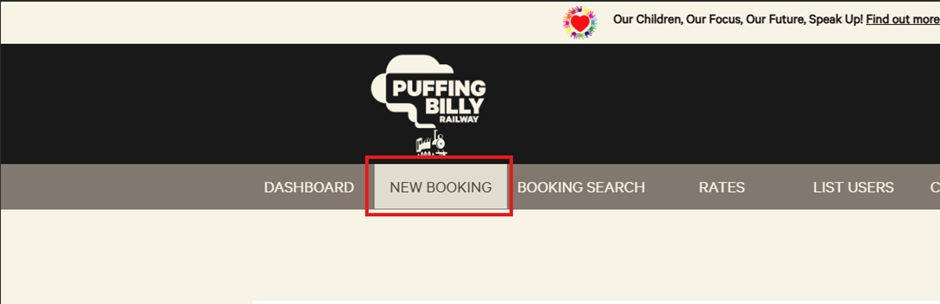
- In the “New Booking” tab is where you can create a booking.

-
1. Select “Buy Now”.

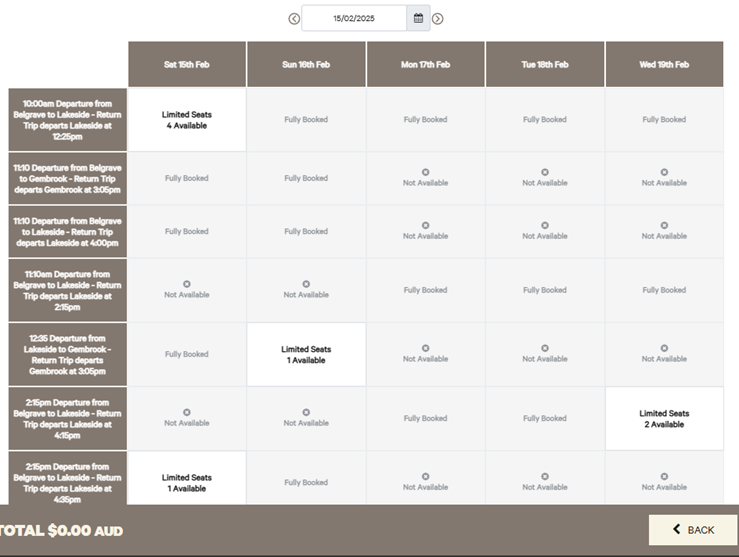
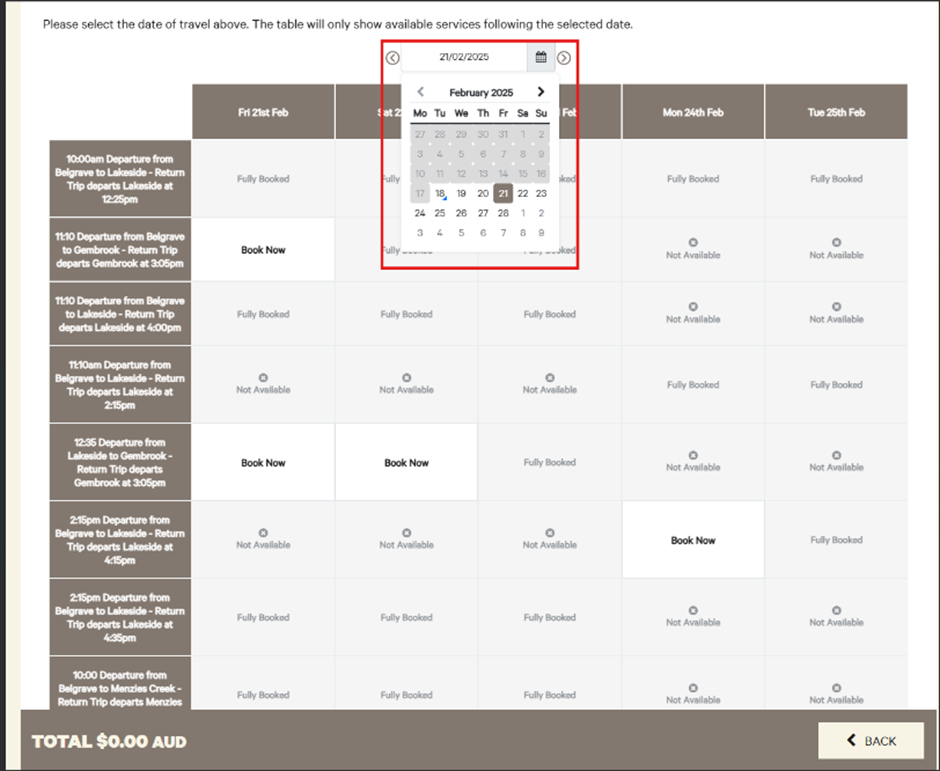
- Here you can select the service and date of the booking.
- You can also click the calendar to look at other dates. If a product is not available on that date, it will take you to the next available date.

-
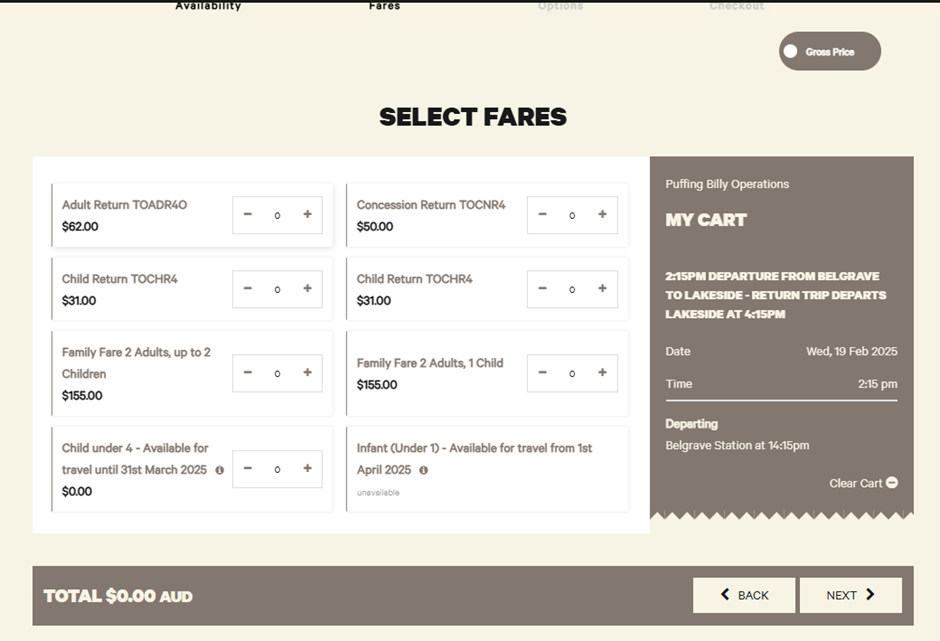
Select who will be travelling.
- Select any options.

- Fill in the customer contact information. This will be the person travelling on the day.


- Once paid, you can print off the booking confirmation if you like. You can confirm the booking was successful by looking in your dashboard for upcoming travel.

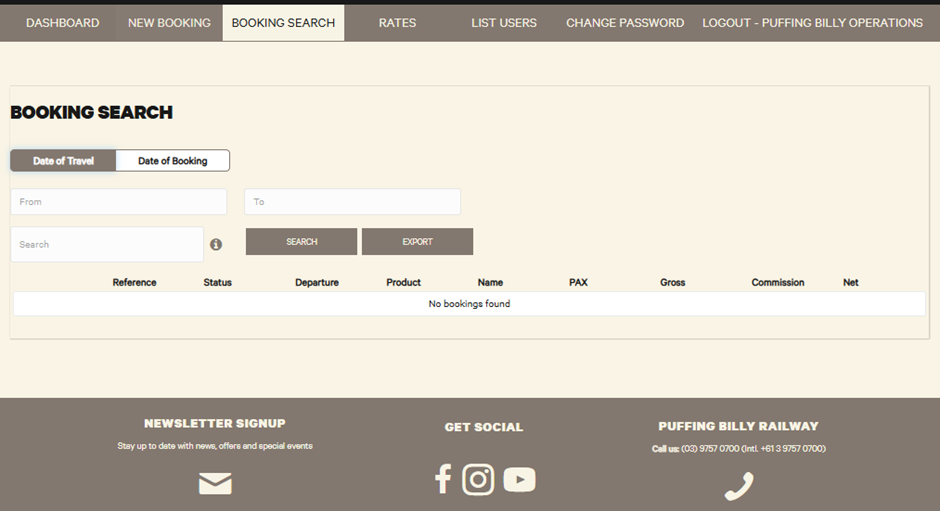
- The “Booking Search” tab will let you search through any past bookings. This can be used if you need to find out any information such as product, departure date, reference numbers etc.

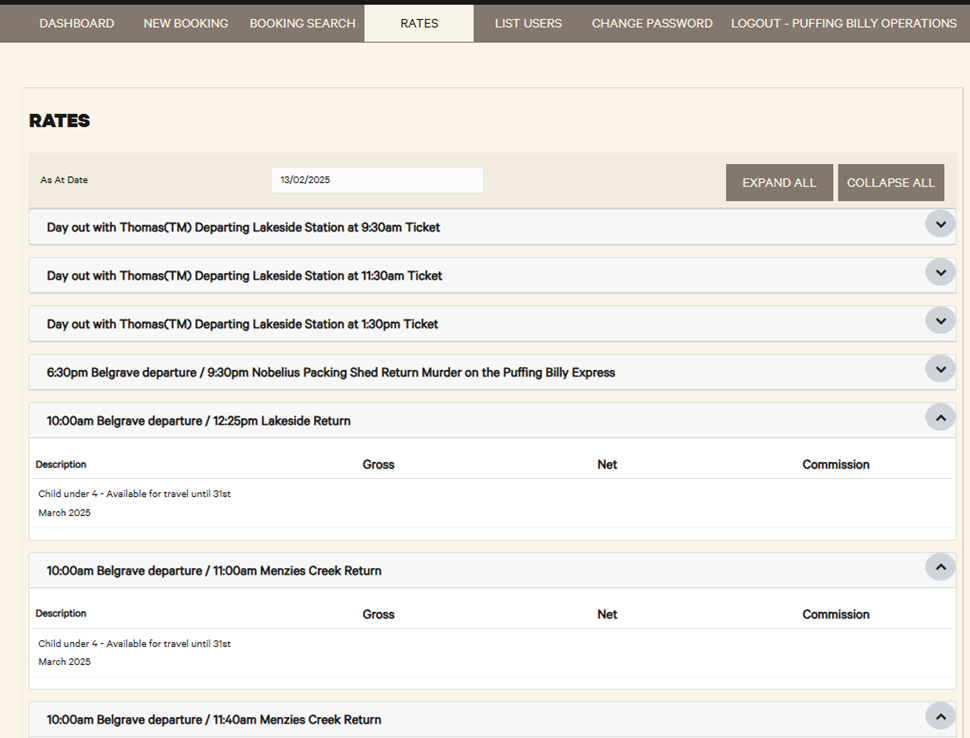
- The “Rates” tab will show your commission for each product.

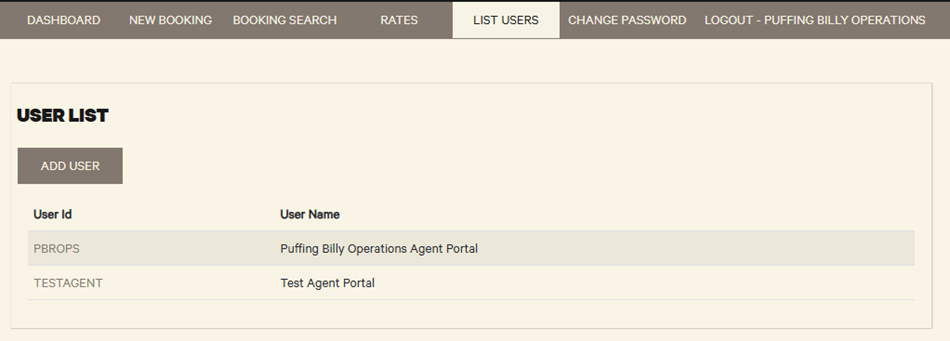
- The “List Users” tab will show a list of current users. You are also able to add a user to be able to login to your agent portal. You can archive/delete a user by clicking on their name and selecting “archive user”.


-
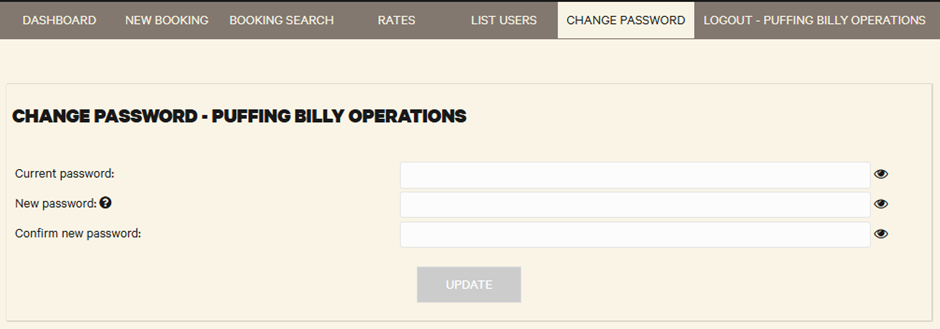
You can change your password here.


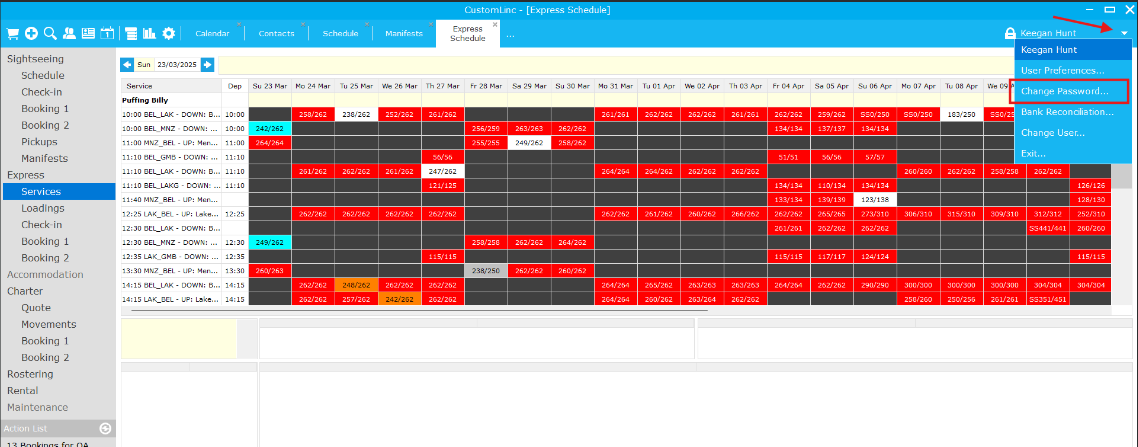
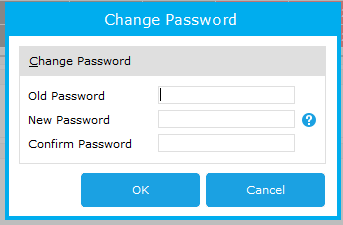
Custom Linc Password Change
This article will show you how to change your password in Custom Linc
- Open Custom Linc. At the top right, hit the drop-down arrow and select "Change Password".

- Enter your old password, followed by your new password.

Creating a New User / CustomLinc
This procedure details the steps required to add a new user to the CustomLinc system. This will typically occur when a new employee commences with the organisation. Before account set up can take place an approved new user request must be submitted via the IT helpdesk.
The CustomLinc user set up process is divided into two parts, adding an individual to the service provider and converting the individual to a user.
1. Adding the Individual to the Service Provider
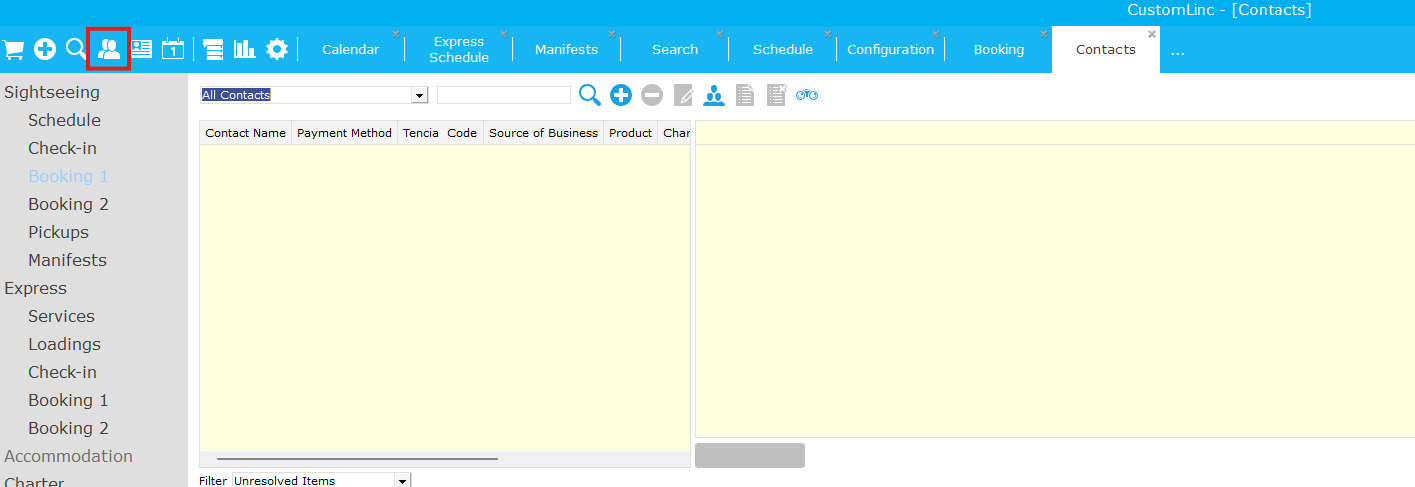
- From within the CustomLinc client click the Contact Search button

- Change the dropdown to Service Provider and click magnifier button

- From the returned list, highlight Puffing Billy

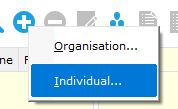
- Click the + button and select Individual

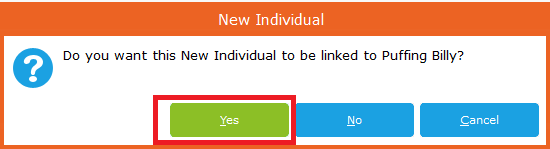
-
When prompted to confirm whether you'd like to add a new inividual to Puffing Billy, click Yes

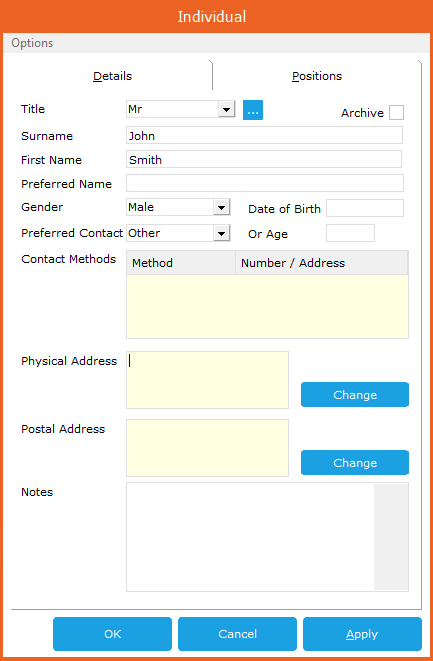
- Enter the information for the individual and click Ok

-
When asked if you would like the individual to be added as a concierge click No
The record for the individual has now been added against the Service Provider.


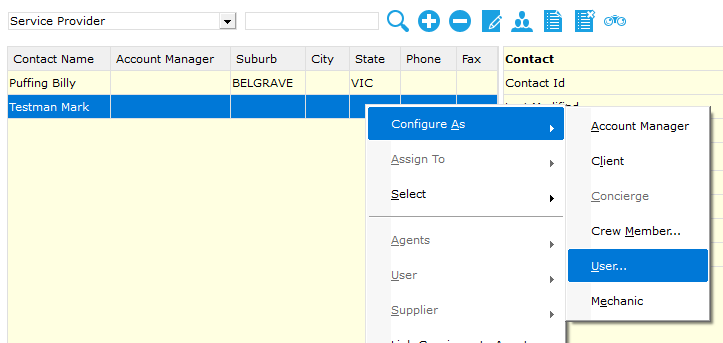
2. Convert the Individual to a User
- From the contacts windows, right click the new individual record, move the pointer to Configure As and select User

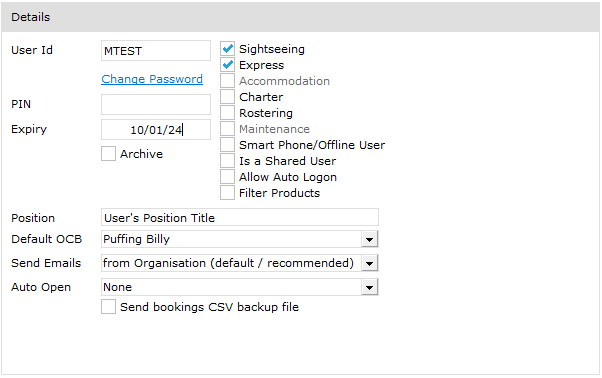
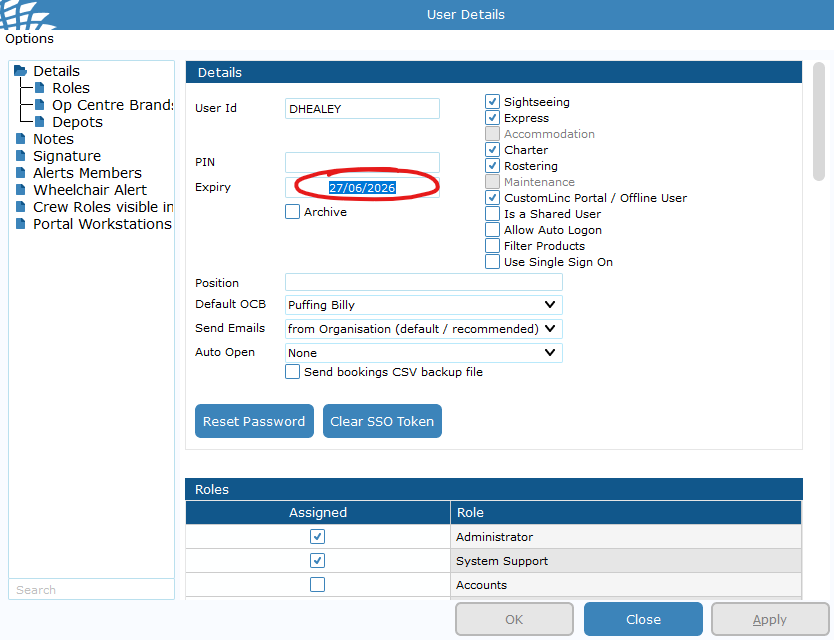
- From the User Details window enter the details of the user account.
To set the password click the blue Change Password text. A password field will be displayed that the user's password can be entered into. If the user is not with you at the time of setting a password, use a generic password for now, the user can change their password once logged in.
User Id is the first letter of the first name and the full surname

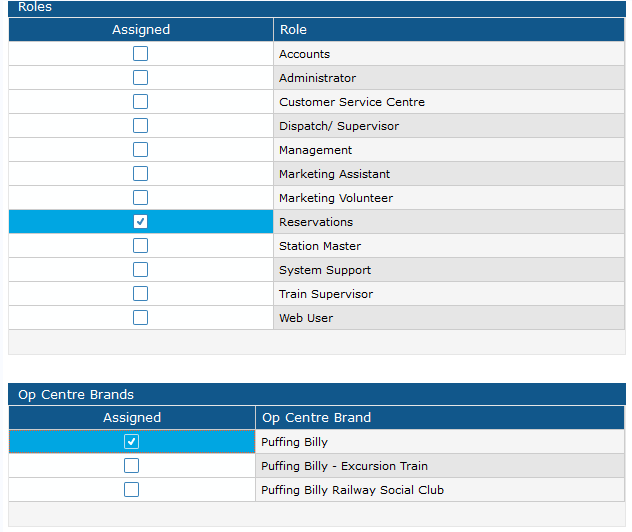
Tick the applicable role for the user and select the applicable Op Centre Brand (OCB). In most cases the OCB will be Puffing Billy

- Click the Ok button
The user account has now been created and the user will be able to log in
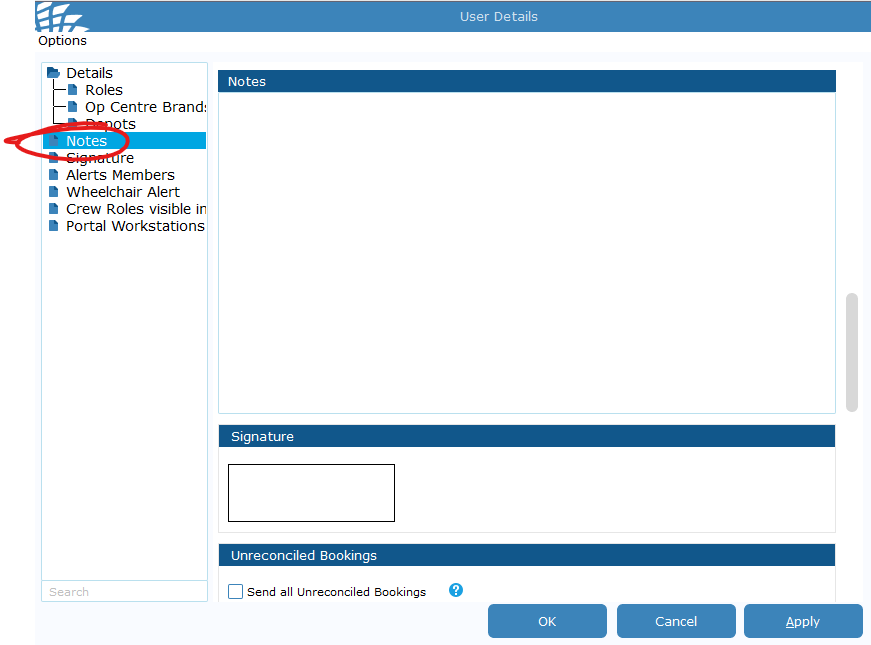
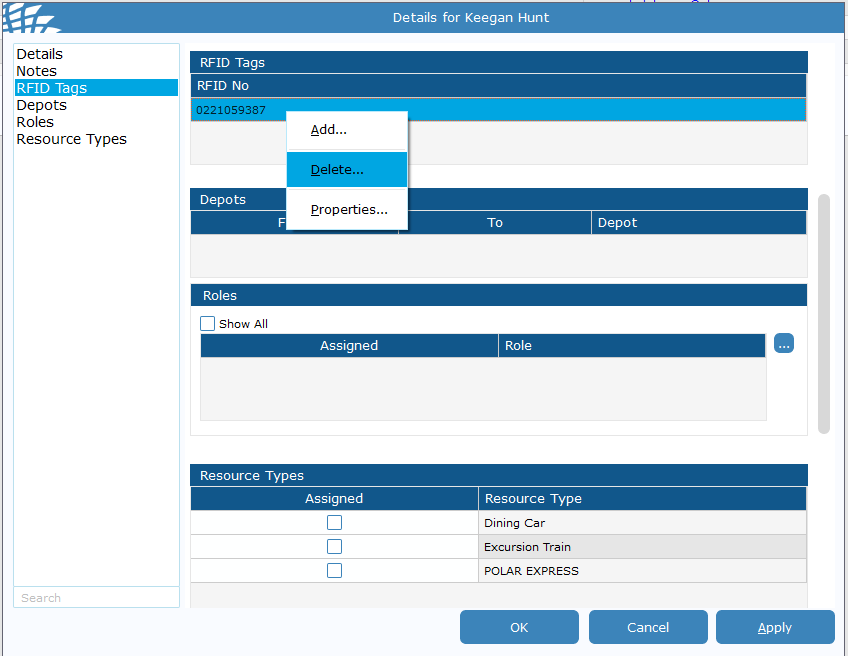
Adding RFID - Custom Linc
This article will show you how to add an RFID tag to a user's account in Custom Linc.
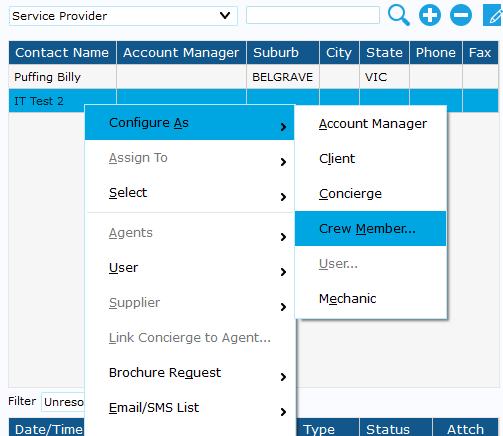
- Firstly, you will have to convert the staff member to a crew member. Search the user in Custom Linc. Right click the user and select "Configure as > Crew Member".

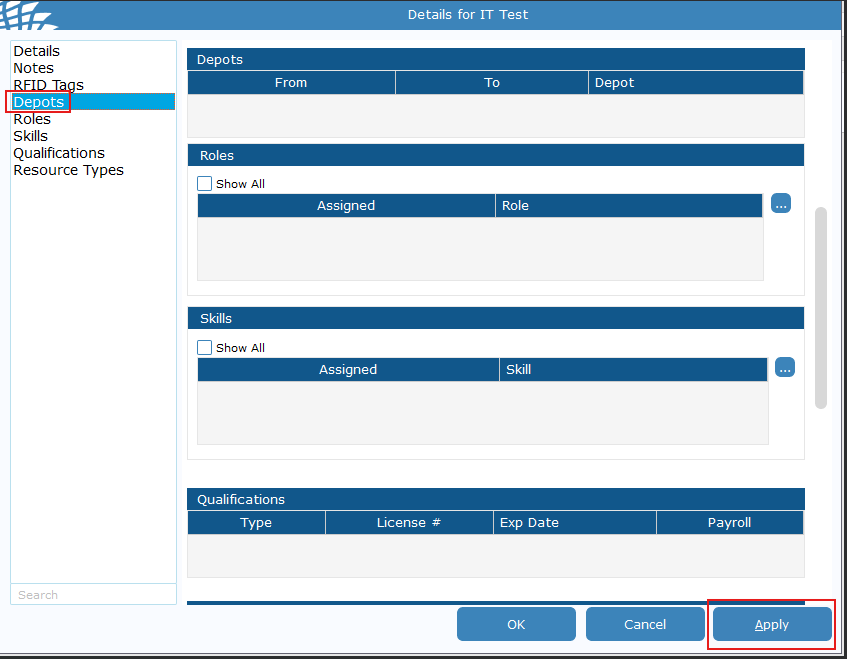
- This box will open up. Click "Depot" on the left-hand side and click "Apply".

- This box will appear, in "Depot", select "Puffing Billy". hit apply and then close.

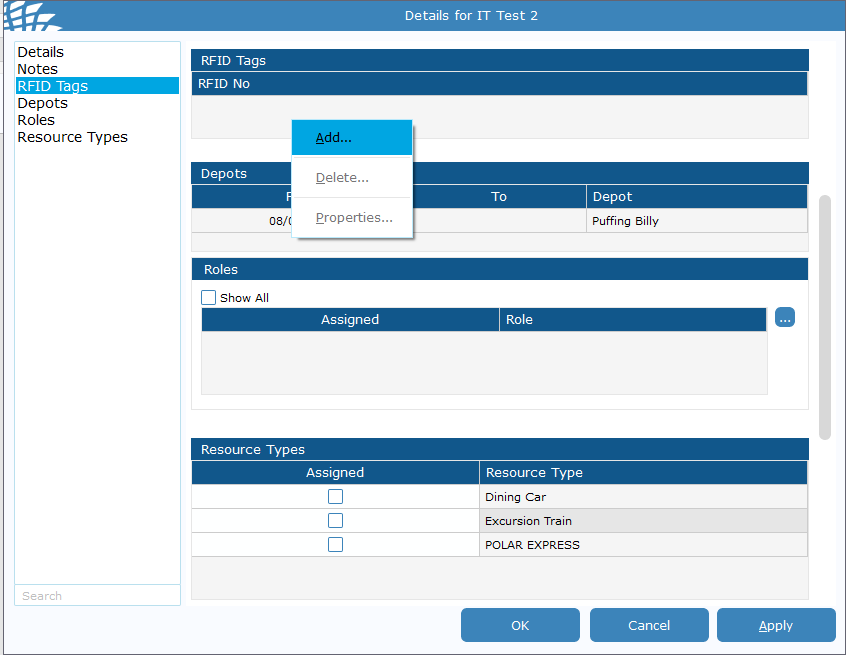
- In the left column head to "RFID Tags", right click in the empty space under "RFID No" and click add.

- This will show a box with tag no, when clicked into the dialogue box, swipe the RFID tag onto the RFID reader you are assigning to that user. Then hit ok.


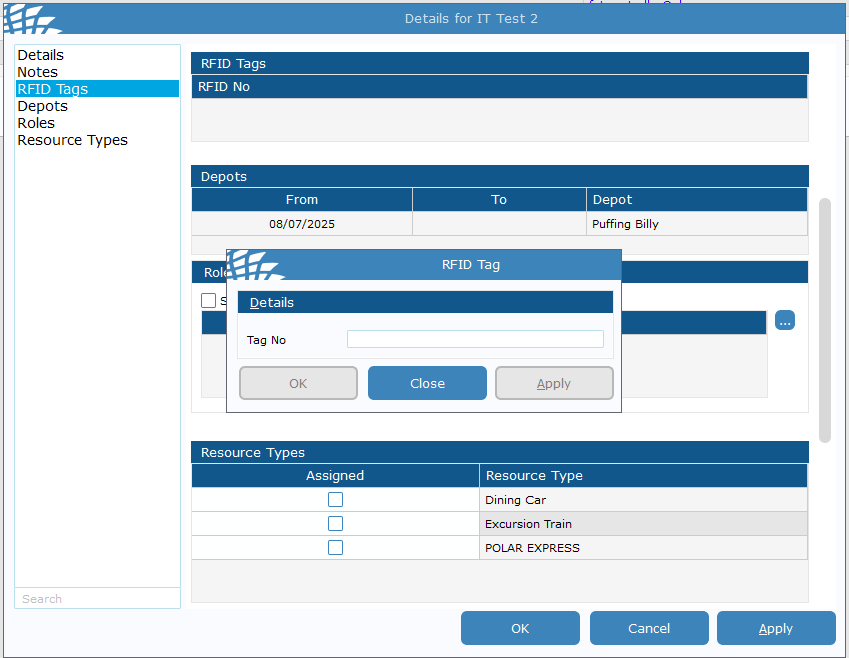
For users with a generic password such as SM's or Booking Clerks using RFID, you will also need to remove the Password Expiry.
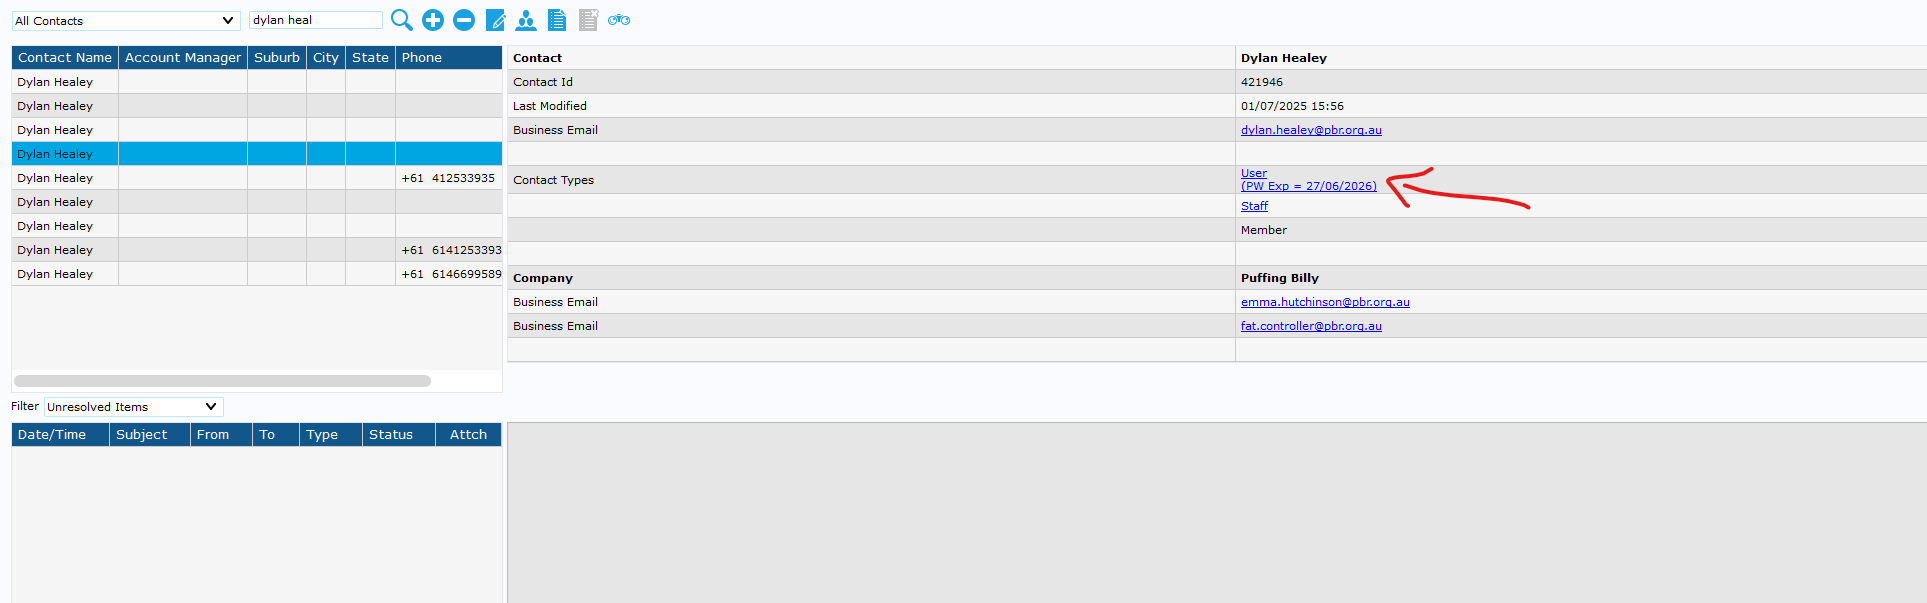
- Go back to the contact search page, find the user you are editing and double click the Contact Type area

- Highlight the expiry date and delete/backspace to remove, then hit apply.

- To confirm this has been done you can see the expiry date no longer shows under Contact Types

-
Please leave a Note under the user to note they have an RFID attached.


-
The user can low login using RFID.

Removing RFID - CustomLinc
This article will show you how to remove an RFID tag from a user.
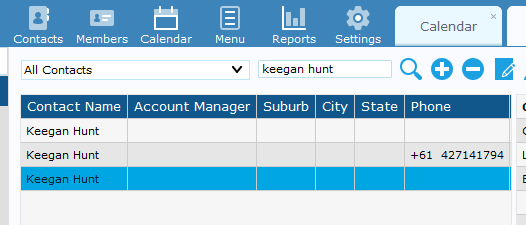
- Open Custom Linc, select "Contacts" and search for the desired person to remove the RFID tag from.

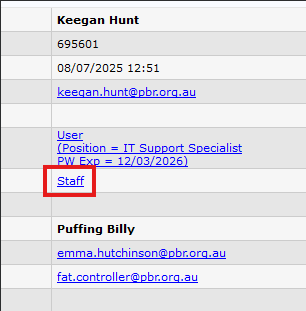
- Click on the user's name to open the menu on the right and select "staff".

- Click on RFID tags, right click on the RFID number and select delete. Then click ok in the bottom right.

- RFID has now been removed.
Agent Management/CRM
How to: Assign or Remove Contacts/Agent to Contact Group(s)
- Find the Contact you wish to allocate to a Contact group
- Select the
 icon
icon
-

- This will pop up the list of Contact Groups that can be allocated, double click on the one you wish to add
- Repeat until you have added all the Contact Groups you wish to.
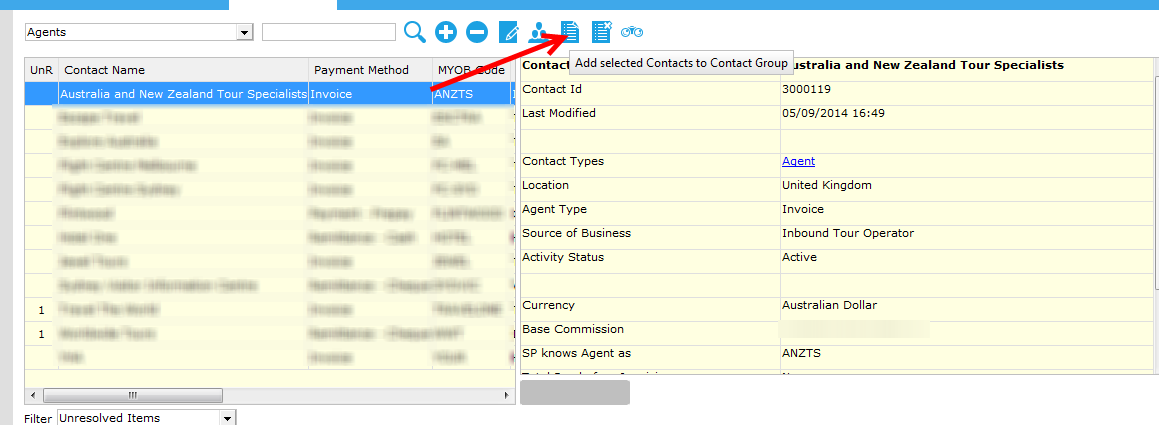
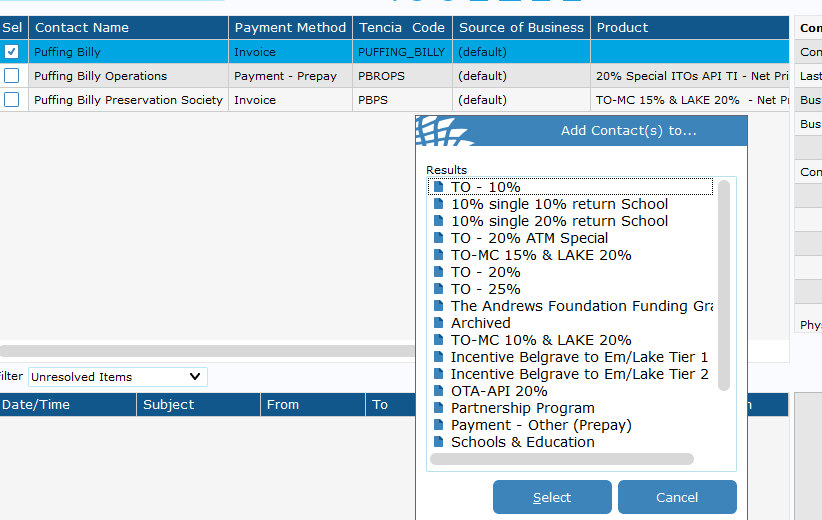
You can add multiple Contacts (agents) to a Contact Group at the same time. However, you cannot add multiple Groups to a Contact, this has to be done one at a time.
To remove a contact group from a contact
- Right click on the Contact Group you wish to remove
- Select Delete

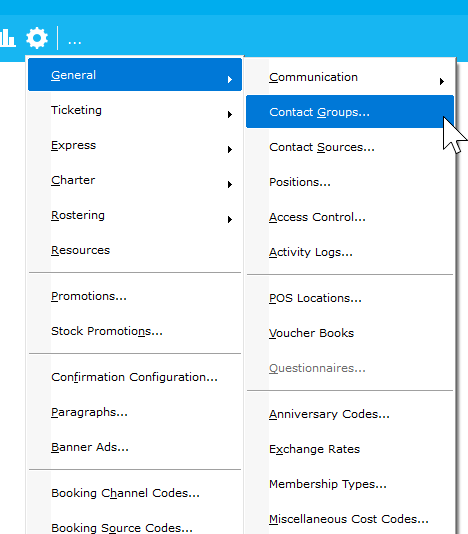
How to: Create or Remove a Contact Group
- Go to Settings > General > Contact Groups

- Select ADD > fill in template > SAVE

You can also edit existing templates by selecting - You cannot ad or remove Contacts from the group here. Please refer to How to: Assign or Remo... | BookStack

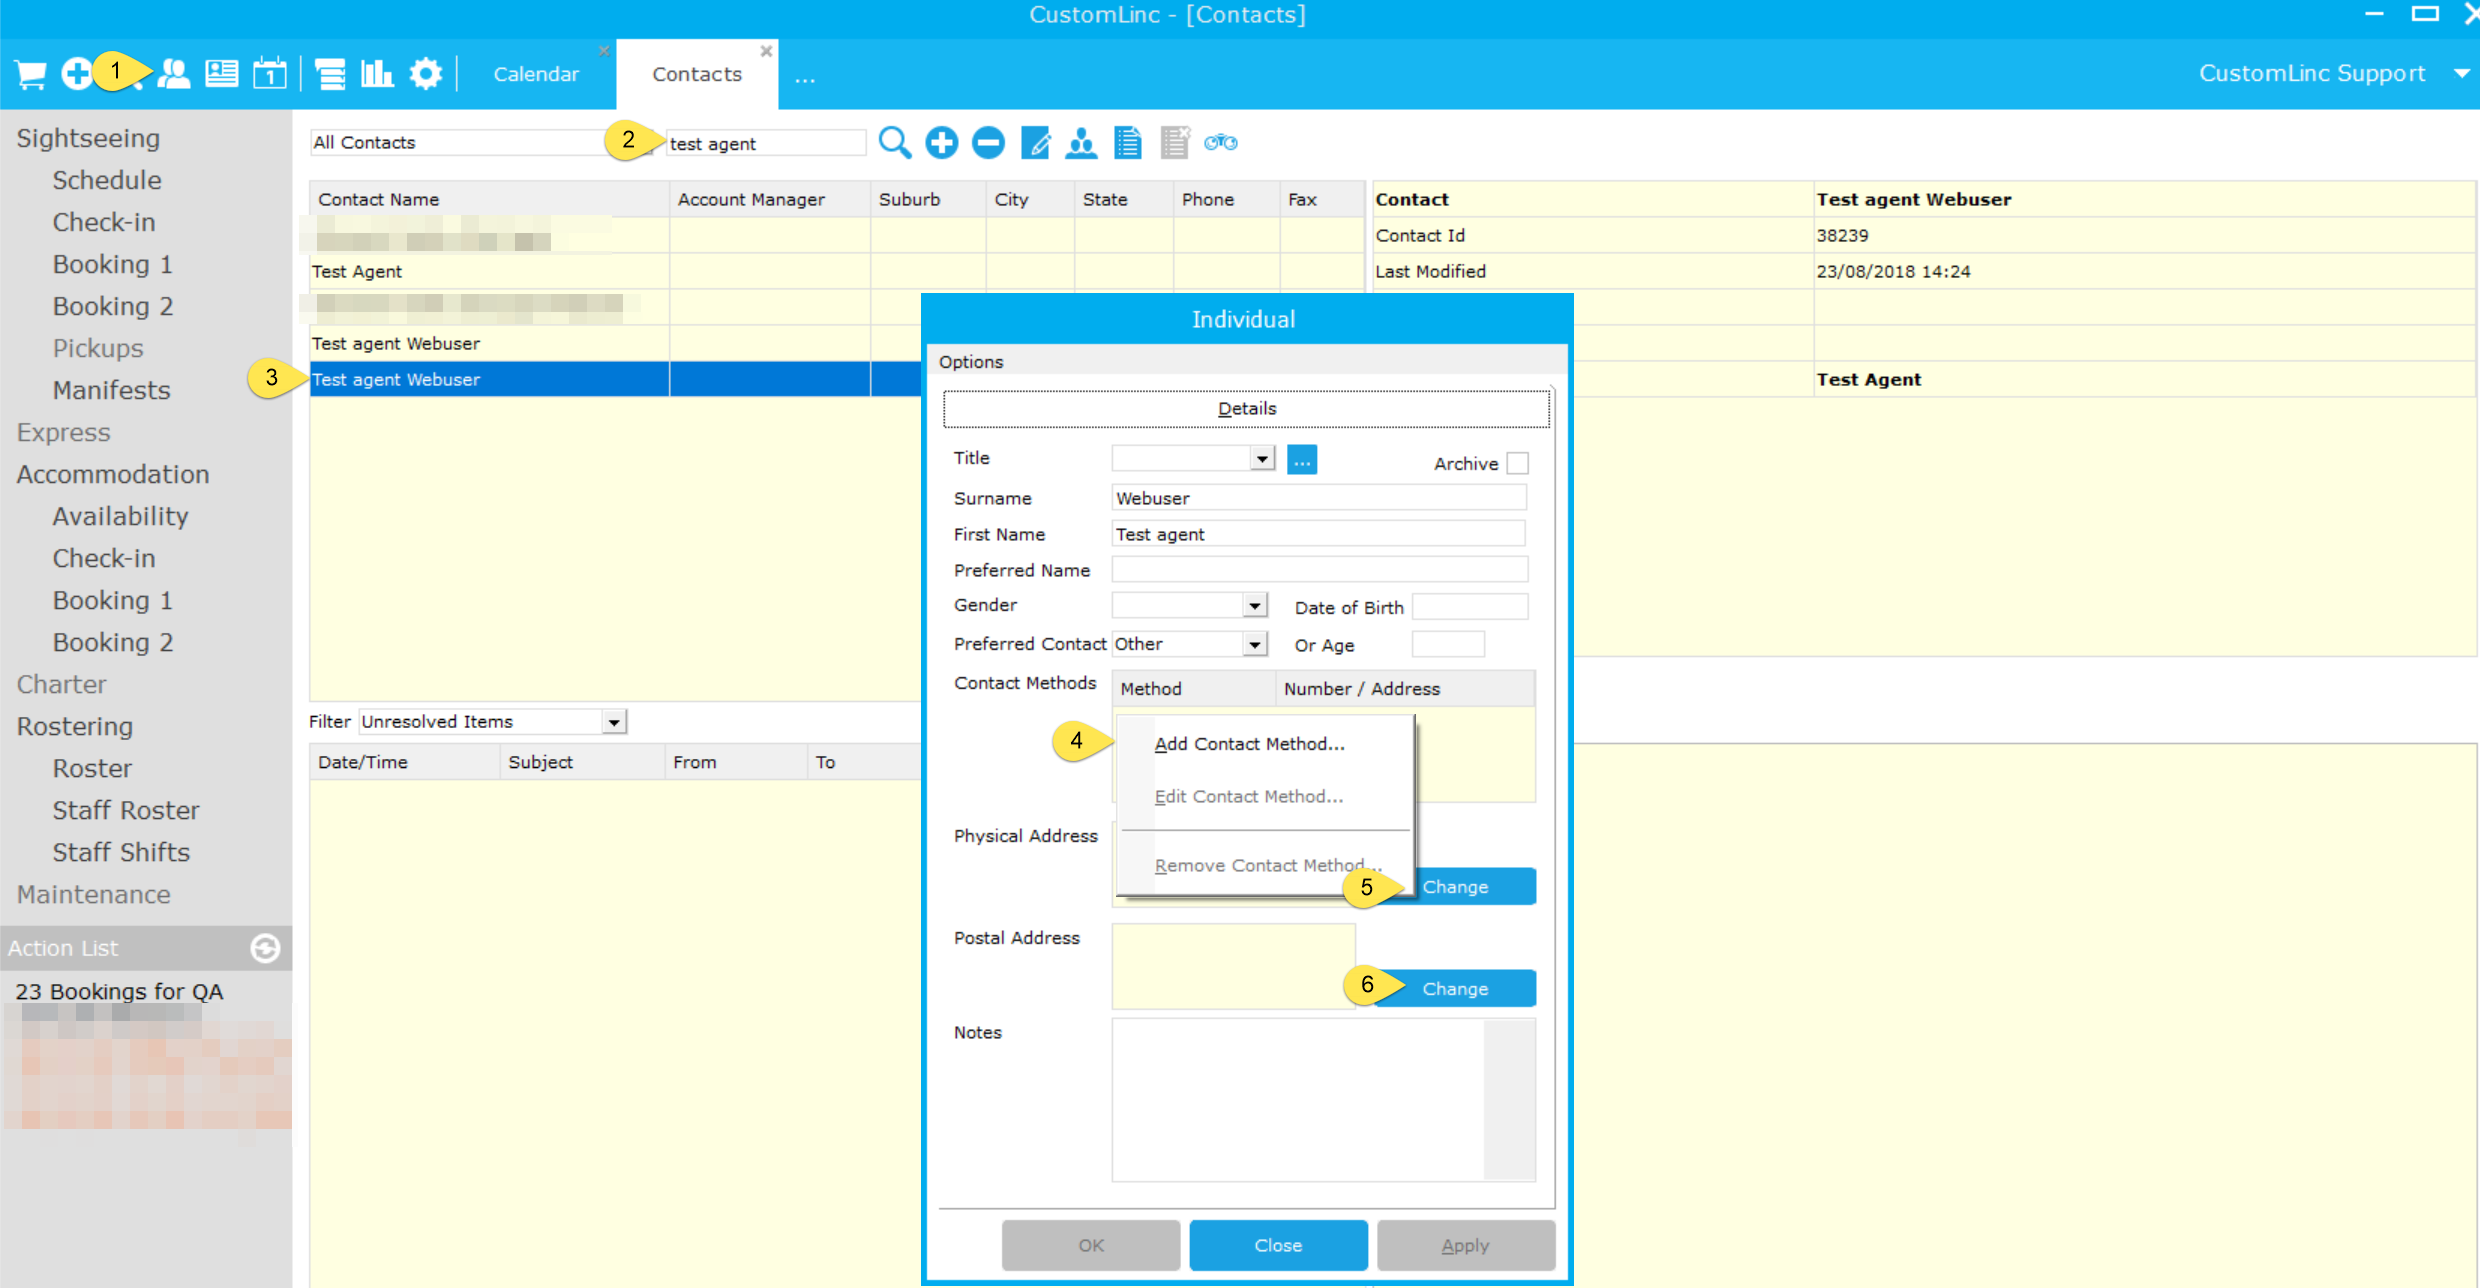
How to: Add Contact details to a contact (Agent).
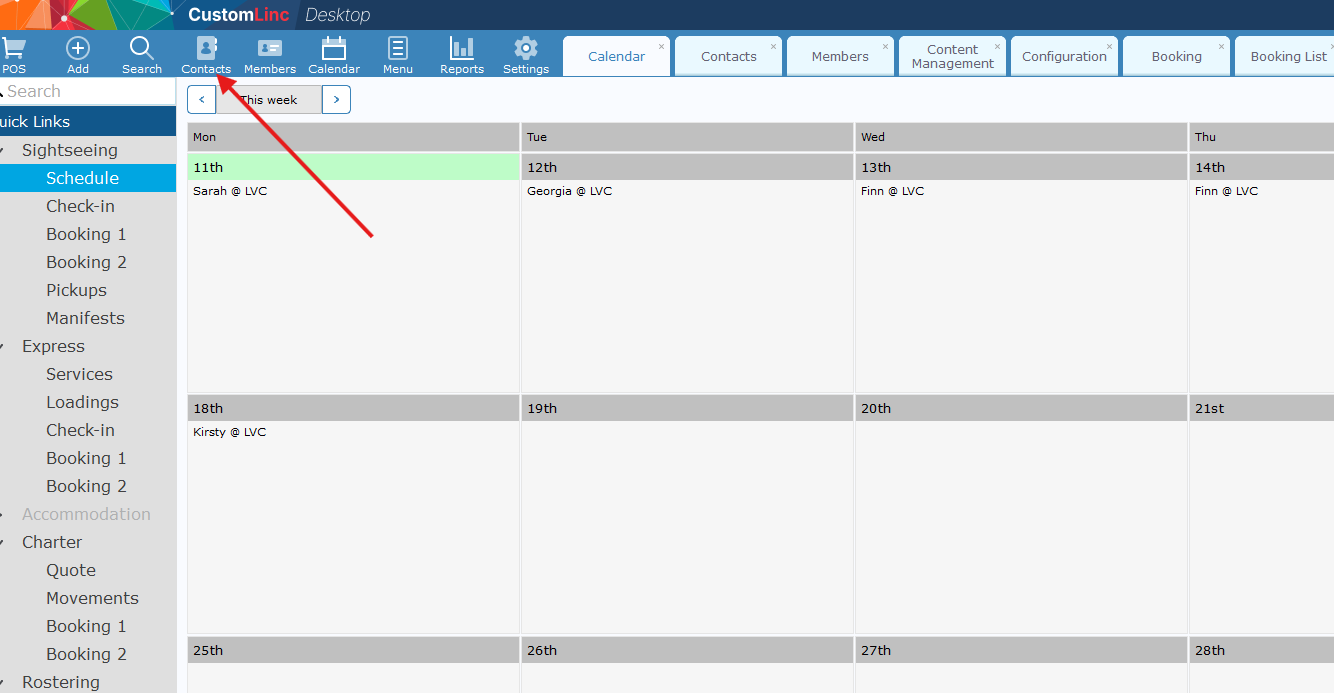
- Contacts screen
- Search for Contact
- Double-click on Contact
Organisation -
Select Add to add Postal and Physical addresses
-
Select Add to add Email, Phone, Fax, Facebook, Twitter and website
Individual
4. Right-click under Contact Methods and select Add Contact Method... to add Email, Phone, Fax, Facebook, Twitter and website
5. Select Change to add/edit a Physical Address
6. Select Change to add/edit a Postal Address
Changing existing Contact Methods on a Contact
Existing Contact Methods will appear on the right of the screen when the Contact is selected as at 1 below as an example.- Double-click on the Contact Method
- Change details as required and select OK
How to: Export a list of emails from a Contact Group
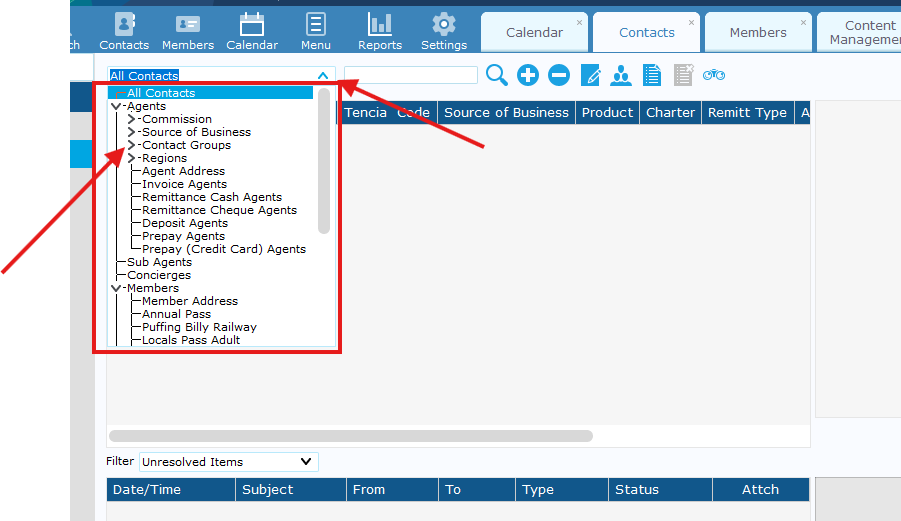
- Go to Contacts

- Select the Contacts drop down to search for a contact filter.
- From here you can click the arrows to expand the filters, the following are examples.
- Contact Groups are managed on a per agent basis - an Agent (contact) can have multiple Contact Groups associated.
- Commission is managed per Agent under contract an agent will only have one active commission at a time.

- From here you can click the arrows to expand the filters, the following are examples.
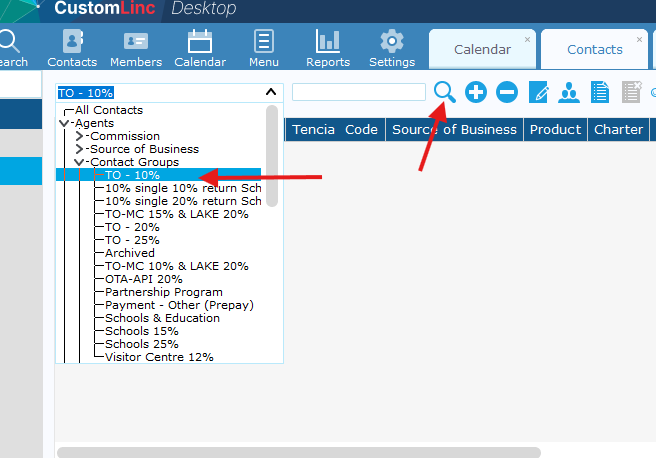
- Select a filter and click search (Magnifying Glass)

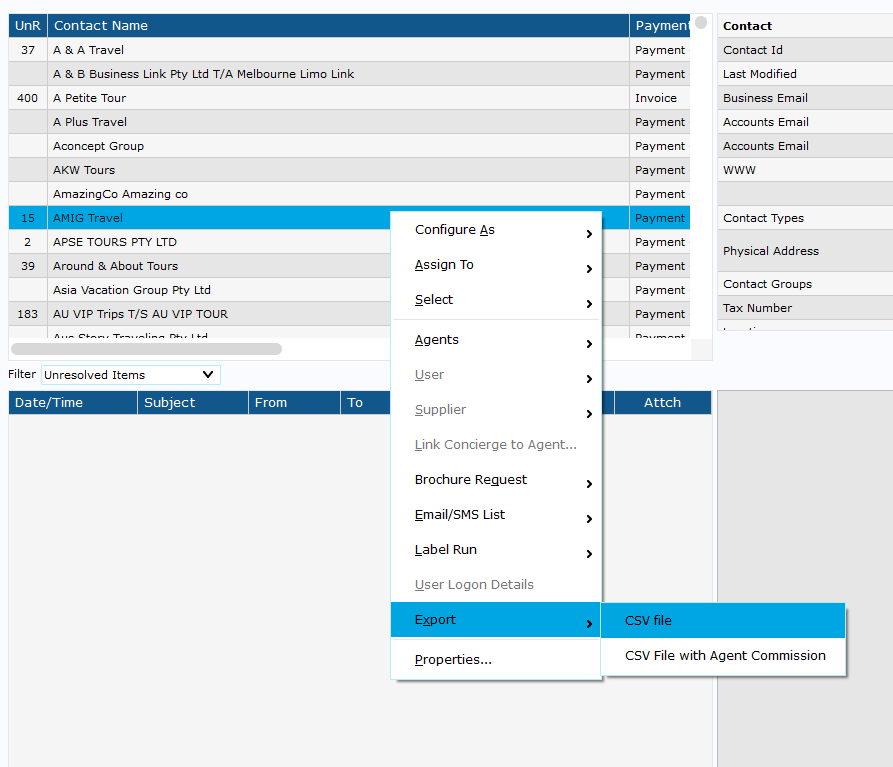
- Once all agents are loaded, right click any agent on the left side, select Export > CSV file

- It will ask you to select a save locations, then it should automatically open up.
In the CSV you will find an EmailBusiness header - This is the primary contact for each agent. -
You can highlight all cells email cells then copy & paste these into the To section in Outlook.
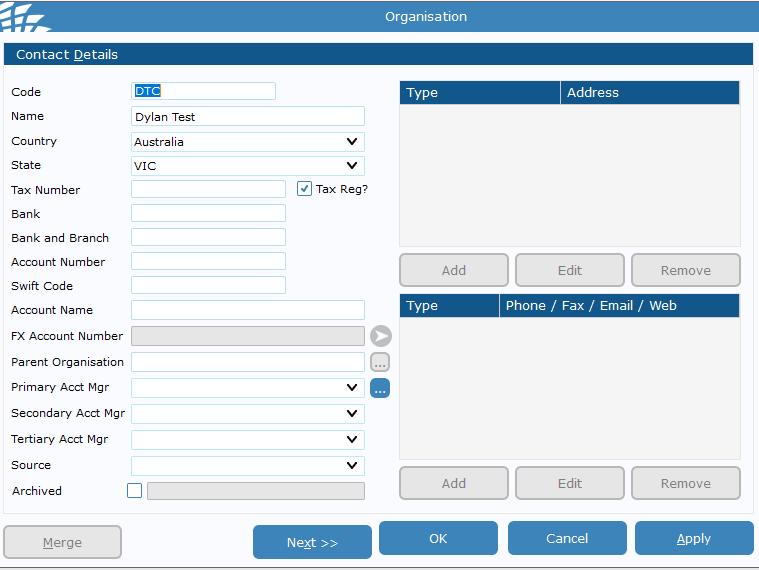
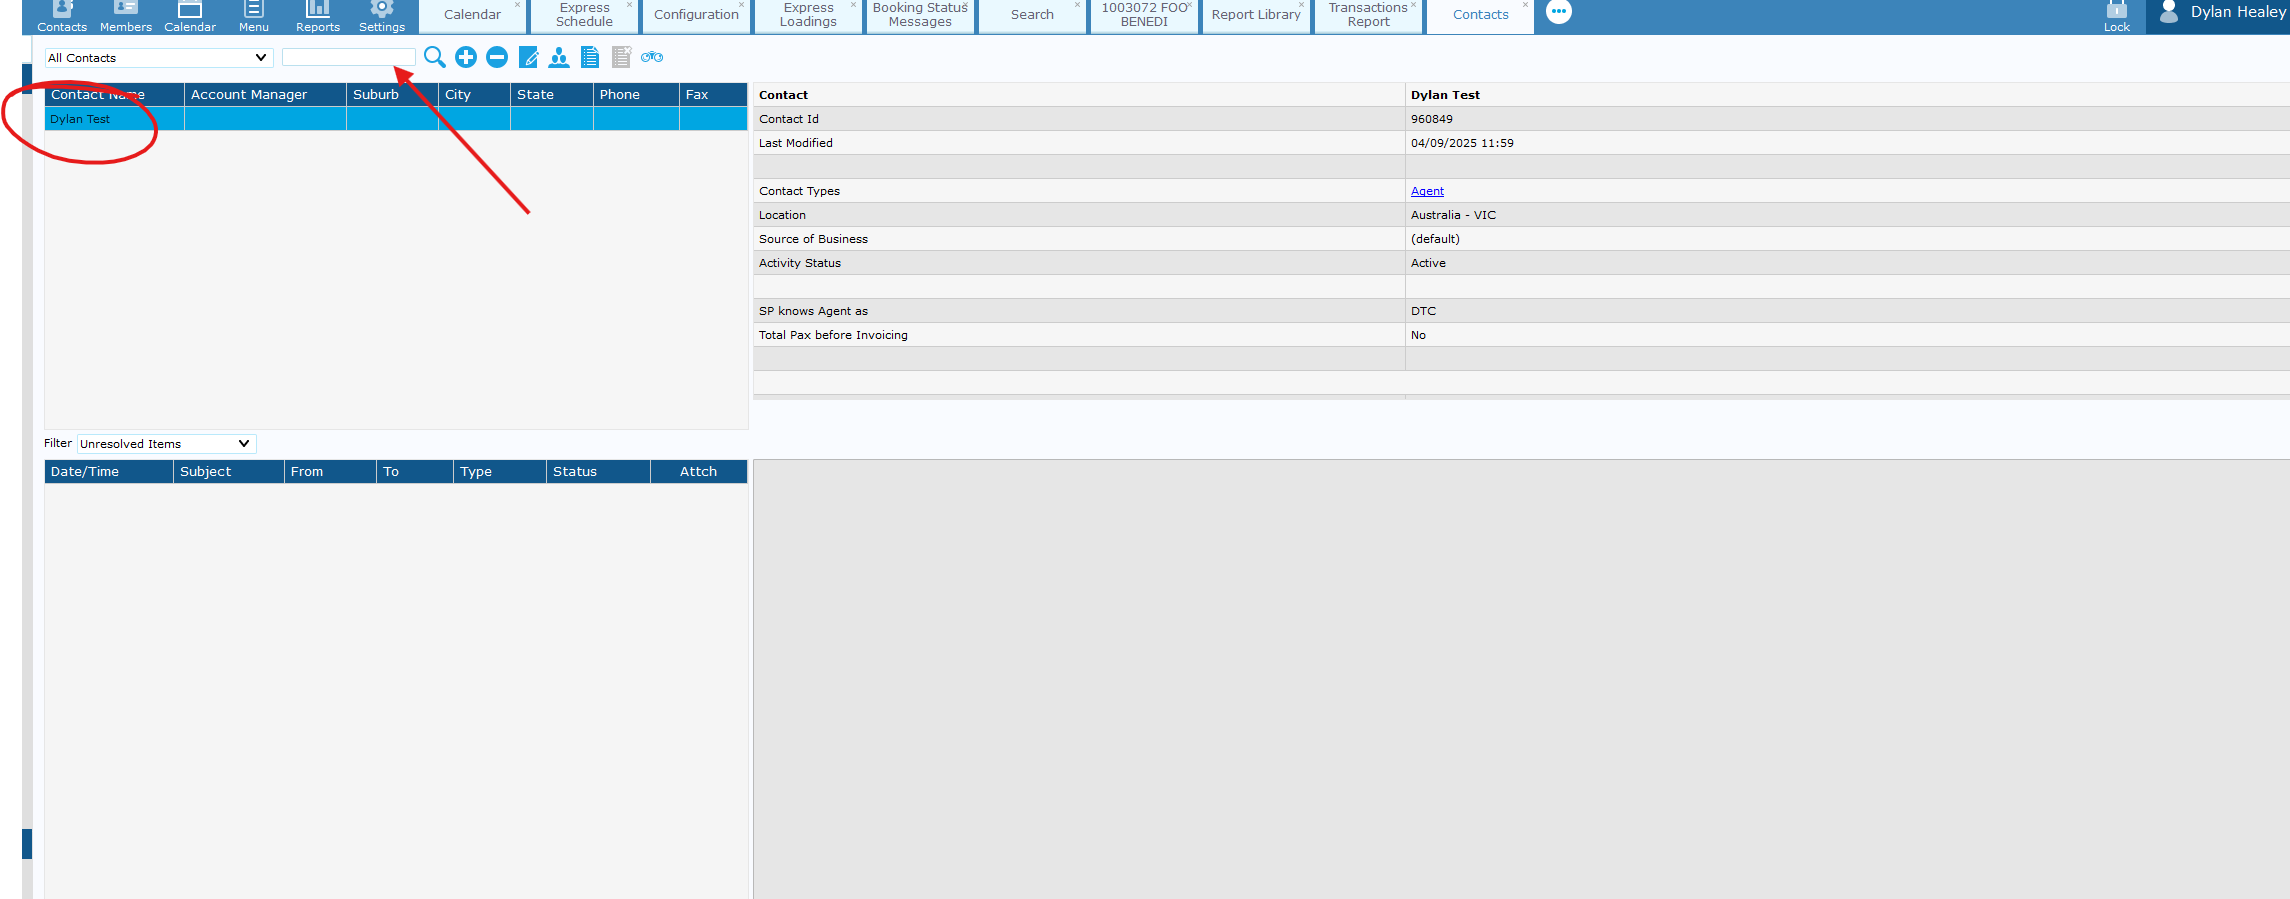
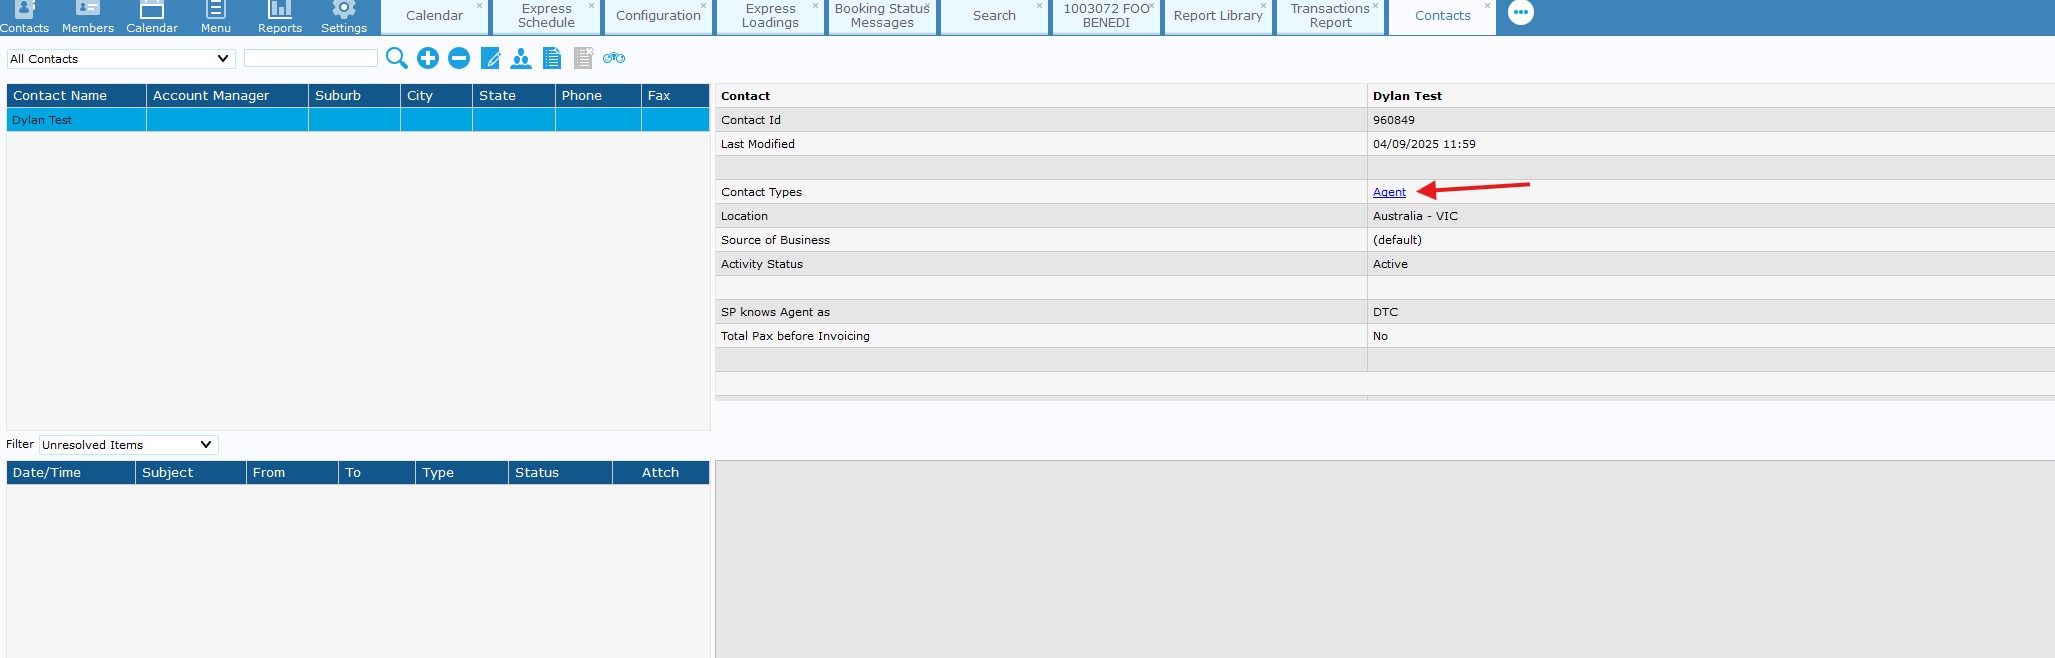
How to: Create a New Agent in CustomLinc
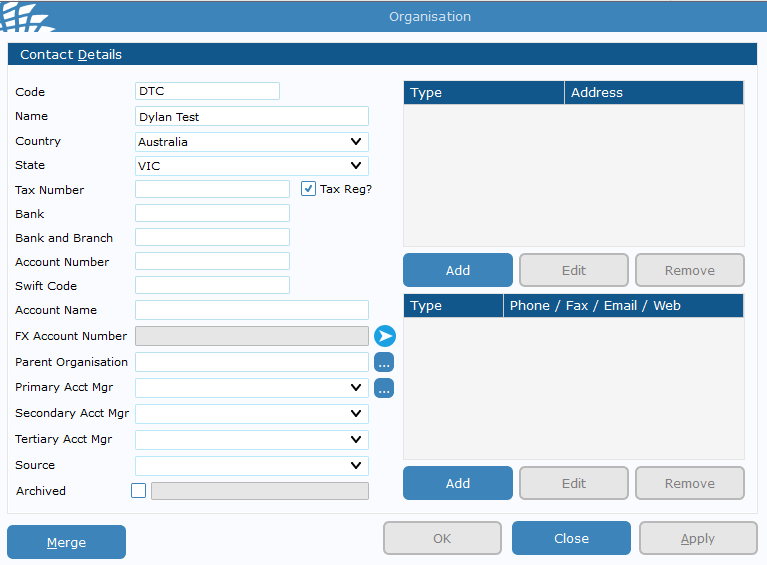
- Go to Contacts > Add Contact (+) > Click Organisation
- Fill in the Name & any other relevant data - A code is required but is not used unless they are on account. We would recommend doing some sort of Business initials like PBR or PBRB for example. > Hit Apply

- Select "Agent" > Click Okay
- Select Apply, and close the windows to get back into the contact page

- You should see the user on the left-hand side - double click and fill in contact details such as address and email contact.


-
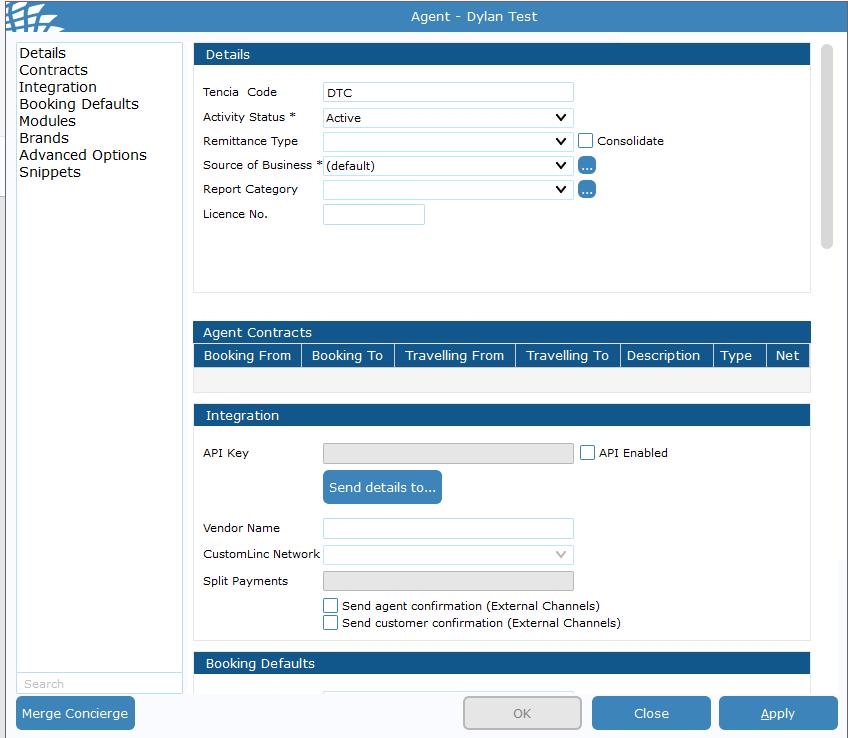
Apply & close this window > Double Click "Agent" in the contact type tab.

-
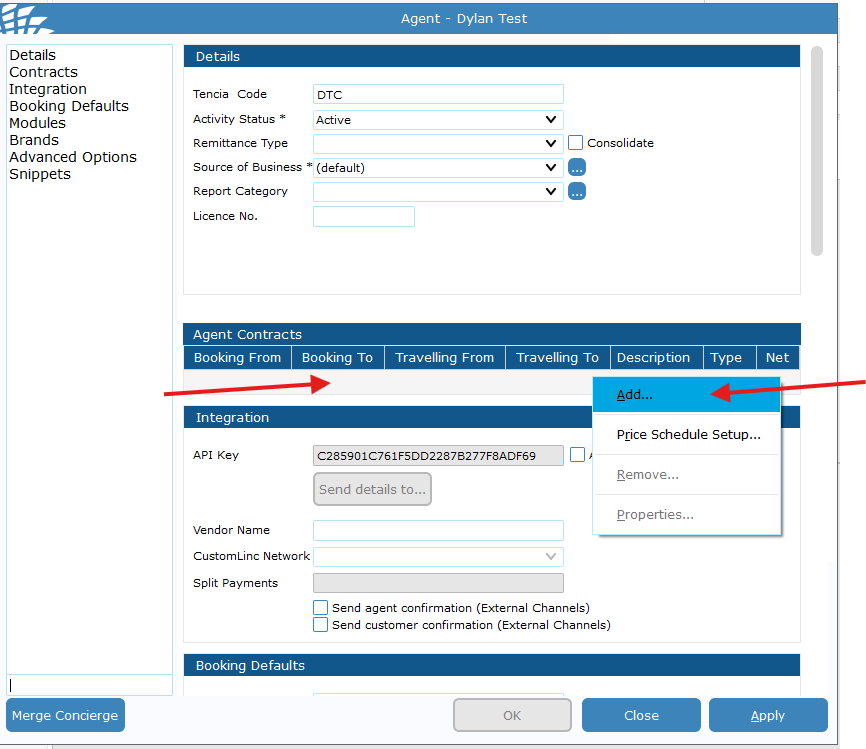
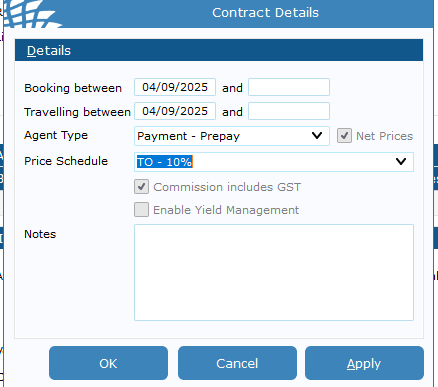
Go to the contracts area> Right click the grey space > Click Add

- Fill in details:
- Booking Between - Usually set day after request to prevent any issues with any bookings made that day;
- Travelling between Usually set day after request to prevent any issues with any bookings made that day ;
- Agent type is the payment process the agent uses (Invoice or Prepaid);
- Price schedule is their commission rate.
If an end date is put into this field the contract will be removed after that date.

-
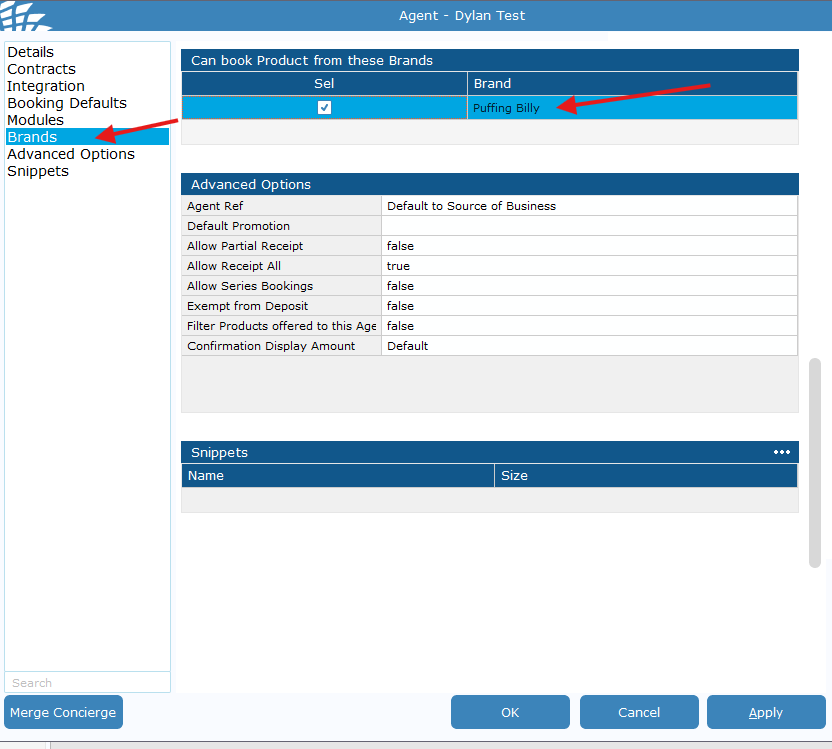
Finally go to brands and make sure Puffing Billy is ticked for the agent. > Hit apply and Close