Printing
Connecting to network printers, printing documents, and solving common print problems.
Printing at PBR
Overview
Printers at your site are automatically configured on your computer by IT when your account is set up. You do not need to add them manually — they should appear in your printer list when you go to print.
If a printer you expect to have is missing, contact IT Helpdesk at helpdesk@pbr.org.au and they will push it to your device.
Printing a Document
- Open the document you want to print
- Press Ctrl + P (or go to File > Print)
- Select the correct printer from the dropdown list
- Choose your settings (number of copies, colour/black and white, single/double-sided)
- Click Print
Setting a Default Printer
- Click the Windows Start button and open Settings
- Go to Bluetooth & devices > Printers & scanners
- Click on the printer you use most often
- Click Set as default
Printer Missing From Your List?
Contact IT Helpdesk — do not attempt to add the printer manually. IT manages printer deployment centrally and will push the correct printer to your device.
Email: helpdesk@pbr.org.au | Portal: helpdesk.pbr.org.au
Troubleshooting Common Print Problems
Printer Shows as Offline
The printer appears in your list but shows "Offline":
- Check the printer itself — is it powered on and showing a ready or idle status on its display?
- Check there is no paper jam (open the trays and covers briefly to inspect)
- On your computer, go to Settings > Printers & scanners, click the printer, and click Open print queue
- In the print queue window, click Printer in the menu and ensure Use Printer Offline is not ticked
- Try printing again — it should reconnect automatically
- If still offline, restart the printer at the device itself and wait 60 seconds
Print Job Stuck in Queue
- Go to Settings > Printers & scanners, click the printer, and click Open print queue
- Right-click the stuck job and select Cancel
- If the job won't cancel, restart the Print Spooler service:
- Press Windows + R, type
services.msc, and press Enter - Find Print Spooler, right-click it, and select Restart
- Press Windows + R, type
- Try printing again
Printer Missing From Your List
Printers are pushed automatically to your device by IT. If a printer you expect to have is not appearing, contact IT Helpdesk — do not attempt to add it manually.
Email: helpdesk@pbr.org.au
Poor Print Quality
- Streaky or faded output: Toner or ink may be low. Check the printer display for a toner low warning. Let your manager know so a replacement cartridge can be ordered.
- Smudged output: May indicate a drum or fuser issue — log a ticket with IT Helpdesk.
Running Out of Paper
Paper is held in the stationery area at your site. If stock is running low, let your manager know so a reorder can be arranged.
Still Having Issues?
Log a ticket at helpdesk.pbr.org.au and include: the printer name/location, what you were trying to print, and any error message on screen or on the printer display.
Safeworking Fax/Printers
There are a few models of printer in use over the sites
Epson WF-2630 - Ink Replacement Guide
Make sure you have your replacement cartridges handy before you begin. You must install new cartridges immediately after removing the old ones.
If an ink cartridge is expended, you see a message on the LCD screen. Note which cartridges need to be replaced and press the OK button, then press the up arrow button.
- Turn on the printer.
- If you are replacing a cartridge before you see a message on the LCD screen, press the up or down arrow button to select Setup and press the OK button. Then select Maintenance > Ink Cartridge(s) Replacement and press one of the Start buttons.
- If you are replacing a cartridge before you see a message on the LCD screen, press the up or down arrow button to select Setup and press the OK button. Then select Maintenance > Ink Cartridge(s) Replacement and press one of the Start buttons.
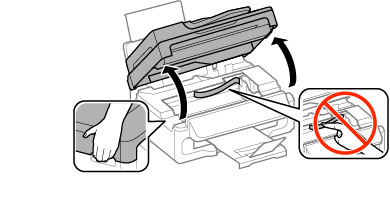
- Lift up the scanner unit.

-
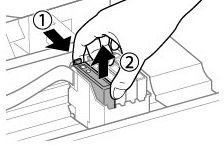
Squeeze the tab on the cartridge and lift the cartridge straight up to remove it.

- Open the new cartridge packet.
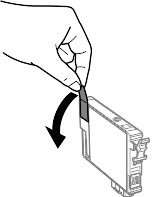
- Remove the yellow tape from the side of the cartridge

Do not remove any other labels or seals, or ink will leak. -
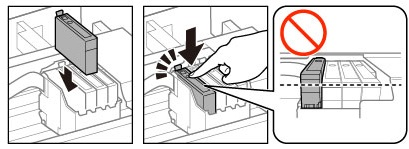
Insert the new cartridge into the holder and push it down until it clicks into place.

-
Lower the scanner unit.
-
Press one of the Start buttons. The print head moves to its home position and the printer starts charging the ink. When you see a confirmation message on the screen, ink charging is finished
Brother Fax-2840 - Toner Replacement
Text Instructions
NOTE: Illustrations shown below are from representative product and may differ from your Brother machine.
- Make sure that the machine is turned on.
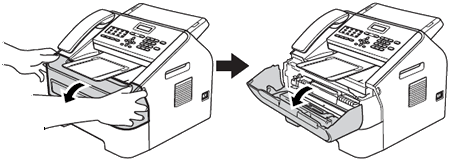
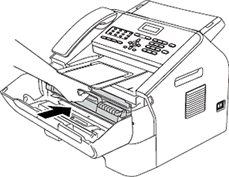
- Open the front cover
- Take out the drum unit and toner cartridge assembly.
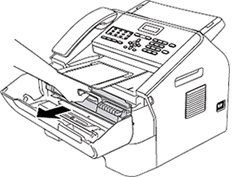
Hold your Brother machine with one hand and hold the drum unit with the other hand. Then, pull the drum unit toward you and lift it up.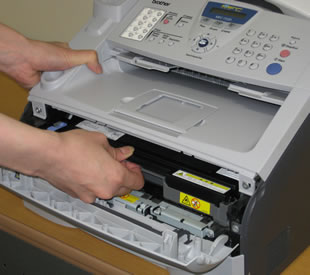
- Push down the green lock lever and take the toner cartridge out of the drum unit.
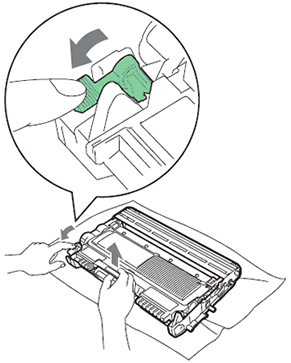
-
Unpack the new toner cartridge. Hold the cartridge level with both hands and gently shake it from side to side several times to spread the toner evenly inside the cartridge.

-
Pull off the protective cover.

Put the toner cartridge in the drum unit immediately after you have removed the protective cover. To prevent any degradation to the print quality, DO NOT touch the shaded parts shown in the illustrations.
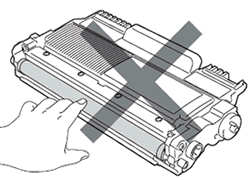
-
Put the new toner cartridge firmly into the drum unit until you hear it lock into place. If you put it in properly, the green lock lever will lift automatically.

Make sure that you put in the toner cartridge properly or it may separate from the drum unit.
-
Clean the primary corona wire inside the drum unit by gently sliding the green tab from left to right and right to left several times.

Be sure to return the tab to the home position (1). If you do not, printed pages may have a vertical stripe.
- Put the drum unit and toner cartridge assembly back into the machine. Close the front cover.
Canon FAX-JX210P - Ink Replacement Guide
Knowing When to Replace a FINE Cartridge
When Ink is Low :
When the ink level is low, the Ink Lamp lights up.
When Ink is Empty :
When the ink is almost empty, RECOMEND NEW CRT is displayed on the LCD and the Ink Lamp blinks. When this occurs it may not be possible to clearly print received faxes from memory. When the ink is empty, NO INK is displayed on the LCD. Printing will resume as soon as the FINE Cartridge is replaced.

- Make sure the fax is turned on.
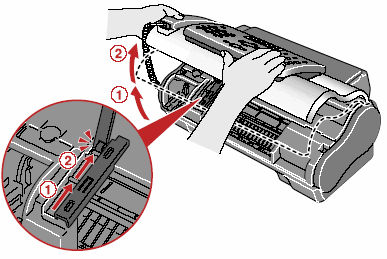
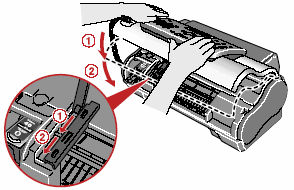
- Open the Printer Cover until it locks into place securely at the second bump.

- Remove the empty Cartridge.
- Push down the FINE Cartridge (1).
- Remove the FINE Cartridge (2).
- Push down the FINE Cartridge (1).
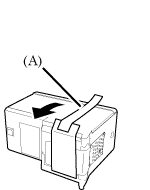
- Unpack a new FINE Cartridge.
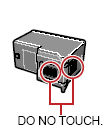
- Remove the protective tape (A). When doing so, DO NOT TOUCH the metallic areas.


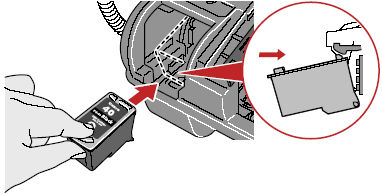
- Insert the FINE Cartridge
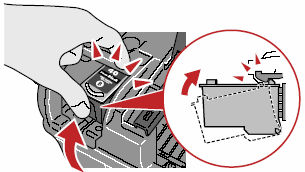
- Insert the FINE Cartridge slightly slanted into the Cartridge Holder.
- Push up the FINE Cartridge until it clicks into place.
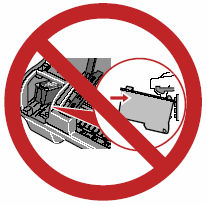
DO NOT put the head of the FINE Cartridge downward into the Cartridge Holder.
- Insert the FINE Cartridge slightly slanted into the Cartridge Holder.
- Close the Printer Cover.
- Insert the FINE Cartridge