Be aware that when you create, modify or delete files in the folder it is automatically synced to OneDrive.
# Creating a Folder in OneDrive ## Step-by-step guide 1. Navigate to the **OneDrive folder** where you would like to create the new Folder. Right click and select **New-Folder**. [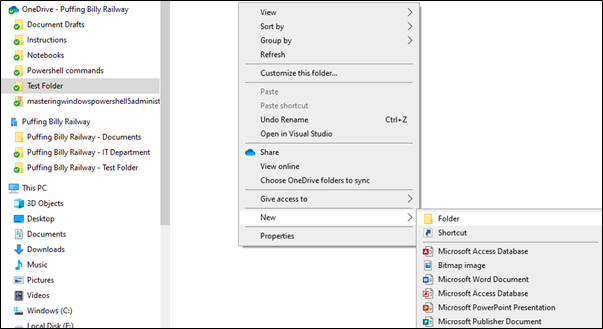](https://bookstack.pbr.org.au/uploads/images/gallery/2022-10/Dapimage.png) 2. Enter in the folder name. [](https://bookstack.pbr.org.au/uploads/images/gallery/2022-10/qsrimage.png) # Removing Access to a Folder/File ## Step-by-step guide 1. Navigate to the Folder/File and click on **Share**. [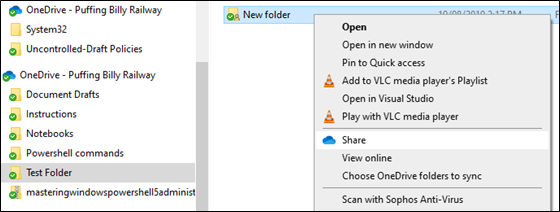](https://bookstack.pbr.org.au/uploads/images/gallery/2022-10/XE5image.png) 2. Click the **three dots** in the top right-hand corner and select ****Manage Access.**** [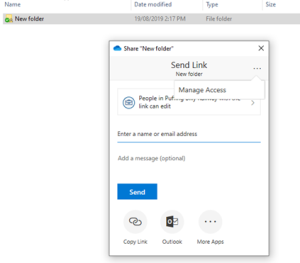](https://bookstack.pbr.org.au/uploads/images/gallery/2022-10/kDpimage.png) 3. Click on the **X** to remove access to the folder/file. This will remove access to all users you have shared the folder/file with. If you wish to remove only certain users, you will need to do this in the web version of OneDrive. Please see **[Removing Access to a File (Web)](https://confluence.pbr.org.au/pages/viewpage.action?pageId=2097484).** [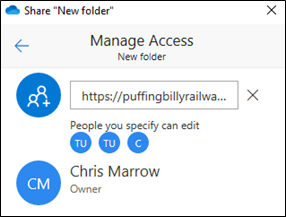](https://bookstack.pbr.org.au/uploads/images/gallery/2022-10/rWmimage.png) # Sharing Folders & Files ## Step-by-step guide 1. Navigate to the folder/file you wish to share, right click the folder/file and click on ****Share.**** [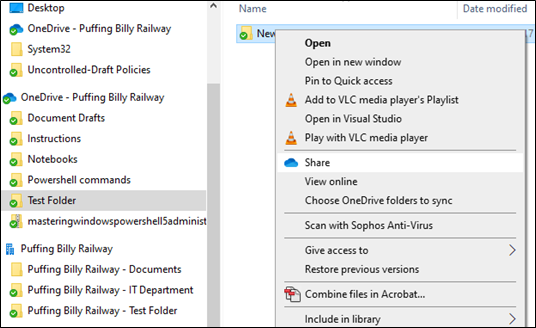](https://bookstack.pbr.org.au/uploads/images/gallery/2022-10/zo9image.png) 2. Select who you would like to have access to the folder/file. [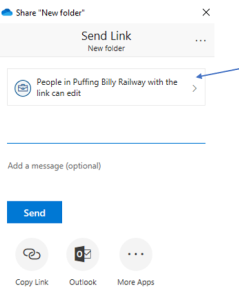](https://bookstack.pbr.org.au/uploads/images/gallery/2022-10/Fvbimage.png) 3. For example, if you wish to share the folder/file with only specific users you can select **Specific people**. By default, the user will have editing access. Untick **Allow editing** if you wish the user/s to only have read access. Click **Apply** when done. [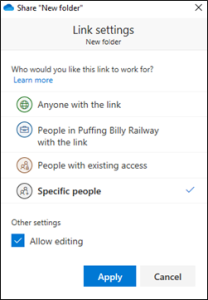](https://bookstack.pbr.org.au/uploads/images/gallery/2022-10/NbFimage.png) 4. Enter in the user’s name and click **Send**. The user will receive an email letting them know they now have access to the folder/file.If you share a folder it will share all folders and files within that folder. You will need to do each folder or file individually if you only want certain items to be shared.
# Accessing OneDrive (Web) # Accessing & Restoring Deleted Items ## Step-by-step guide 1. Click on **Recycle Bin.** [](https://bookstack.pbr.org.au/uploads/images/gallery/2022-10/oFRimage.png) 2. Select the Folder/File and click on **Restore.** [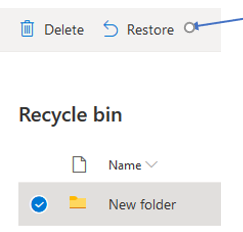](https://bookstack.pbr.org.au/uploads/images/gallery/2022-10/oBWimage.png) # Creating a folder in OneDrive (Web) ## Step-by-step guide 1. Click on **New** and select ****Folder.**** [](https://bookstack.pbr.org.au/uploads/images/gallery/2022-10/nwjimage.png) 2. Enter in the folder name and click **Create**. [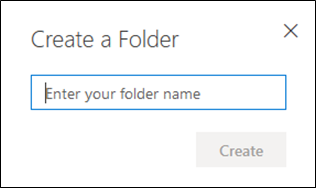](https://bookstack.pbr.org.au/uploads/images/gallery/2022-10/Xalimage.png) # Opening OneDrive in a Web Browser ## Step-by-step guide 1. Go to [https://onedrive.live.com/about/en-us/signin/](https://onedrive.live.com/about/en-us/signin/) 2. Sign in with your PBR email and password. [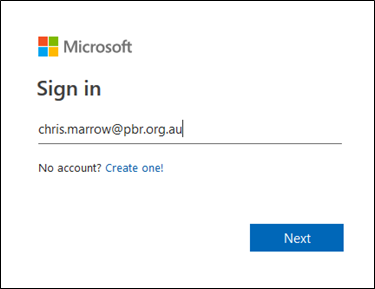](https://bookstack.pbr.org.au/uploads/images/gallery/2022-10/T1bimage.png) # Removing Access to a File (Web) ## Step-by-step guide 1. Select the file and click on the **Shared** button. [](https://bookstack.pbr.org.au/uploads/images/gallery/2022-10/sdwimage.png) 2. The manage access window will appear. Click on the **X** to remove the user’s access. [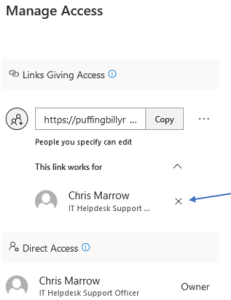](https://bookstack.pbr.org.au/uploads/images/gallery/2022-10/xRtimage.png) 3. You will receive a confirmation popup. Press on **Remove.** [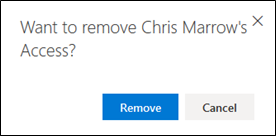](https://bookstack.pbr.org.au/uploads/images/gallery/2022-10/Jdvimage.png) # Sharing Folders & Files With a User (Web) ## Step-by-step guide 1. Select the folder or file you want to share, then click on the **three dots** to bring up a menu and then select **Share**. If you share a folder it will share all folders and files within that folder. You will need to do each folder or file individually if you only want certain items to be shared. [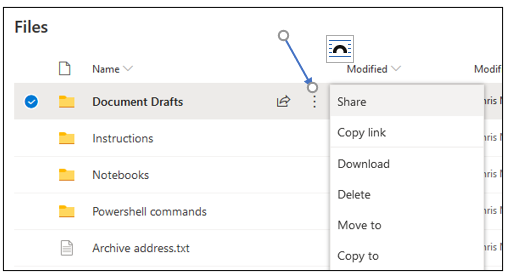](https://bookstack.pbr.org.au/uploads/images/gallery/2022-10/oahimage.png) 2. A window will pop up. Click on the button to edit who can view and edit the document. [](https://bookstack.pbr.org.au/uploads/images/gallery/2022-10/W1Kimage.png) 3. Select specific people and allow editing so only certain people can view the file and edit it. Click Apply. [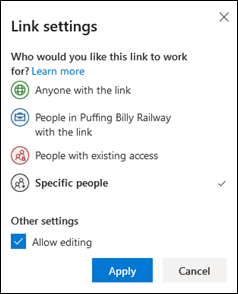](https://bookstack.pbr.org.au/uploads/images/gallery/2022-10/f4Eimage.png) 4. Enter in the user’s email address. Add more user’s if needed. Click **Send** when you’re ready. [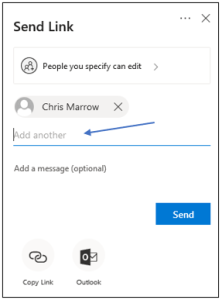](https://bookstack.pbr.org.au/uploads/images/gallery/2022-10/fLRimage.png) 5. The user will receive an email with the link to the file. The folder or file will also now display that it is shared in OneDrive.  6. If you click on the Shared button it will display who the file is shared with and what level of access they have. Click on **Grant Access** if you wish to add more users. [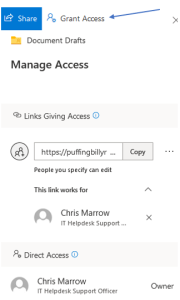](https://bookstack.pbr.org.au/uploads/images/gallery/2022-10/aQYimage.png) # View Files that are Shared with you/by you (Web) ## Step-by-step guide 1. On the left-hand menu select ****Shared.**** [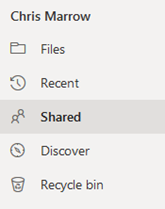](https://bookstack.pbr.org.au/uploads/images/gallery/2022-10/sGSimage.png) 2. Up the top you can select between **Shared with me** or **Shared by me** to see a list of folders and files. [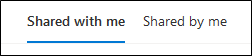](https://bookstack.pbr.org.au/uploads/images/gallery/2022-10/ZiCimage.png)