# Accessing OneDrive (Desktop)

# Signing in / Syncing OneDrive

## Step-by-step guide

1. Search for **Onedrive** in Windows and open the app.  
    [![image.png](https://bookstack.pbr.org.au/uploads/images/gallery/2022-10/scaled-1680-/VGaimage.png)](https://bookstack.pbr.org.au/uploads/images/gallery/2022-10/VGaimage.png)
2. The OneDrive icon will appear in the right-hand corner of the taskbar. Click on it to open OneDrive.  
    [![image.png](https://bookstack.pbr.org.au/uploads/images/gallery/2022-10/scaled-1680-/rAJimage.png)](https://bookstack.pbr.org.au/uploads/images/gallery/2022-10/rAJimage.png)
3. Sign into OneDrive with your PBR credentials.  
    [![image.png](https://bookstack.pbr.org.au/uploads/images/gallery/2022-10/scaled-1680-/XIaimage.png)](https://bookstack.pbr.org.au/uploads/images/gallery/2022-10/XIaimage.png)
4. Click **Next.**
5. Make sure **Sync all files and Folders** is selected and then press **Start sync.**  
    [![image.png](https://bookstack.pbr.org.au/uploads/images/gallery/2022-10/scaled-1680-/qGAimage.png)](https://bookstack.pbr.org.au/uploads/images/gallery/2022-10/qGAimage.png)
6. Click through any remaining screens. Once done your files will sync to OneDrive.
7. Open **File Explorer** in Windows. You will now be able to see the folder under OneDrive - Puffing Billy Railway located in the left-hand menu.
    
    [![image.png](https://bookstack.pbr.org.au/uploads/images/gallery/2022-10/scaled-1680-/iCgimage.png)](https://bookstack.pbr.org.au/uploads/images/gallery/2022-10/iCgimage.png)
    
    <p class="callout warning">Be aware that when you create, modify or delete files in the folder it is automatically synced to OneDrive.</p>

# Creating a Folder in OneDrive

## Step-by-step guide

1. Navigate to the **OneDrive folder** where you would like to create the new Folder. Right click and select **New-Folder**.  
    [![image.png](https://bookstack.pbr.org.au/uploads/images/gallery/2022-10/scaled-1680-/Dapimage.png)
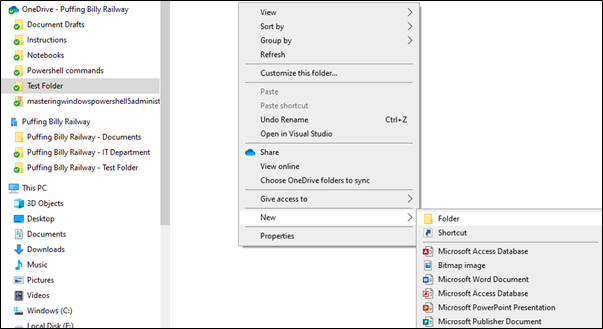
](https://bookstack.pbr.org.au/uploads/images/gallery/2022-10/Dapimage.png)
2. Enter in the folder name.  
    [![image.png](https://bookstack.pbr.org.au/uploads/images/gallery/2022-10/scaled-1680-/qsrimage.png)](https://bookstack.pbr.org.au/uploads/images/gallery/2022-10/qsrimage.png)

# Removing Access to a Folder/File

## Step-by-step guide

1. Navigate to the Folder/File and click on **Share**.  
    [![image.png](https://bookstack.pbr.org.au/uploads/images/gallery/2022-10/scaled-1680-/XE5image.png)
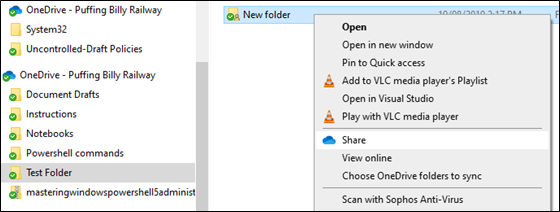
](https://bookstack.pbr.org.au/uploads/images/gallery/2022-10/XE5image.png)
2. Click the **three dots** in the top right-hand corner and select ****Manage Access.**** [![image.png](https://bookstack.pbr.org.au/uploads/images/gallery/2022-10/scaled-1680-/kDpimage.png)
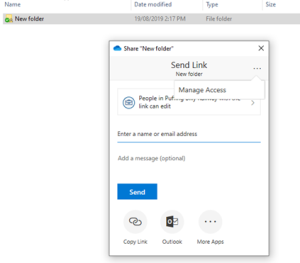
](https://bookstack.pbr.org.au/uploads/images/gallery/2022-10/kDpimage.png)
3. Click on the **X** to remove access to the folder/file.
    
    This will remove access to all users you have shared the folder/file with. If you wish to remove only certain users, you will need to do this in the web version of OneDrive. Please see <u>**[Removing Access to a File (Web)](https://confluence.pbr.org.au/pages/viewpage.action?pageId=2097484).**</u>
    
    [![image.png](https://bookstack.pbr.org.au/uploads/images/gallery/2022-10/scaled-1680-/rWmimage.png)
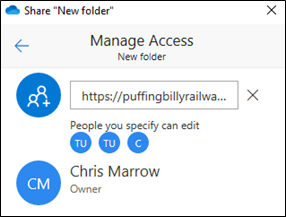
](https://bookstack.pbr.org.au/uploads/images/gallery/2022-10/rWmimage.png)

# Sharing Folders & Files

## Step-by-step guide

1. Navigate to the folder/file you wish to share, right click the folder/file and click on ****Share.**** [![image.png](https://bookstack.pbr.org.au/uploads/images/gallery/2022-10/scaled-1680-/zo9image.png)
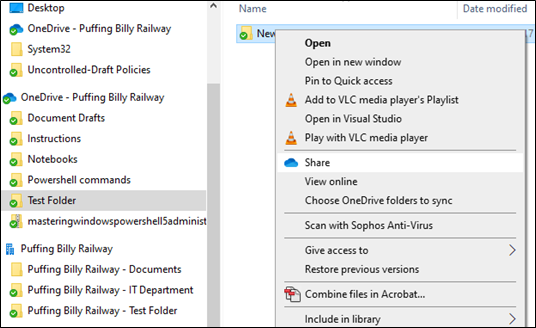
](https://bookstack.pbr.org.au/uploads/images/gallery/2022-10/zo9image.png)
2. Select who you would like to have access to the folder/file.  
    [![image.png](https://bookstack.pbr.org.au/uploads/images/gallery/2022-10/scaled-1680-/Fvbimage.png)
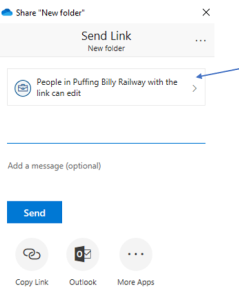
](https://bookstack.pbr.org.au/uploads/images/gallery/2022-10/Fvbimage.png)
3. For example, if you wish to share the folder/file with only specific users you can select **Specific people**. By default, the user will have editing access. Untick **Allow editing** if you wish the user/s to only have read access. Click **Apply** when done.  
    [![image.png](https://bookstack.pbr.org.au/uploads/images/gallery/2022-10/scaled-1680-/NbFimage.png)
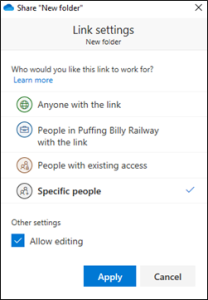
](https://bookstack.pbr.org.au/uploads/images/gallery/2022-10/NbFimage.png)
4. Enter in the user’s name and click **Send**. The user will receive an email letting them know they now have access to the folder/file.
    
    <p class="callout info">If you share a folder it will share all folders and files within that folder. You will need to do each folder or file individually if you only want certain items to be shared.</p>