# Capacity Management

Operational guides for managing Belgrave-Gembrook services in CustomLinc.

# Capacity Overview & Quick Reference

## Key Concepts: Manifests and Legs

In CustomLinc, a **manifest** represents the overall service (e.g. the 11:00 Bel-Lak-Gem / 15:05 Gem-Lak-Bel service). It appears as a **green highlighted row** in the Manifests view. Within each manifest, individual **legs** represent each segment of that journey — for example, Belgrave to Lakeside, or Lakeside to Gembrook. Legs appear as indented grey rows beneath the manifest.

[![image.png](https://bookstack.pbr.org.au/uploads/images/gallery/2026-05/scaled-1680-/5M5image.png)](https://bookstack.pbr.org.au/uploads/images/gallery/2026-05/5M5image.png)Changing capacity at the *manifest level* flows down and updates the relevant legs automatically. However, the **Belgrave – Gembrook Allocation (Return)** leg is a special product and must be adjusted separately using a different procedure.

---

## Quick Reference Guide

<table id="bkmrk-what-you-want-to-cha"><thead><tr><th>What you want to change</th><th>Where to right-click</th><th>Key settings</th><th>Extra step?</th></tr></thead><tbody><tr><td>All Return service (Excl. Bel-Gmb) or single-journey capacity  
  
</td><td>Green manifest row</td><td>Set max Pax to…</td><td>No — legs update automatically</td></tr><tr><td>Belgrave–Gembrook Return capacity  
*(typically 56)*</td><td>Belgrave – Gembrook Allocation (Return) leg row</td><td>Set max Pax to… **and** Set Allocation on Allocation Groups</td><td>Yes — set Allocation Group to match</td></tr></tbody></table>

---

## Maintenance Notes

- Review and update capacities whenever rolling stock or service configurations change.
- Always verify leg capacity figures after making changes to confirm they have applied correctly.

# Adjusting the Train Capacity (Manifest)

## Overview

Use this procedure to change the capacity for general and single-journey passengers. This affects the four main legs: Belgrave–Lakeside, Lakeside–Gembrook, Gembrook–Lakeside, and Lakeside–Belgrave.

[![image.png](https://bookstack.pbr.org.au/uploads/images/gallery/2026-05/scaled-1680-/moKimage.png)](https://bookstack.pbr.org.au/uploads/images/gallery/2026-05/moKimage.png)

 **Do not manually edit these individual legs** — changing the manifest will update them automatically.

## Steps

1. In CustomLinc, navigate to **Sightseeing &gt; Manifests**.
2. Locate the relevant service. The manifest is the **green highlighted row** showing the full journey. Individual legs appear indented beneath it.
3. **Right-click** on the green manifest row.
4. Hover over **Stop Sell / Max Pax…** and select **This Manifest**.
5. In the dialog: 
    - Set the **From** and **To** dates for the change, or use *Select Recurring Days…* to target specific days of the week.
    - Tick **Set max Pax to…** and enter the new capacity in the field to the right.
6. Click **Finish**.
7. Verify the change by reviewing the four leg rows beneath the manifest — their capacity figures should now reflect the updated value.

## Important Notes

- <p class="callout info">Always right-click on the **green manifest row**, not an individual leg. Right-clicking a leg will only modify that single leg &amp; will stop that leg getting updated max capacities via the manifest.</p>

---

## Belgrave – Gembrook Return Management

<p class="callout danger">Adjusting the Belgrave–Gembrook Return allocation is a separate procedure. See [Adjusting the Belgrave–Gembrook Return Allocation](https://bookstack.pbr.org.au/books/capacity-management/page/adjusting-the-belgrave-gembrook-return-allocation).</p>

# Adjusting the Belgrave–Gembrook Return Allocation

## Overview

Use this procedure to change the capacity for the **Belgrave – Gembrook Return** allocation — the full return journey product, typically set to 56 seats.

[![image.png](https://bookstack.pbr.org.au/uploads/images/gallery/2026-06/scaled-1680-/Rpbimage.png)
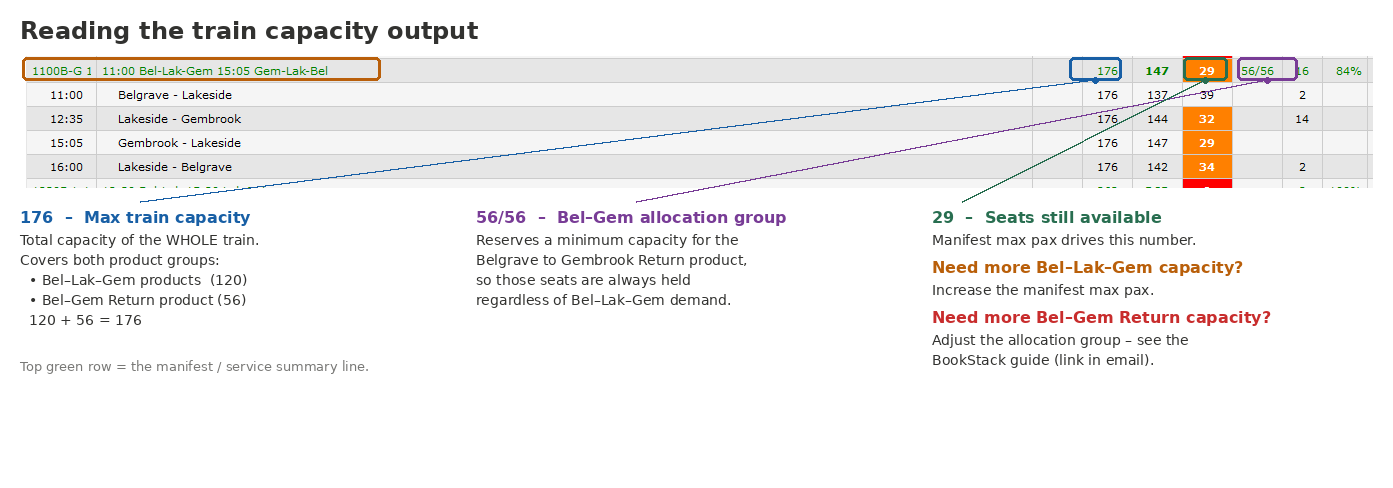
](https://bookstack.pbr.org.au/uploads/images/gallery/2026-06/Rpbimage.png)

## How Capacity is Structured

Each leg on a Belgrave–Gembrook service has a total capacity of **176 passengers**, made up of two components:

<table id="bkmrk-componentcapacitynot" style="width:100%;height:219.969px;"><thead><tr style="height:29.7969px;"><th style="height:29.7969px;">Component</th><th style="height:29.7969px;">Capacity</th><th style="height:29.7969px;">Notes</th></tr></thead><tbody><tr style="height:113.781px;"><td style="height:113.781px;">Bel - Lak &amp; Lak - Gmb Return / single-journey passengers</td><td style="height:113.781px;">120</td><td style="height:113.781px;">Availability works is calculated as this.   
  
Max Pax of Manifest minus Gembrook Allocation Group (below)  
  
Standard is 176 - 56 (120).</td></tr><tr style="height:46.5938px;"><td style="height:46.5938px;">Belgrave – Gembrook (Return)</td><td style="height:46.5938px;">56</td><td style="height:46.5938px;"><span style="text-decoration:underline;">Minimum seats held via Allocation Group (inside Manifest),</span>  
  
<span style="text-decoration:underline;">Maximum bookings available limited by product.</span></td></tr><tr style="height:29.7969px;"><td style="height:29.7969px;">**Total per leg**</td><td style="height:29.7969px;">**176**</td><td style="height:29.7969px;"> </td></tr></tbody></table>

##   
To edit the maximum available of ticket for Belgrave - Gembrook Return product.

1. Go to **Sightseeing** &gt; **Availability**
2. Find you're the **Belgrave - Gembrook Return** product
3. Right Click &gt; **Stop Sell/Max Pax**
4. Change **Product Max Pax** to new amount.   
    [![image.png](https://bookstack.pbr.org.au/uploads/images/gallery/2026-06/scaled-1680-/i8Simage.png)](https://bookstack.pbr.org.au/uploads/images/gallery/2026-06/i8Simage.png)
5. If you also need to increase the max capacity of the train (e.g. an extra carriage has been added), go to **Sightseeing** &gt; **Manifest** and change the **Manfiest max pax** to the appropriate number.   
      
    [![image.png](https://bookstack.pbr.org.au/uploads/images/gallery/2026-06/scaled-1680-/m8Pimage.png)](https://bookstack.pbr.org.au/uploads/images/gallery/2026-06/m8Pimage.png)

## To edit the HELD amount of pax for the Belgrave - Gembrook product.  


1. Complete the above guide as well to increase the product availability first. Then:
2. In **Sightseeing &gt; Manifests**, locate the relevant manifest.
3. **Right-click** on the manifest &gt; **Stop Sell**/**Max Pax** &gt; **This Manifest**  
    [![image.png](https://bookstack.pbr.org.au/uploads/images/gallery/2026-06/scaled-1680-/BBHimage.png)](https://bookstack.pbr.org.au/uploads/images/gallery/2026-06/BBHimage.png)
4. In the dialog: 
    - Set the **From** and **To** date range, or use *Select Recurring Days…* as needed.
    - Tick **Set Allocation on Allocation Groups** - this is critical and must not be skipped.  
          
        [![image.png](https://bookstack.pbr.org.au/uploads/images/gallery/2026-06/scaled-1680-/kUlimage.png)](https://bookstack.pbr.org.au/uploads/images/gallery/2026-06/kUlimage.png)
5. Click **Finish**. The Allocation Groups screen will appear.
6. On the Allocation Groups screen, find **Belgrave to Gembrook Return** and set its **Allocation** to the HELD amount of seats for this type of product.   
    [![image.png](https://bookstack.pbr.org.au/uploads/images/gallery/2026-05/scaled-1680-/jySimage.png)](https://bookstack.pbr.org.au/uploads/images/gallery/2026-05/jySimage.png)
7. Click **Finish** to save.
8. Change
9. Does the entire train capacity need to be increased because of this?  
    If yes, please also adjust the manifest accordingly — see the *Adjusting the Main Manifest Capacity* guide.  
    An example of this would be an **extra** carriage being added to the carriage set specifically for Bel-Gmb.

## Important Notes

- <p class="callout info">The **"Set Allocation on Allocation Groups"** checkbox must always be ticked when changing this leg. Skipping it will cause a mismatch between the max Pax limit and the reserved seat allocation, which may result in overbooking.</p>
- Only update the **Belgrave to Gembrook Return** allocation group. Leave *Gembrook to Belgrave* blank unless specifically instructed otherwise.
- This leg's capacity does **not** change automatically when you adjust the main manifest — both procedures must be performed independently if both values need updating.

# Creating a Special Guest Pass Booking

1. Go to Add Booking &gt; Make a Standard Booking  
    [![image.png](https://bookstack.pbr.org.au/uploads/images/gallery/2026-06/scaled-1680-/image.png)
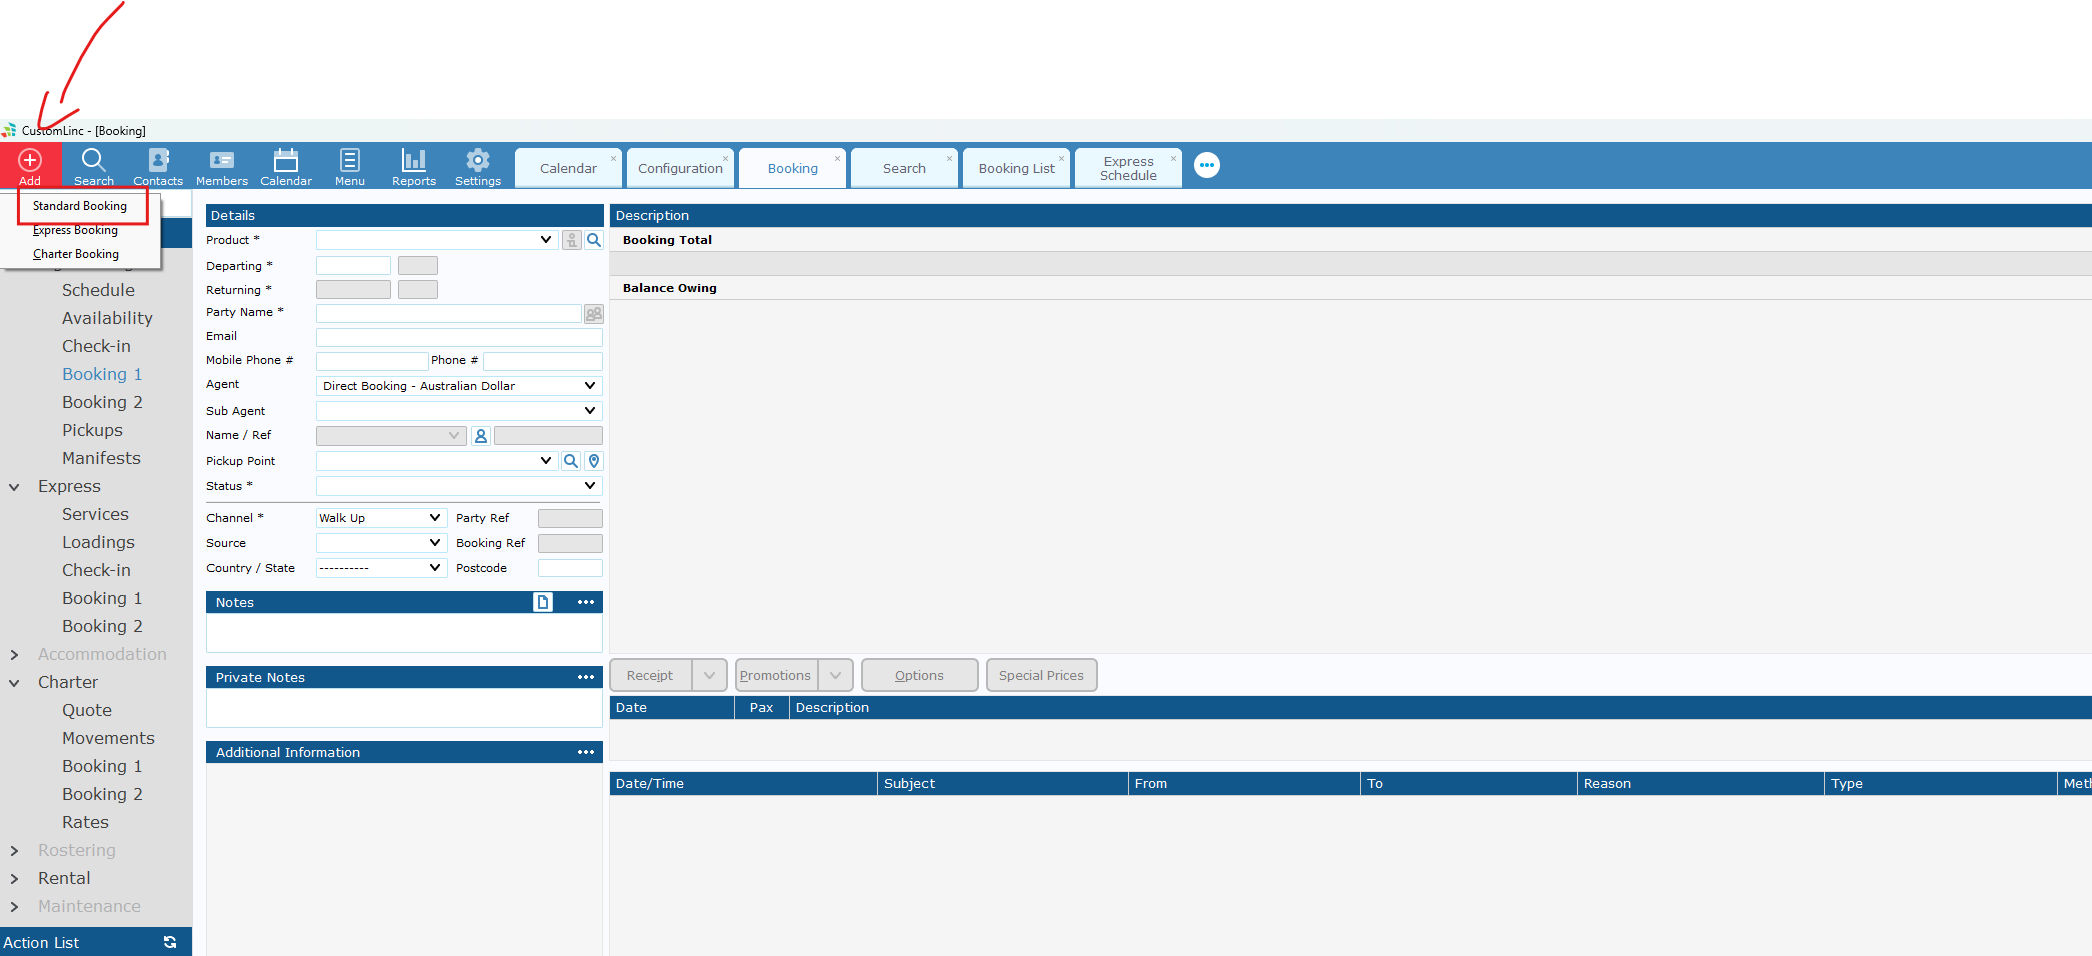
](https://bookstack.pbr.org.au/uploads/images/gallery/2026-06/image.png)
2. Select the applicable SGP product, if unsure consult with team.   
    [![image.png](https://bookstack.pbr.org.au/uploads/images/gallery/2026-06/scaled-1680-/ZiXimage.png)
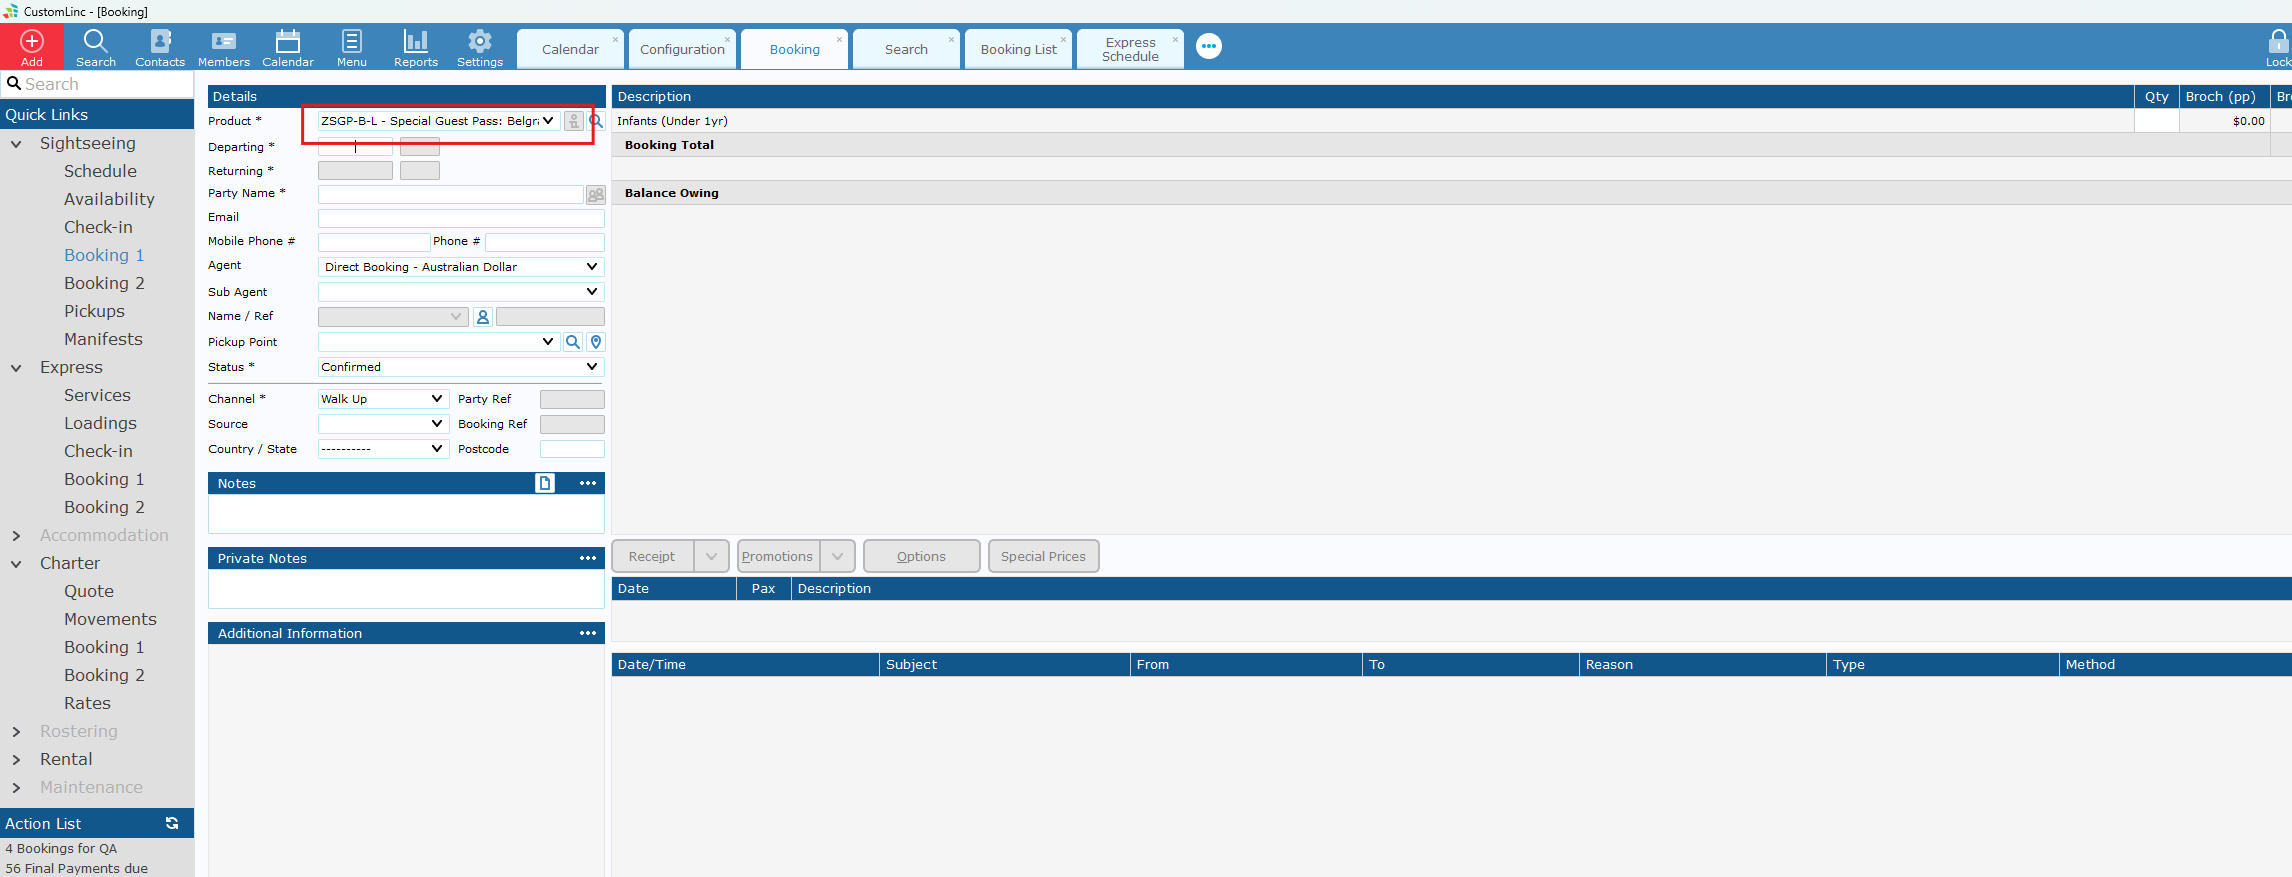
](https://bookstack.pbr.org.au/uploads/images/gallery/2026-06/ZiXimage.png)
3. The departure date is the Expiry date of the booking/voucher.   
      
    <span style="text-decoration:underline;">If you do not set a date, it will **default** to **1 Year** in the future. </span>  
      
    [![image.png](https://bookstack.pbr.org.au/uploads/images/gallery/2026-06/scaled-1680-/rbVimage.png)
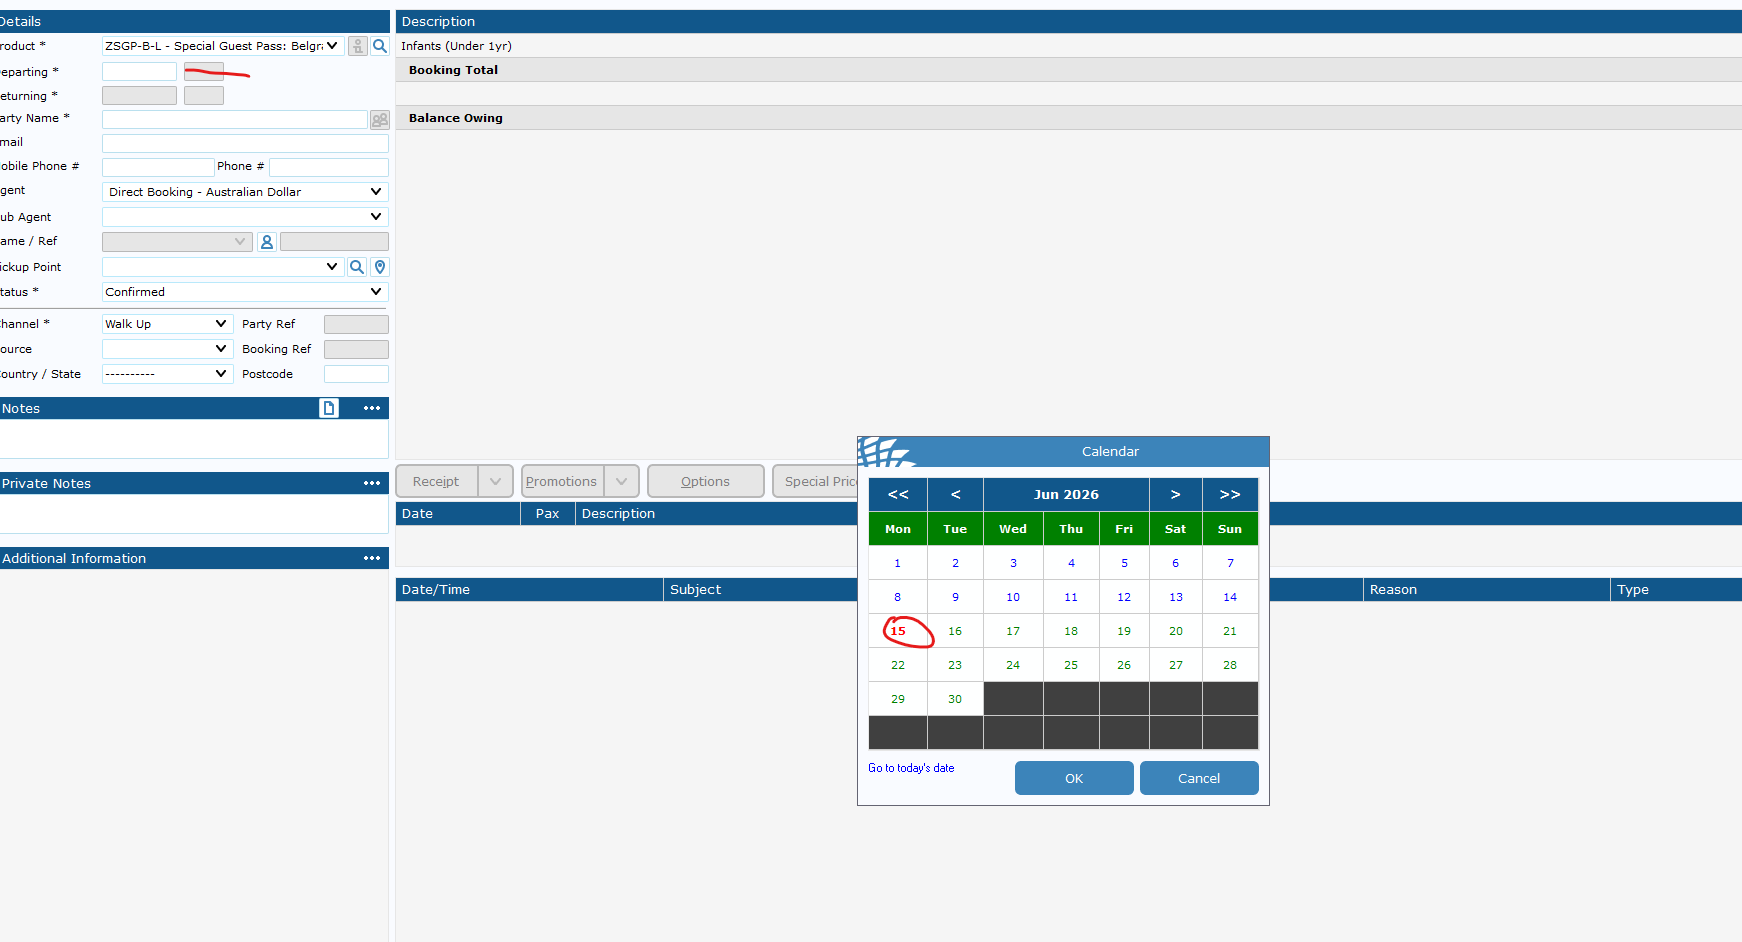
](https://bookstack.pbr.org.au/uploads/images/gallery/2026-06/rbVimage.png)
4. Input booking details &amp; fare amounts.   
    [![image.png](https://bookstack.pbr.org.au/uploads/images/gallery/2026-06/scaled-1680-/Eerimage.png)](https://bookstack.pbr.org.au/uploads/images/gallery/2026-06/Eerimage.png)
5. The Default Status should be "Voucher confirmed". If it is not please set it to this and contact system configurators to fix.   
      
    [![image.png](https://bookstack.pbr.org.au/uploads/images/gallery/2026-07/scaled-1680-/image.png)](https://bookstack.pbr.org.au/uploads/images/gallery/2026-07/image.png)
6. If you need Special Fares like Free of Charge (FOC). Click update without placing in any fares. You will see a prompt to enter special fares - Click Yes.   
    [![image.png](https://bookstack.pbr.org.au/uploads/images/gallery/2026-06/scaled-1680-/kjuimage.png)](https://bookstack.pbr.org.au/uploads/images/gallery/2026-06/kjuimage.png)
7. Enter amount and reason.   
    [![image.png](https://bookstack.pbr.org.au/uploads/images/gallery/2026-06/scaled-1680-/kDTimage.png)](https://bookstack.pbr.org.au/uploads/images/gallery/2026-06/kDTimage.png)
8. Send **Confirmation to Client** to email in booking, or required address  
    [![image.png](https://bookstack.pbr.org.au/uploads/images/gallery/2026-07/scaled-1680-/Rp6image.png)](https://bookstack.pbr.org.au/uploads/images/gallery/2026-07/Rp6image.png)
    
      
    If you need to send to a different email address, place the email in the alternate email address area and make sure the button to the left is ticked.   
    [![image.png](https://bookstack.pbr.org.au/uploads/images/gallery/2026-07/scaled-1680-/rLIimage.png)](https://bookstack.pbr.org.au/uploads/images/gallery/2026-07/rLIimage.png)
9. Click finish and it will queue an email to be sent - this should be sent within 5 minutes or so.

# How to Redeem a SGP or Gift Voucher Booking

1. Request for the Reference number on their confirmation email &amp; Use CL Search to find the booking  
    [![image.png](https://bookstack.pbr.org.au/uploads/images/gallery/2026-06/scaled-1680-/FpPimage.png)
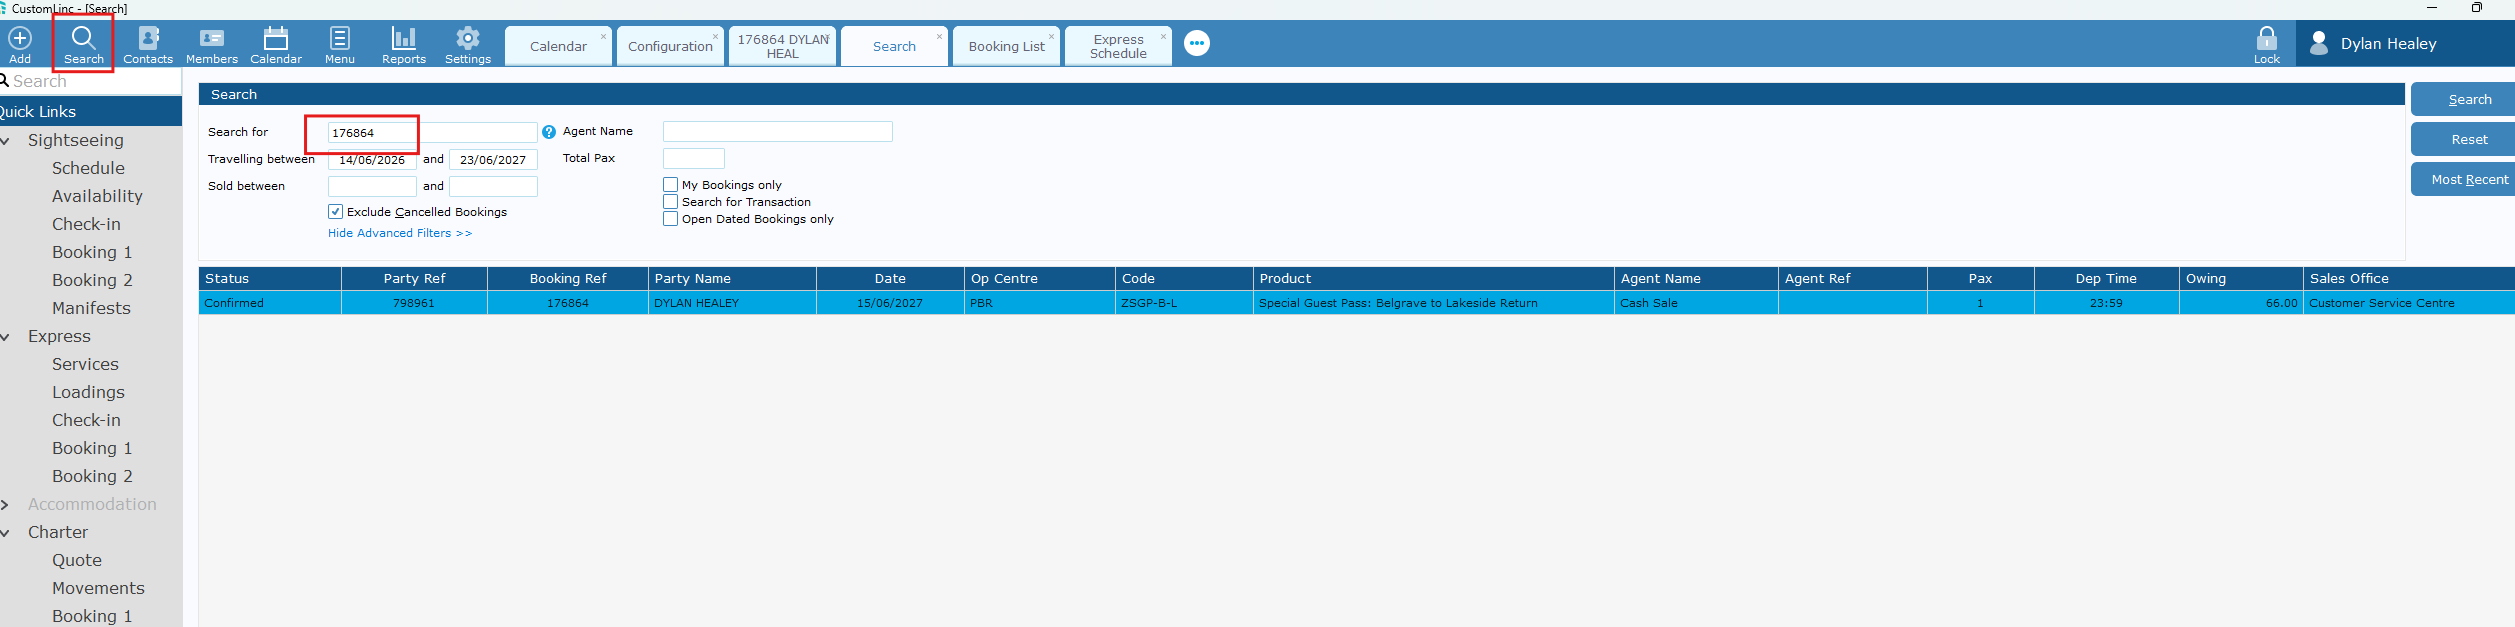
](https://bookstack.pbr.org.au/uploads/images/gallery/2026-06/FpPimage.png)
2. Confirm an applicable product and available date with the customer.   
    [![image.png](https://bookstack.pbr.org.au/uploads/images/gallery/2026-06/scaled-1680-/mg3image.png)
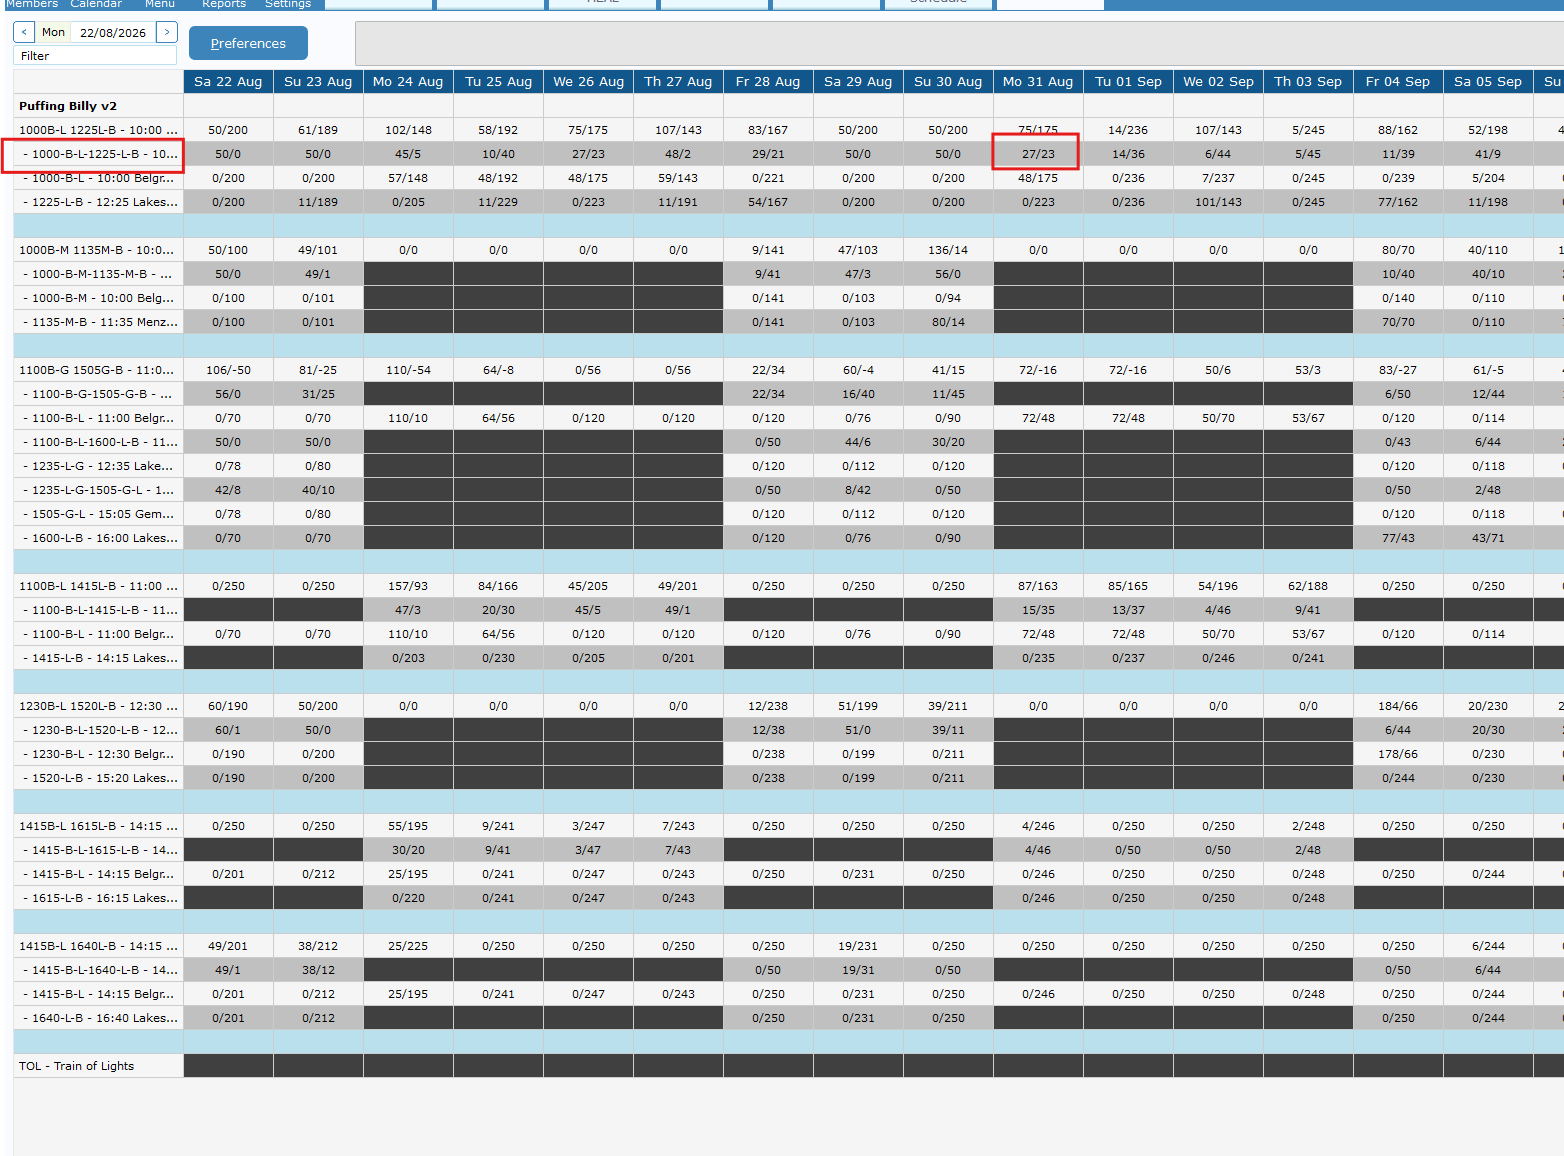
](https://bookstack.pbr.org.au/uploads/images/gallery/2026-06/mg3image.png)
3. Click edit on the booking  
    [![image.png](https://bookstack.pbr.org.au/uploads/images/gallery/2026-06/scaled-1680-/oJuimage.png)
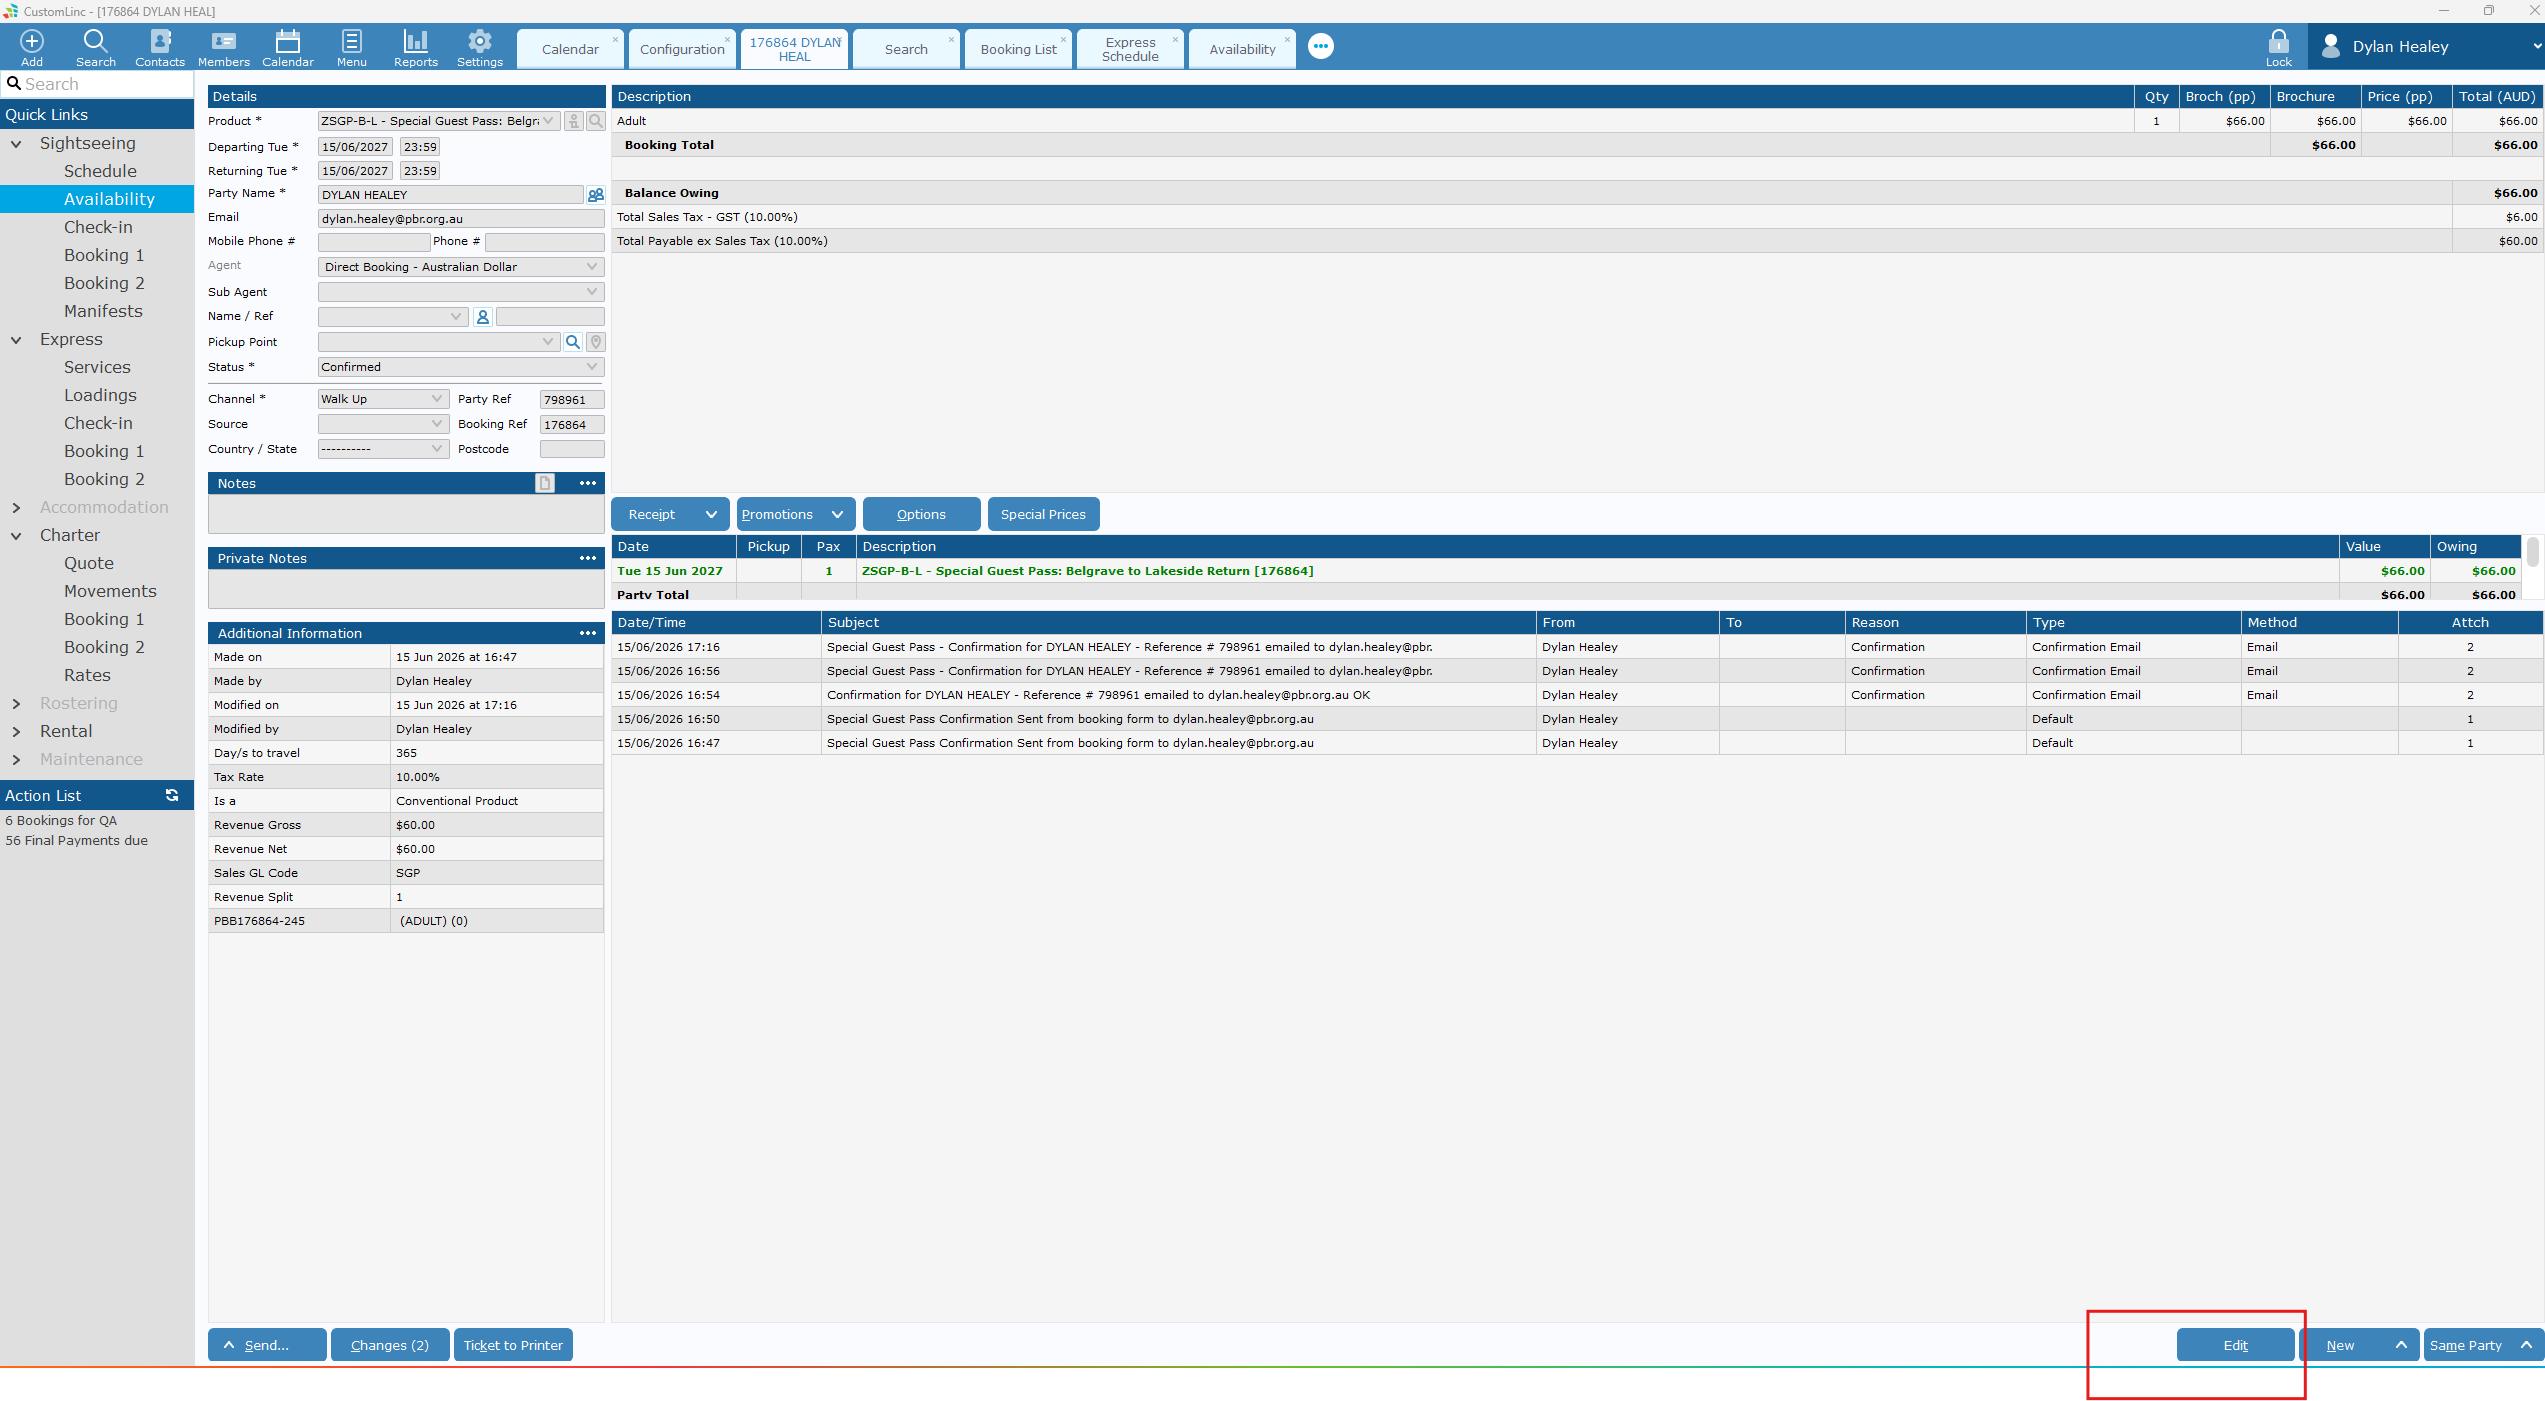
](https://bookstack.pbr.org.au/uploads/images/gallery/2026-06/oJuimage.png)
4. Change *Date* **THEN** *Product* to what was select in step 2  
      
    [![image.png](https://bookstack.pbr.org.au/uploads/images/gallery/2026-06/scaled-1680-/Svhimage.png)
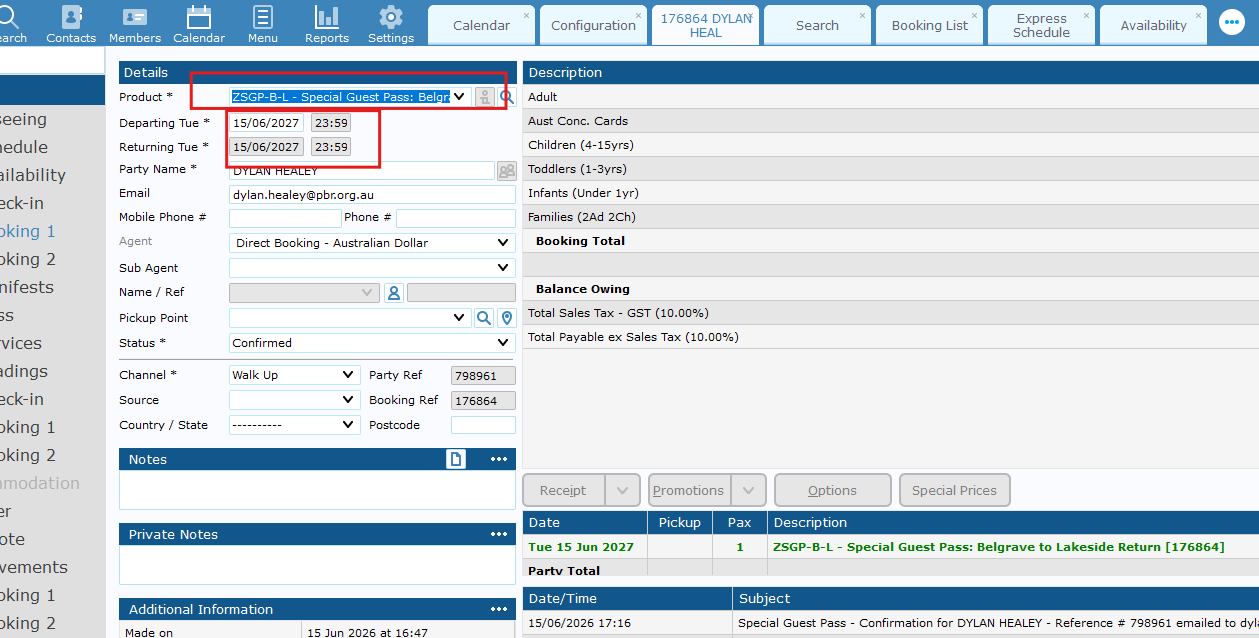
](https://bookstack.pbr.org.au/uploads/images/gallery/2026-06/Svhimage.png)
5. Change booking Details if needed to customers name, and email.
6. Click Update.
7. Go to Send &gt; Confirmation to Client.   
    [![image.png](https://bookstack.pbr.org.au/uploads/images/gallery/2026-06/scaled-1680-/hrNimage.png)
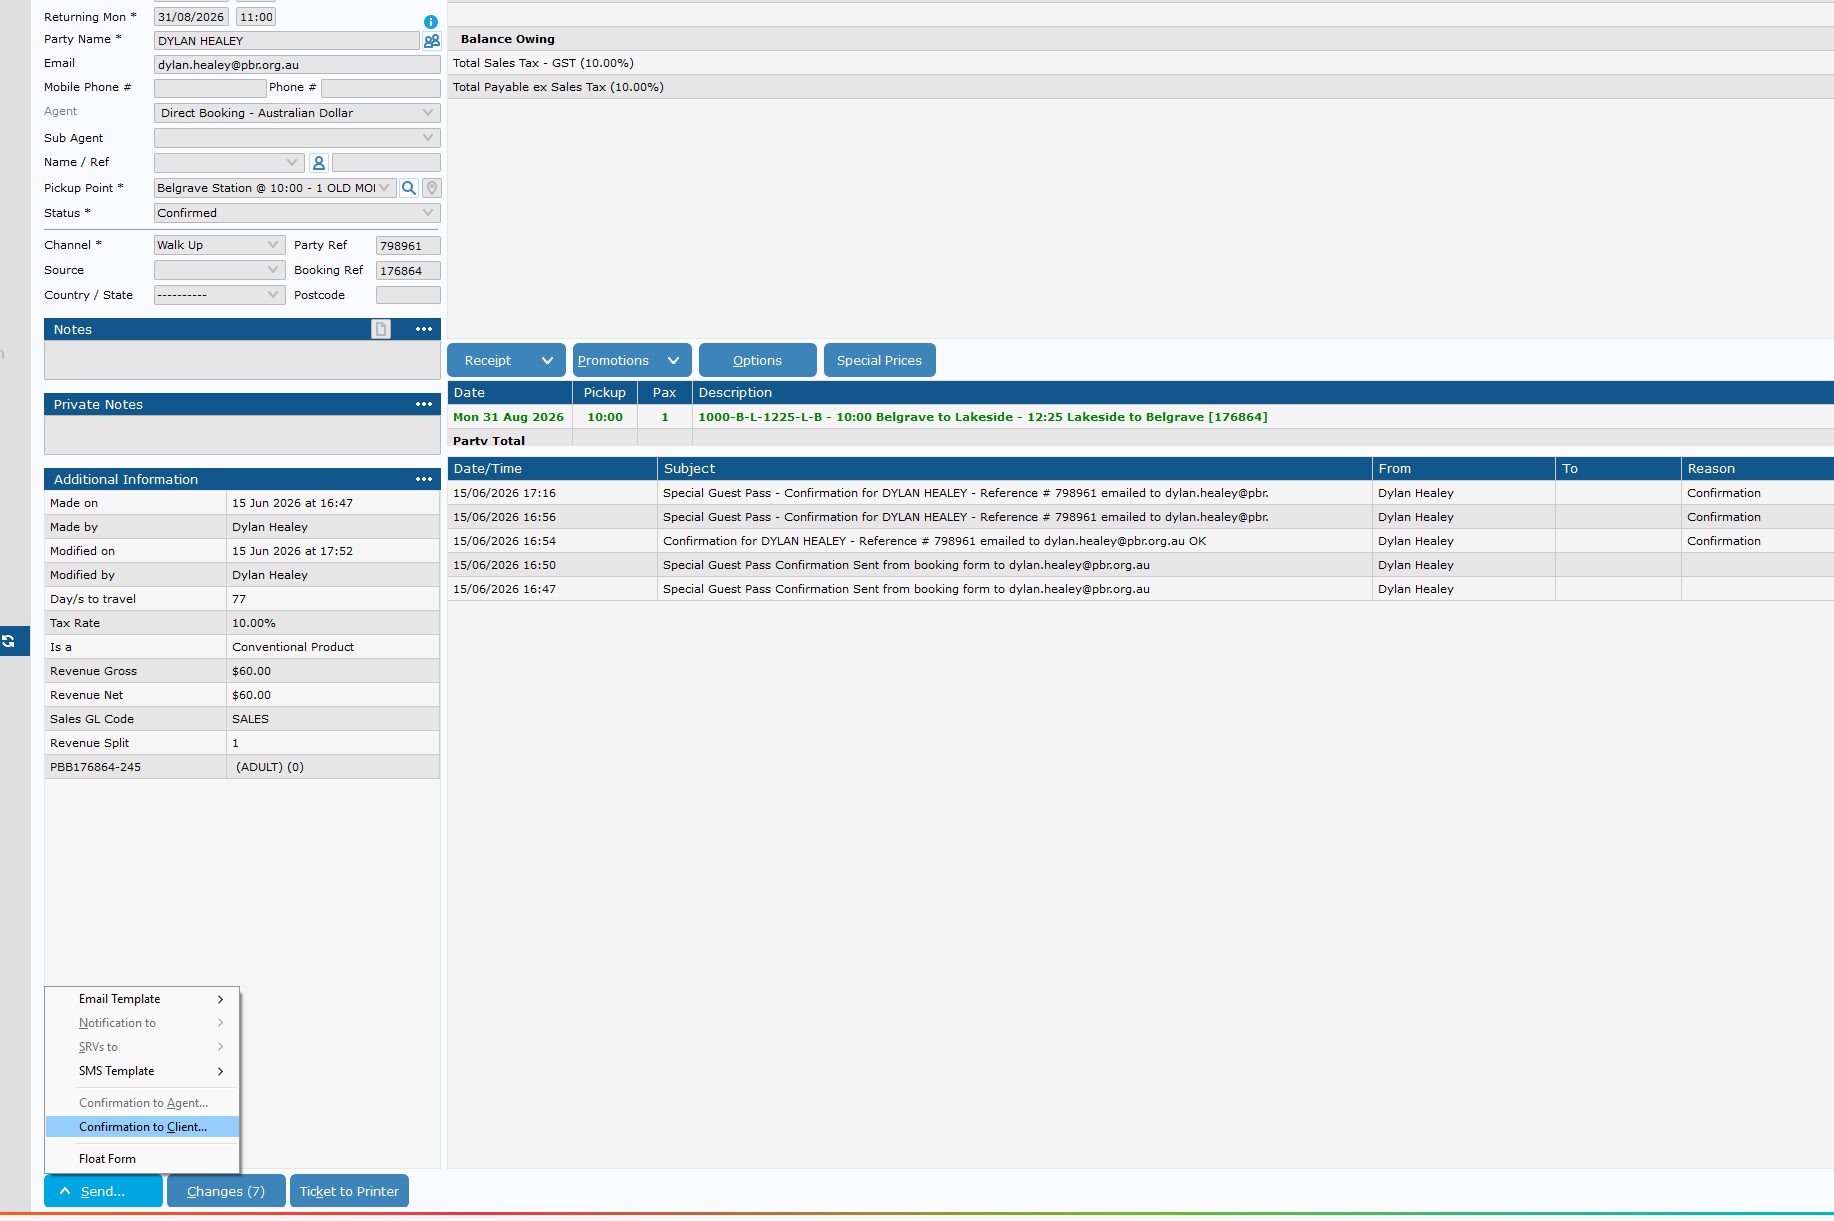
](https://bookstack.pbr.org.au/uploads/images/gallery/2026-06/hrNimage.png)