Capacity Management
Operational guides for managing Belgrave-Gembrook services in CustomLinc.
- Capacity Overview & Quick Reference
- Adjusting the Train Capacity (Manifest)
- Adjusting the Belgrave–Gembrook Return Allocation
- Creating a Special Guest Pass Booking
- How to Redeem a SGP or Gift Voucher Booking
Capacity Overview & Quick Reference
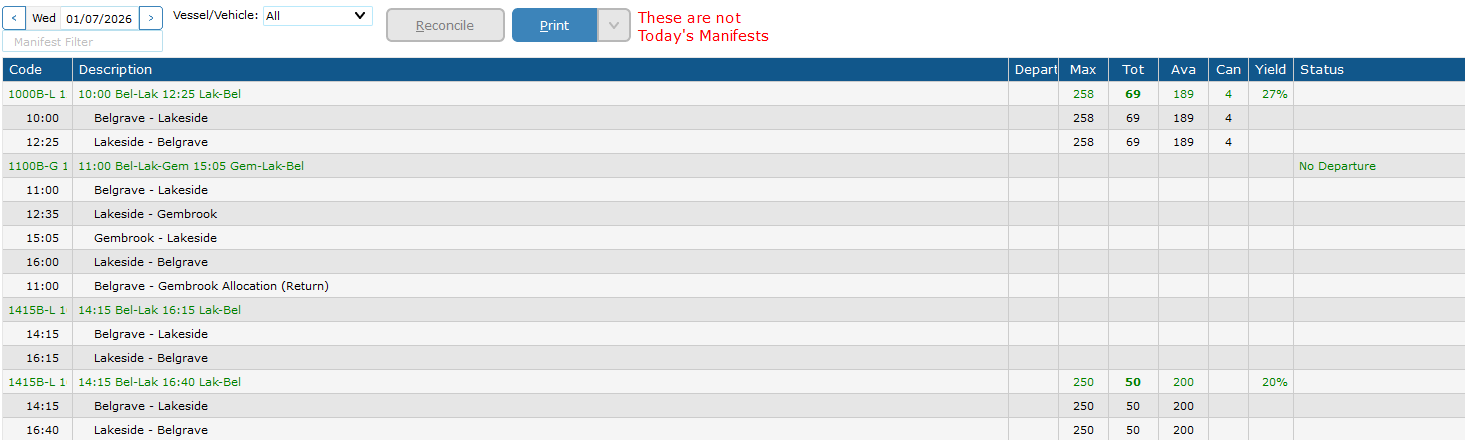
Key Concepts: Manifests and Legs
In CustomLinc, a manifest represents the overall service (e.g. the 11:00 Bel-Lak-Gem / 15:05 Gem-Lak-Bel service). It appears as a green highlighted row in the Manifests view. Within each manifest, individual legs represent each segment of that journey — for example, Belgrave to Lakeside, or Lakeside to Gembrook. Legs appear as indented grey rows beneath the manifest.
 Changing capacity at the manifest level flows down and updates the relevant legs automatically. However, the Belgrave – Gembrook Allocation (Return) leg is a special product and must be adjusted separately using a different procedure.
Quick Reference Guide
| What you want to change | Where to right-click | Key settings | Extra step? |
|---|---|---|---|
| All Return service (Excl. Bel-Gmb) or single-journey capacity |
Green manifest row | Set max Pax to… | No — legs update automatically |
| Belgrave–Gembrook Return capacity (typically 56) |
Belgrave – Gembrook Allocation (Return) leg row | Set max Pax to… and Set Allocation on Allocation Groups | Yes — set Allocation Group to match |
Maintenance Notes
- Review and update capacities whenever rolling stock or service configurations change.
- Always verify leg capacity figures after making changes to confirm they have applied correctly.
Adjusting the Train Capacity (Manifest)
Overview
Use this procedure to change the capacity for general and single-journey passengers. This affects the four main legs: Belgrave–Lakeside, Lakeside–Gembrook, Gembrook–Lakeside, and Lakeside–Belgrave.
Do not manually edit these individual legs — changing the manifest will update them automatically.
Steps
Important Notes
-
Always right-click on the green manifest row, not an individual leg. Right-clicking a leg will only modify that single leg & will stop that leg getting updated max capacities via the manifest.
Belgrave – Gembrook Return Management
Adjusting the Belgrave–Gembrook Return allocation is a separate procedure. See Adjusting the Belgrave–Gembrook Return Allocation.
Adjusting the Belgrave–Gembrook Return Allocation
Overview
Use this procedure to change the capacity for the Belgrave – Gembrook Return allocation — the full return journey product, typically set to 56 seats.
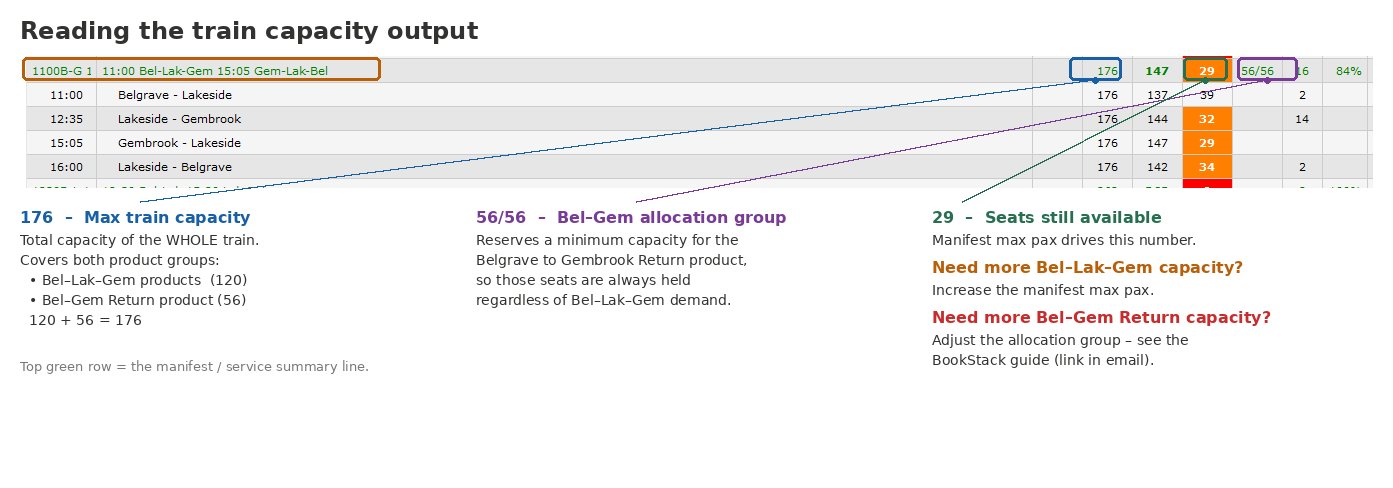
How Capacity is Structured
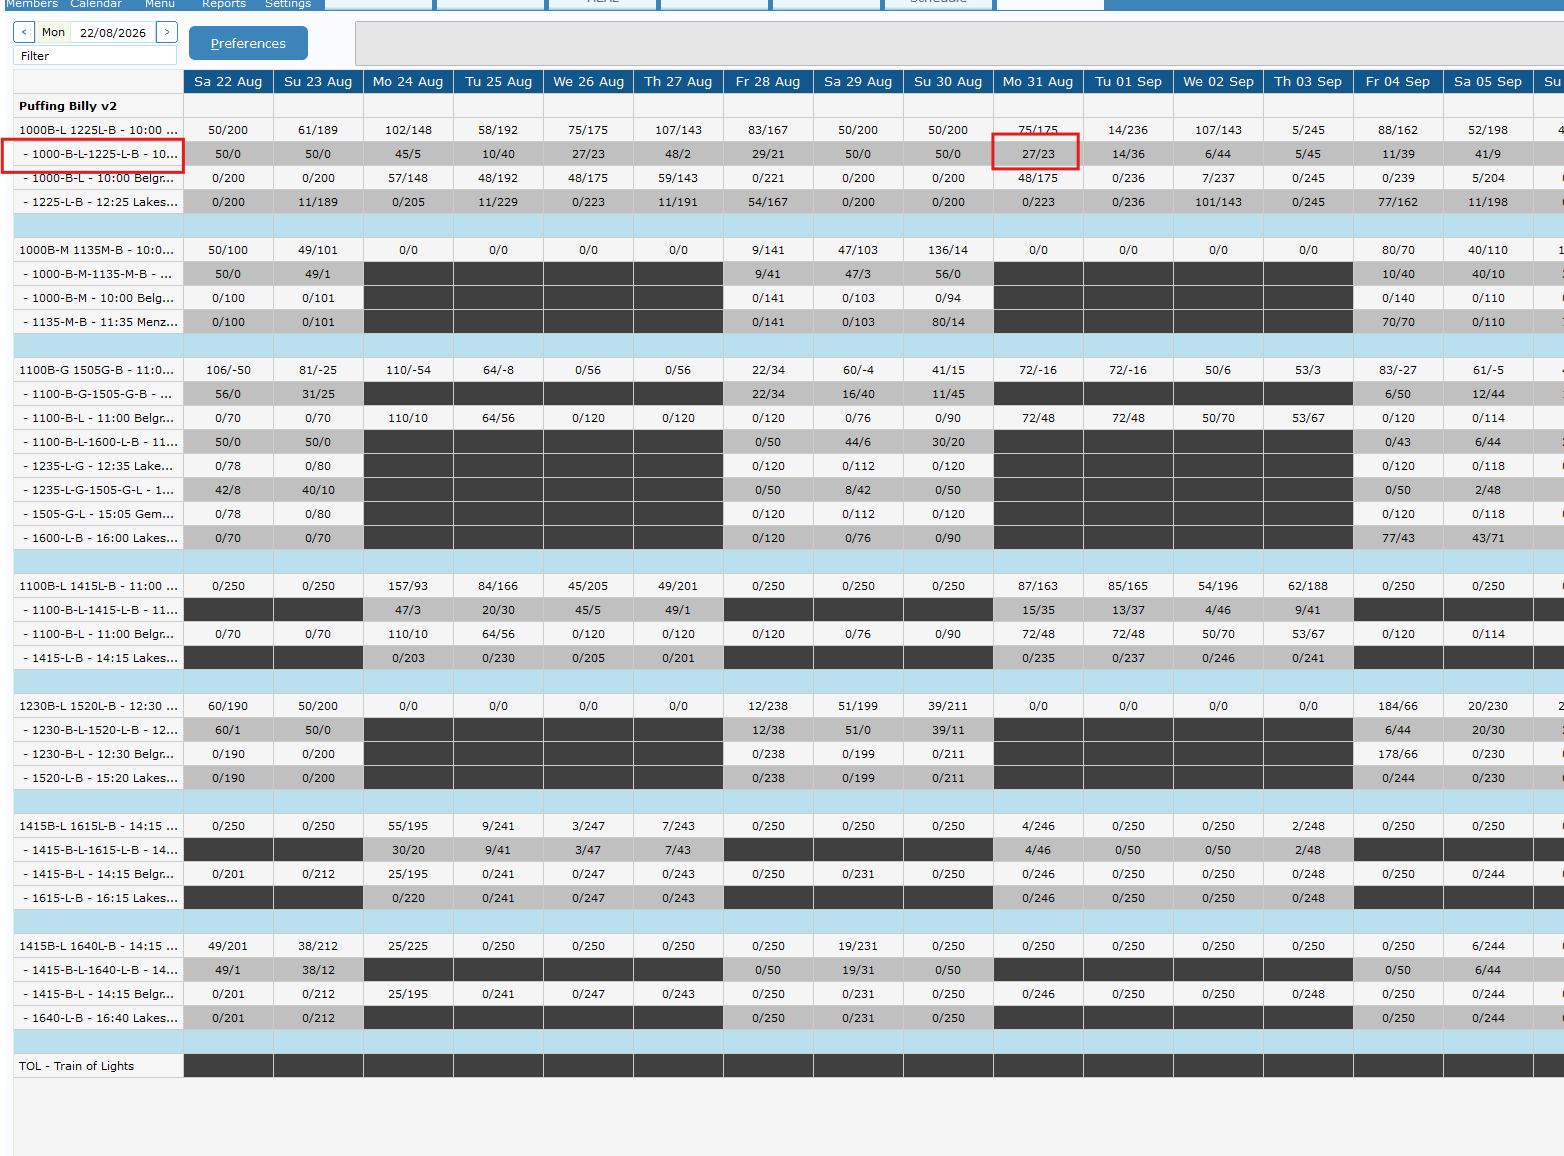
Each leg on a Belgrave–Gembrook service has a total capacity of 176 passengers, made up of two components:
| Component | Capacity | Notes |
|---|---|---|
| Bel - Lak & Lak - Gmb Return / single-journey passengers | 120 | Availability works is calculated as this. Max Pax of Manifest minus Gembrook Allocation Group (below) Standard is 176 - 56 (120). |
| Belgrave – Gembrook (Return) | 56 | Minimum seats held via Allocation Group (inside Manifest), Maximum bookings available limited by product. |
| Total per leg | 176 |
To edit the maximum available of ticket for Belgrave - Gembrook Return product.
- Go to Sightseeing > Availability
- Find you're the Belgrave - Gembrook Return product
- Right Click > Stop Sell/Max Pax
- Change Product Max Pax to new amount.

- If you also need to increase the max capacity of the train (e.g. an extra carriage has been added), go to Sightseeing > Manifest and change the Manfiest max pax to the appropriate number.

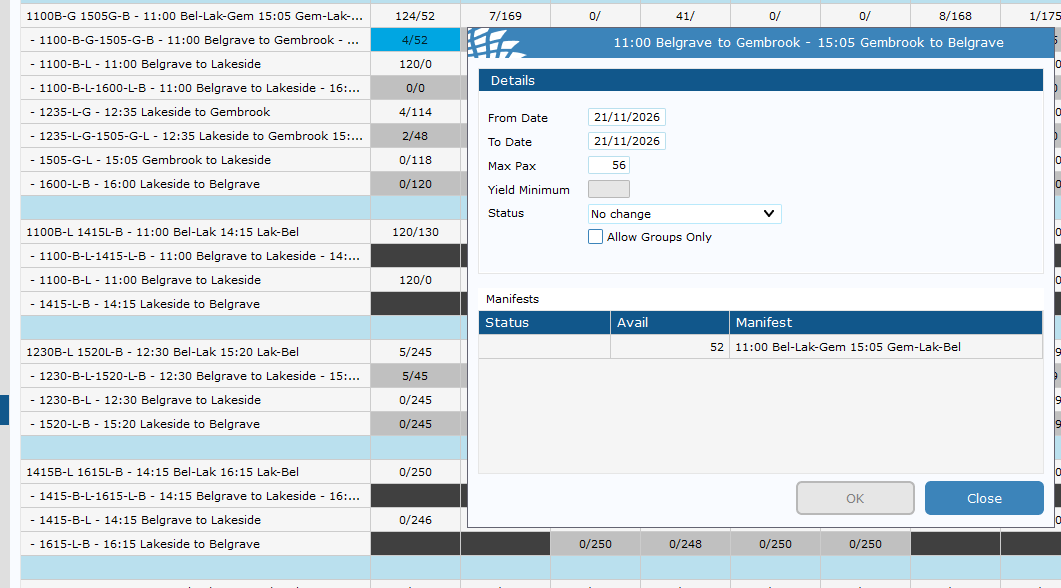
To edit the HELD amount of pax for the Belgrave - Gembrook product.
- Complete the above guide as well to increase the product availability first. Then:
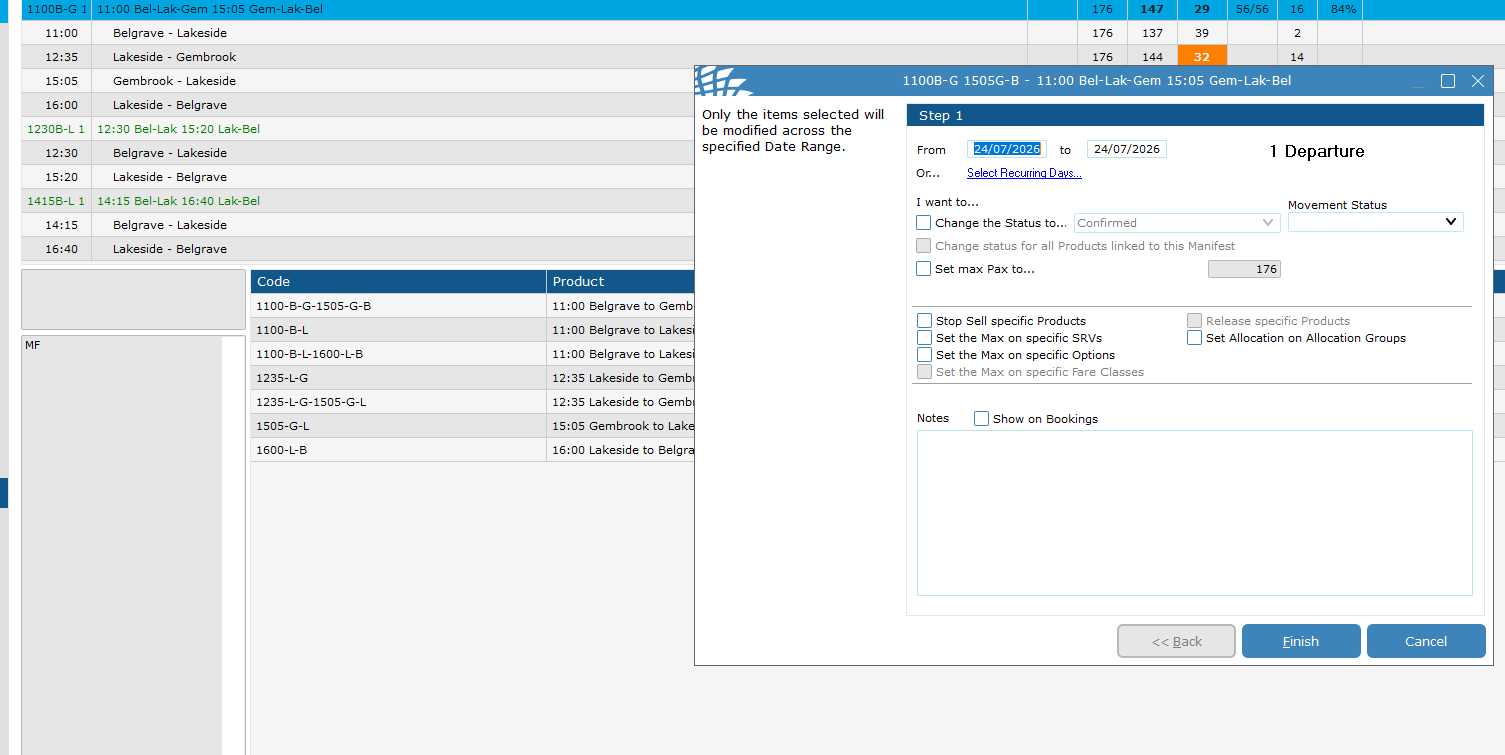
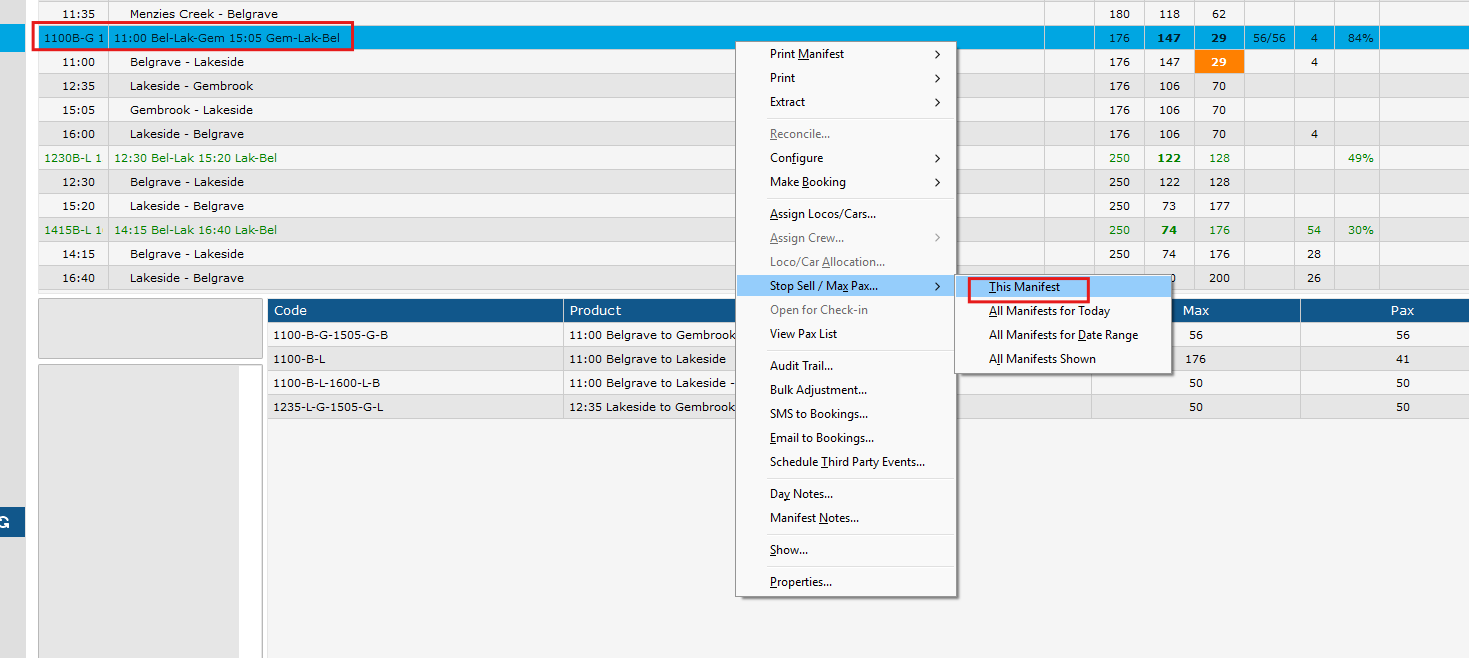
- In Sightseeing > Manifests, locate the relevant manifest.
- Right-click on the manifest > Stop Sell/Max Pax > This Manifest

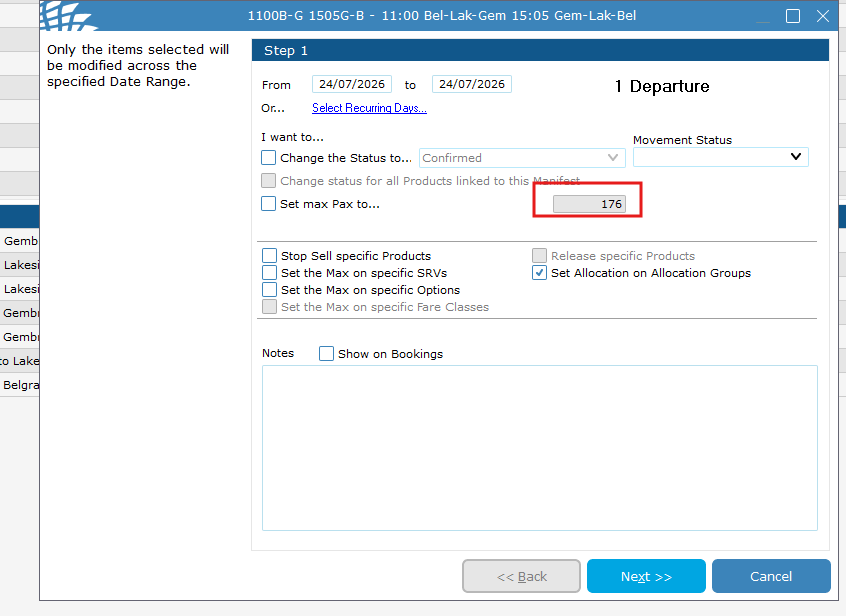
- In the dialog:
- Set the From and To date range, or use Select Recurring Days… as needed.
- Tick Set Allocation on Allocation Groups - this is critical and must not be skipped.

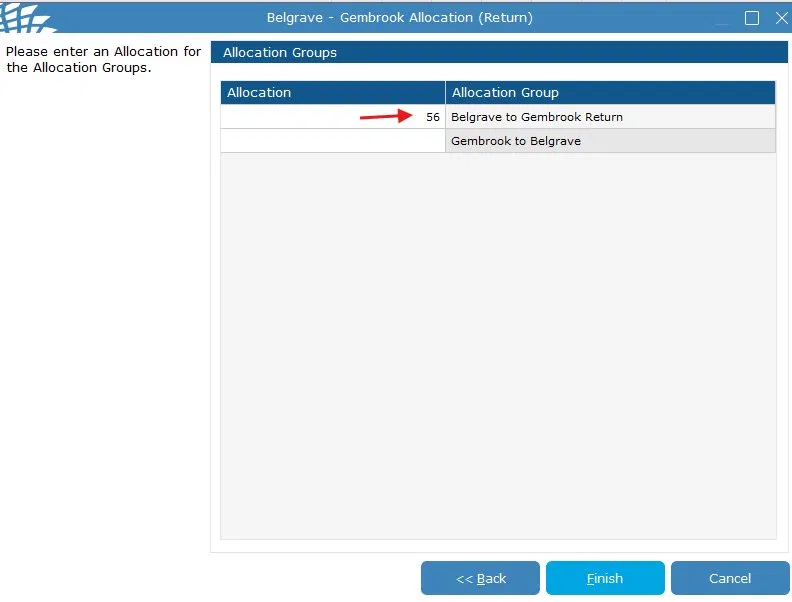
- Click Finish. The Allocation Groups screen will appear.
- On the Allocation Groups screen, find Belgrave to Gembrook Return and set its Allocation to the HELD amount of seats for this type of product.

- Click Finish to save.
- Change
- Does the entire train capacity need to be increased because of this?
If yes, please also adjust the manifest accordingly — see the Adjusting the Main Manifest Capacity guide.
An example of this would be an extra carriage being added to the carriage set specifically for Bel-Gmb.
Important Notes
-
The "Set Allocation on Allocation Groups" checkbox must always be ticked when changing this leg. Skipping it will cause a mismatch between the max Pax limit and the reserved seat allocation, which may result in overbooking.
- Only update the Belgrave to Gembrook Return allocation group. Leave Gembrook to Belgrave blank unless specifically instructed otherwise.
- This leg's capacity does not change automatically when you adjust the main manifest — both procedures must be performed independently if both values need updating.
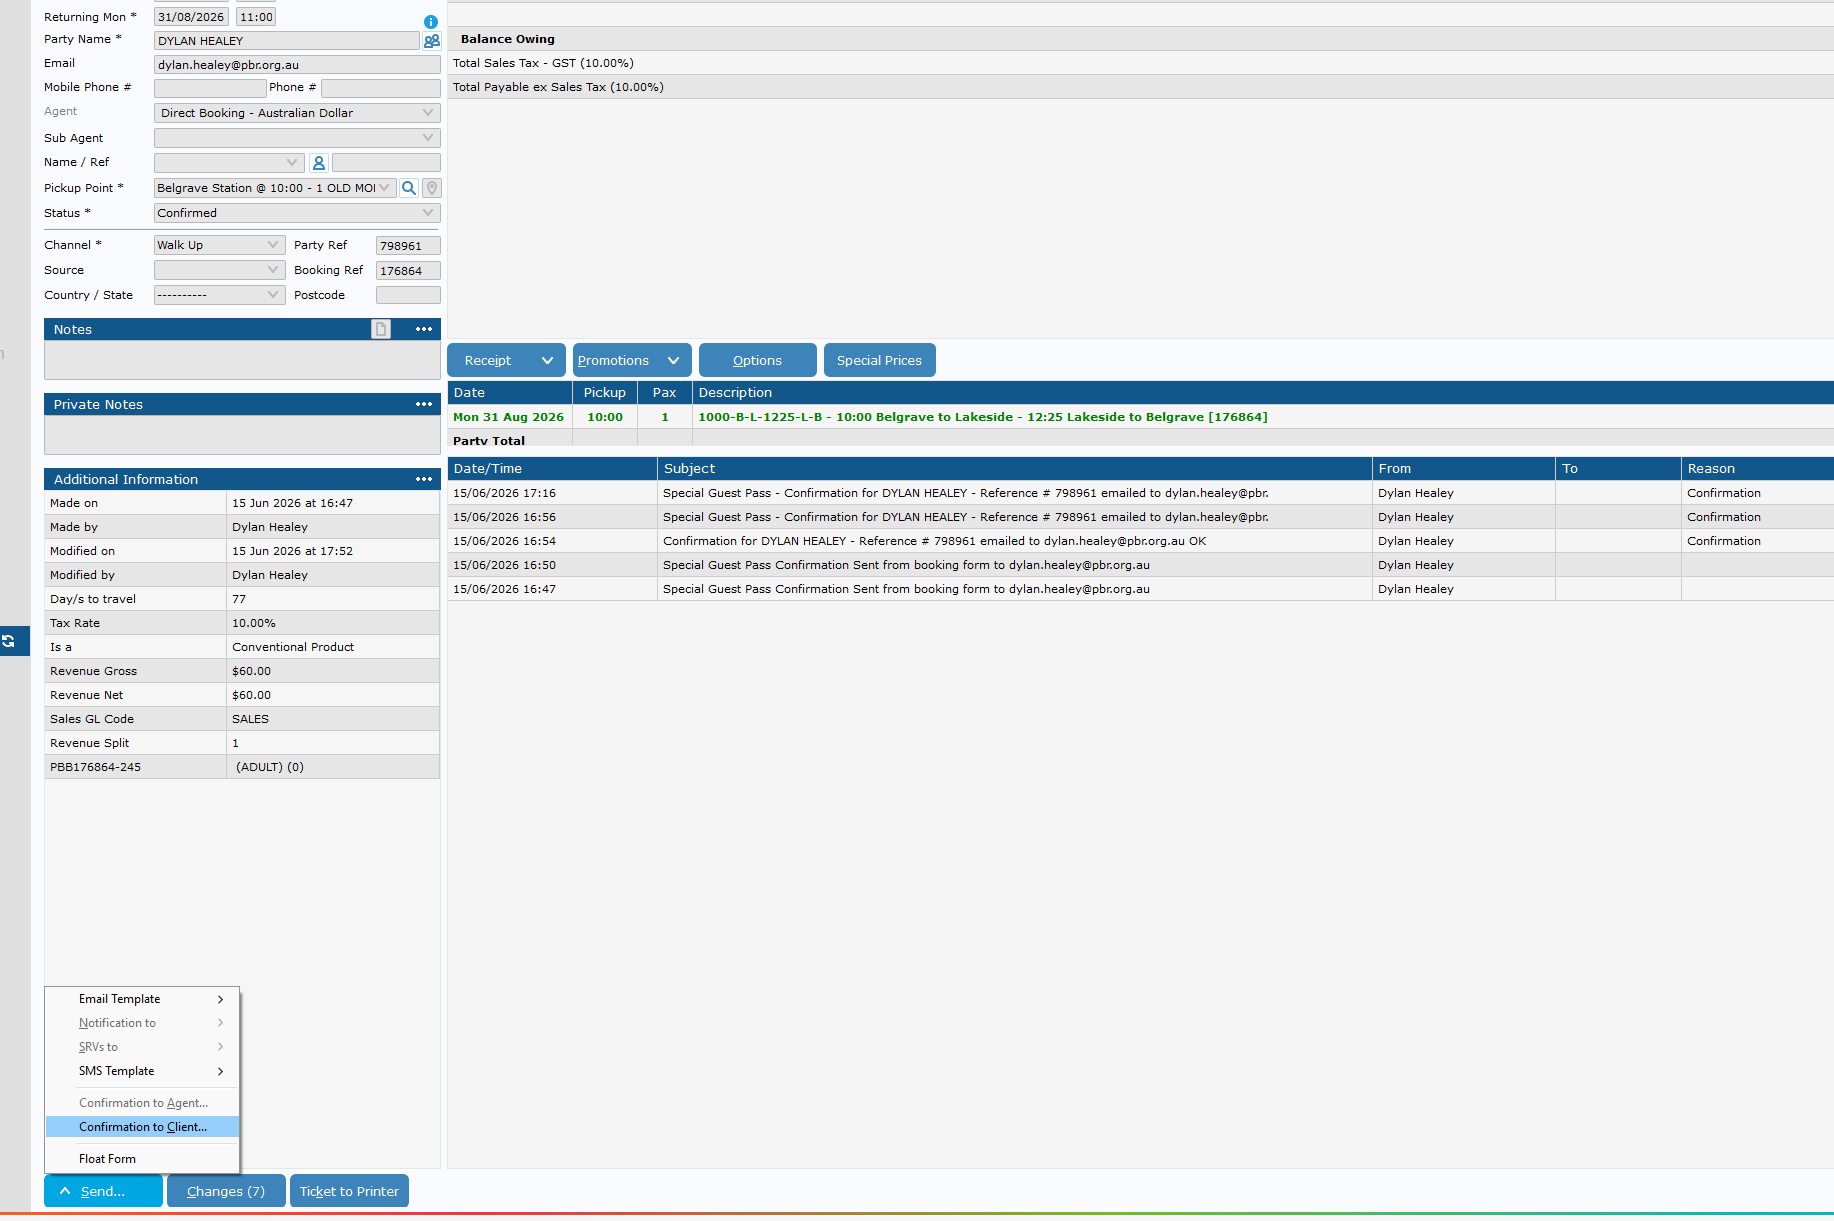
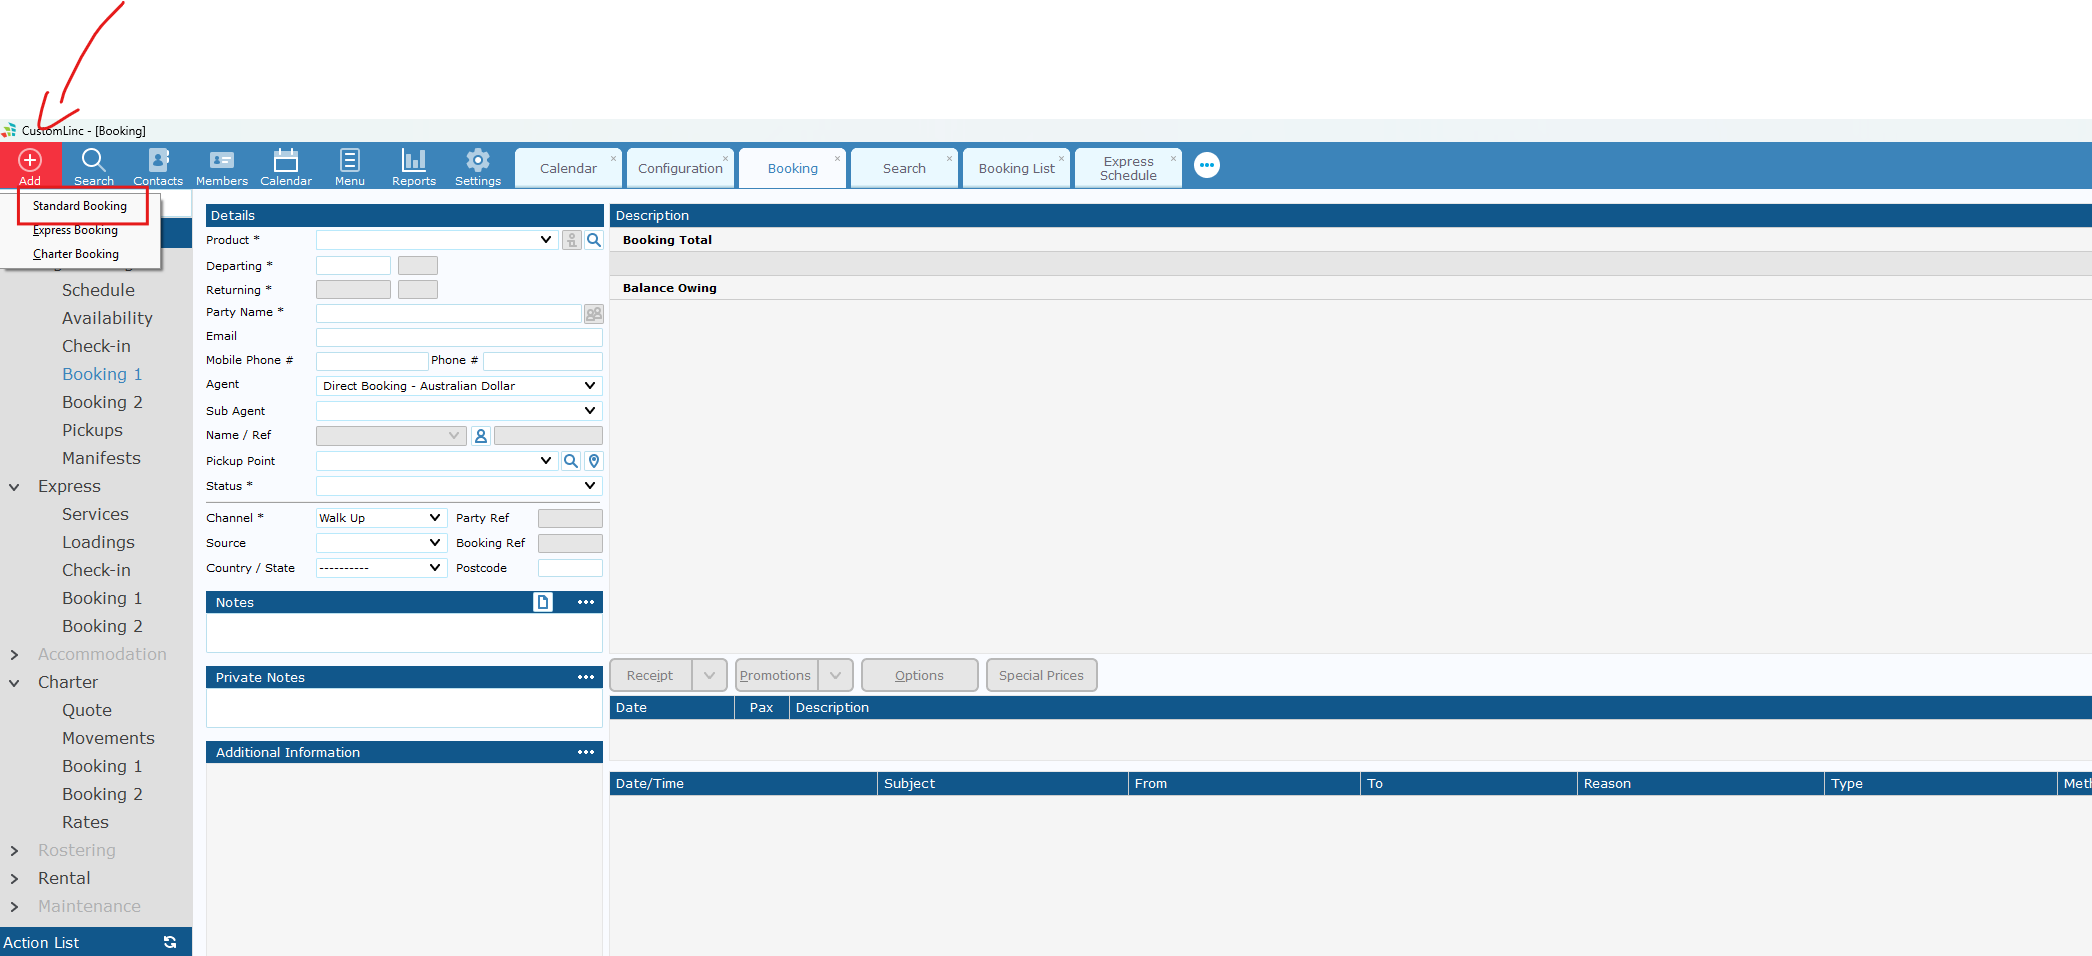
Creating a Special Guest Pass Booking
- Go to Add Booking > Make a Standard Booking

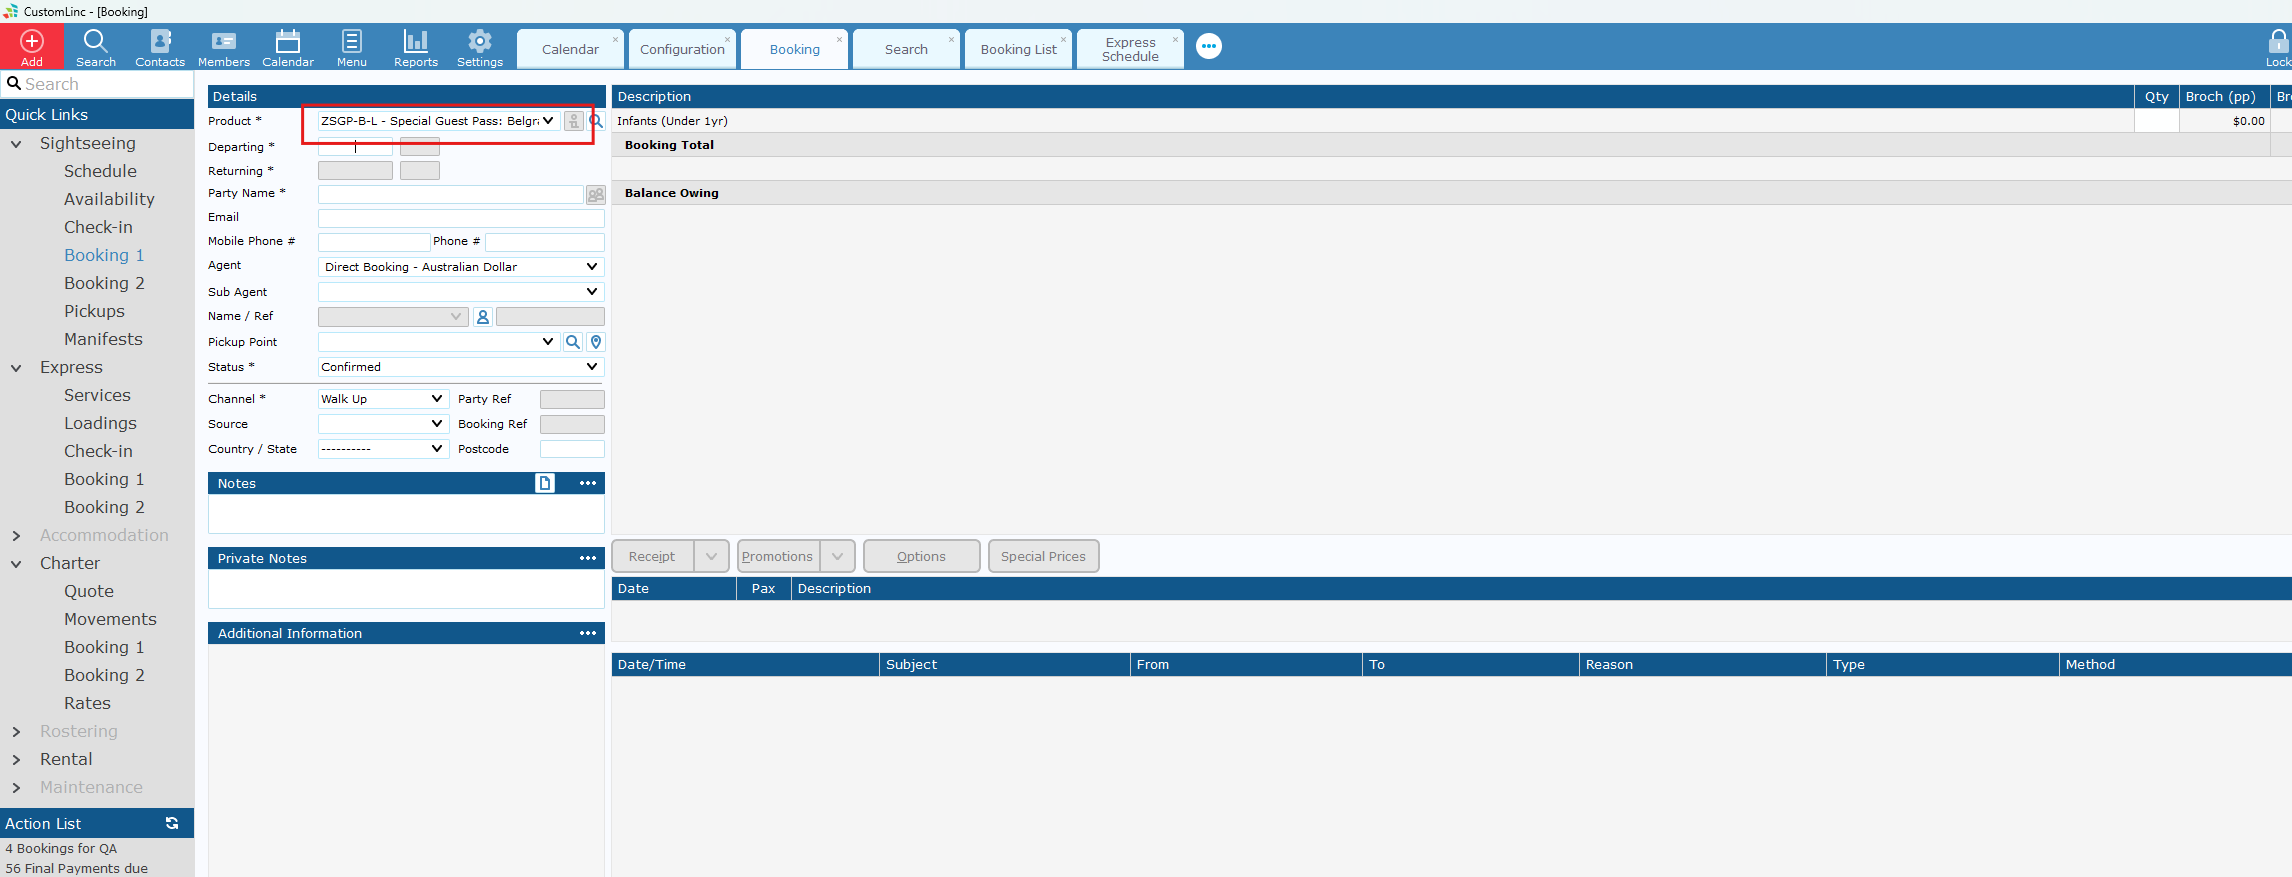
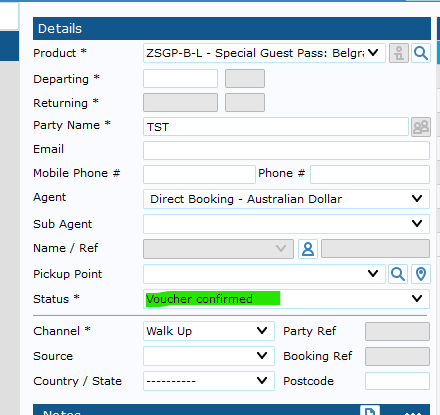
- Select the applicable SGP product, if unsure consult with team.

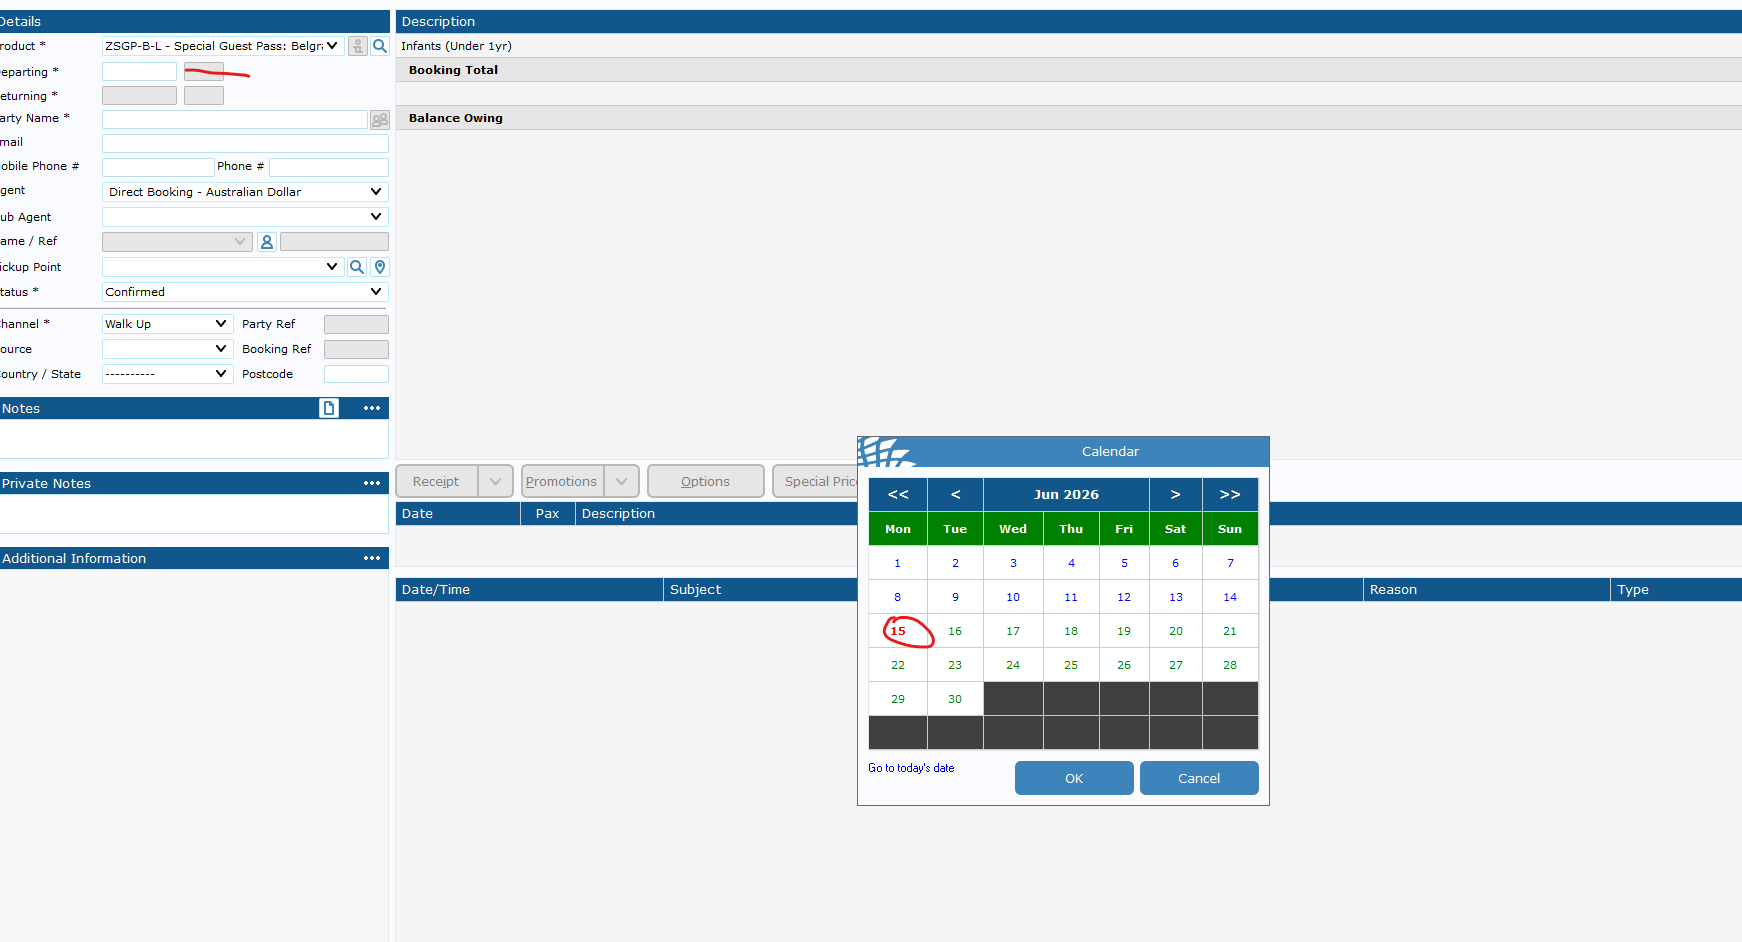
- The departure date is the Expiry date of the booking/voucher.
If you do not set a date, it will default to 1 Year in the future.

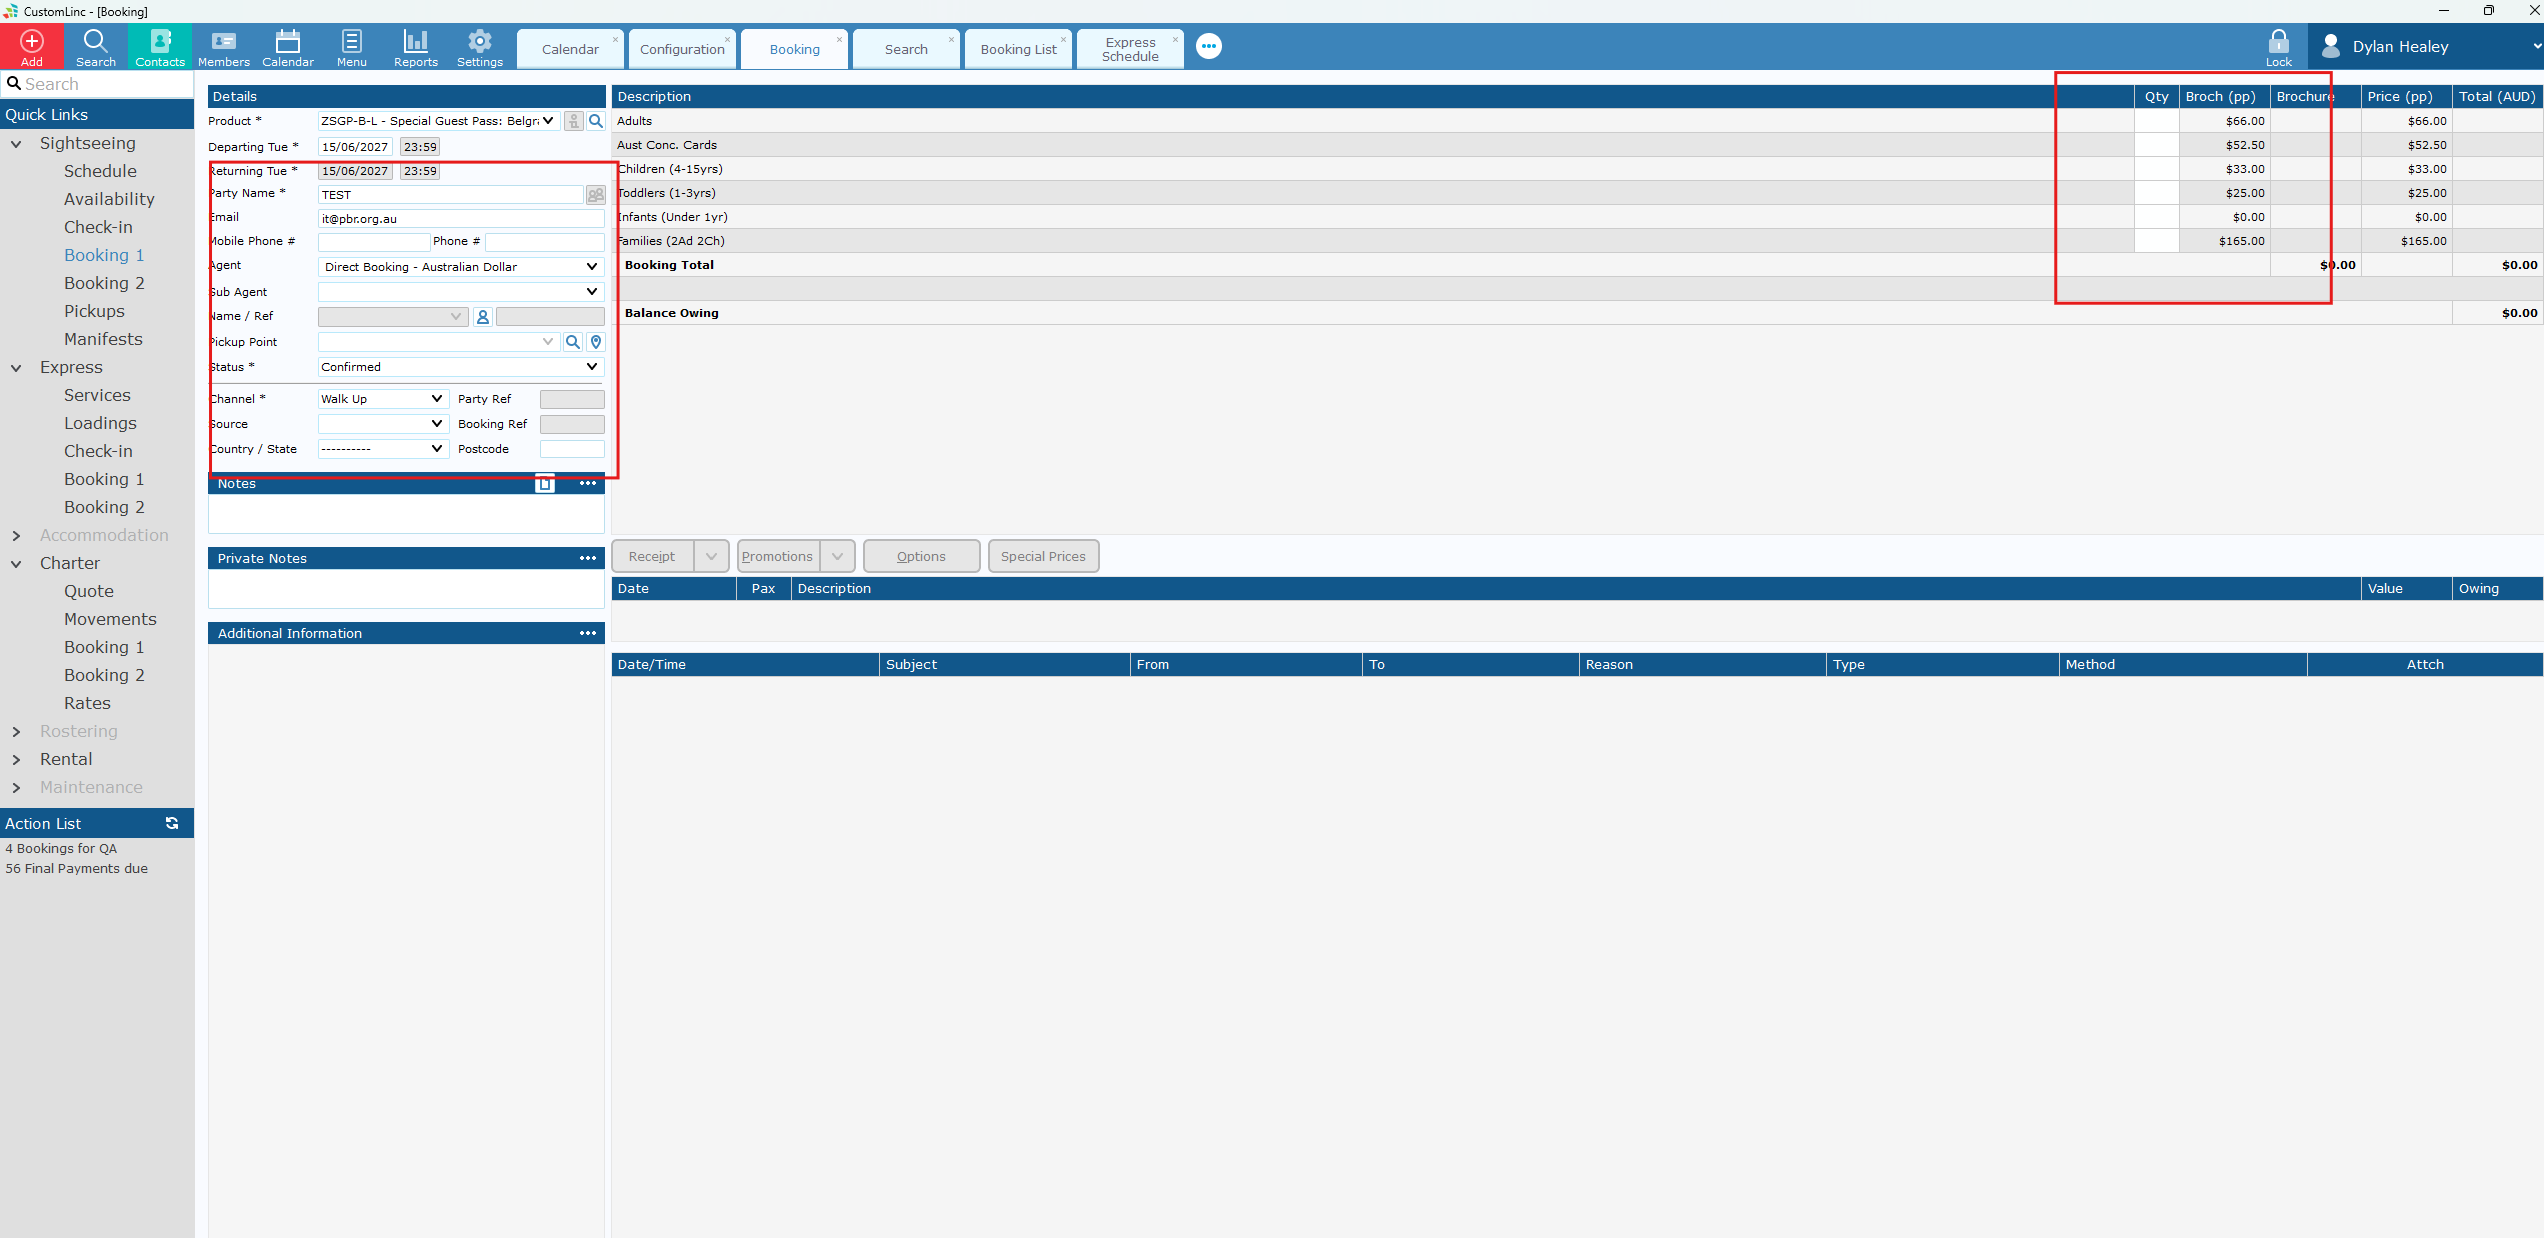
- Input booking details & fare amounts.

- The Default Status should be "Voucher confirmed". If it is not please set it to this and contact system configurators to fix.

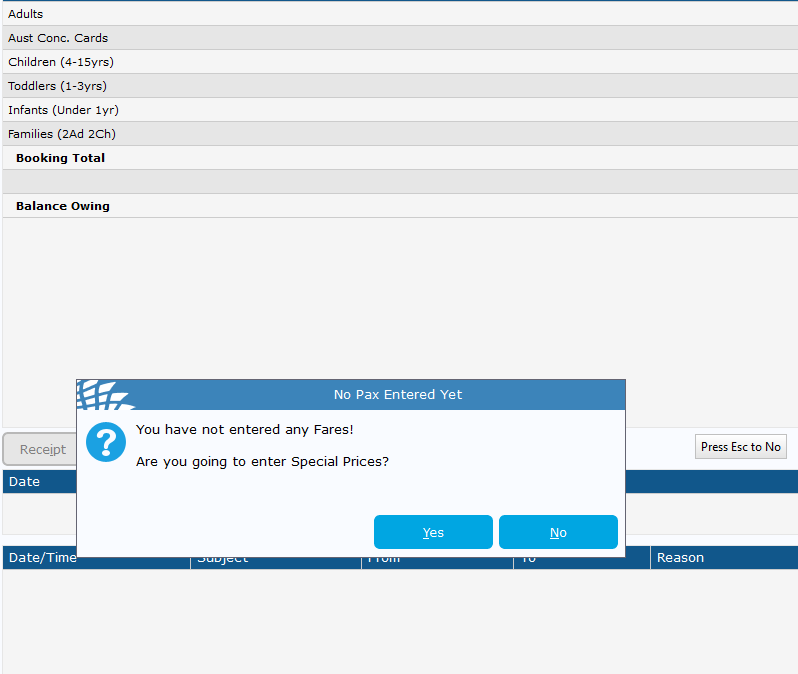
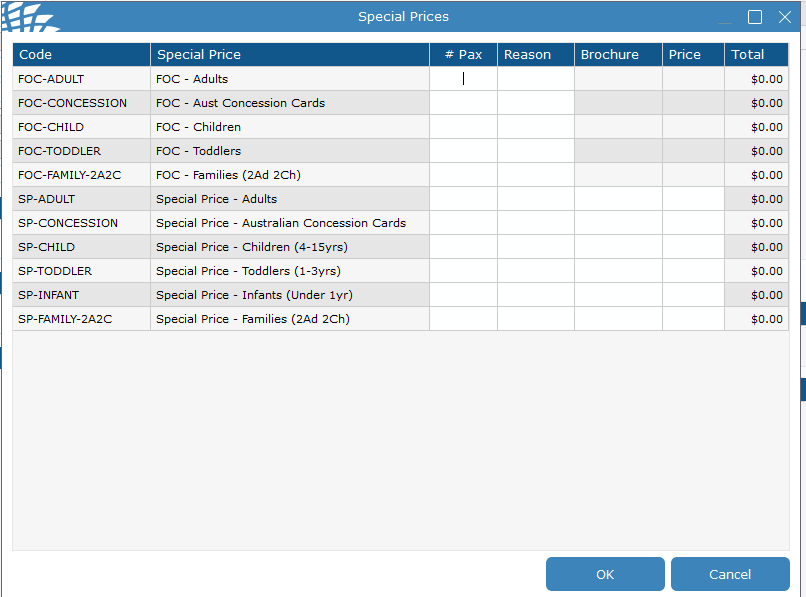
- If you need Special Fares like Free of Charge (FOC). Click update without placing in any fares. You will see a prompt to enter special fares - Click Yes.

- Enter amount and reason.

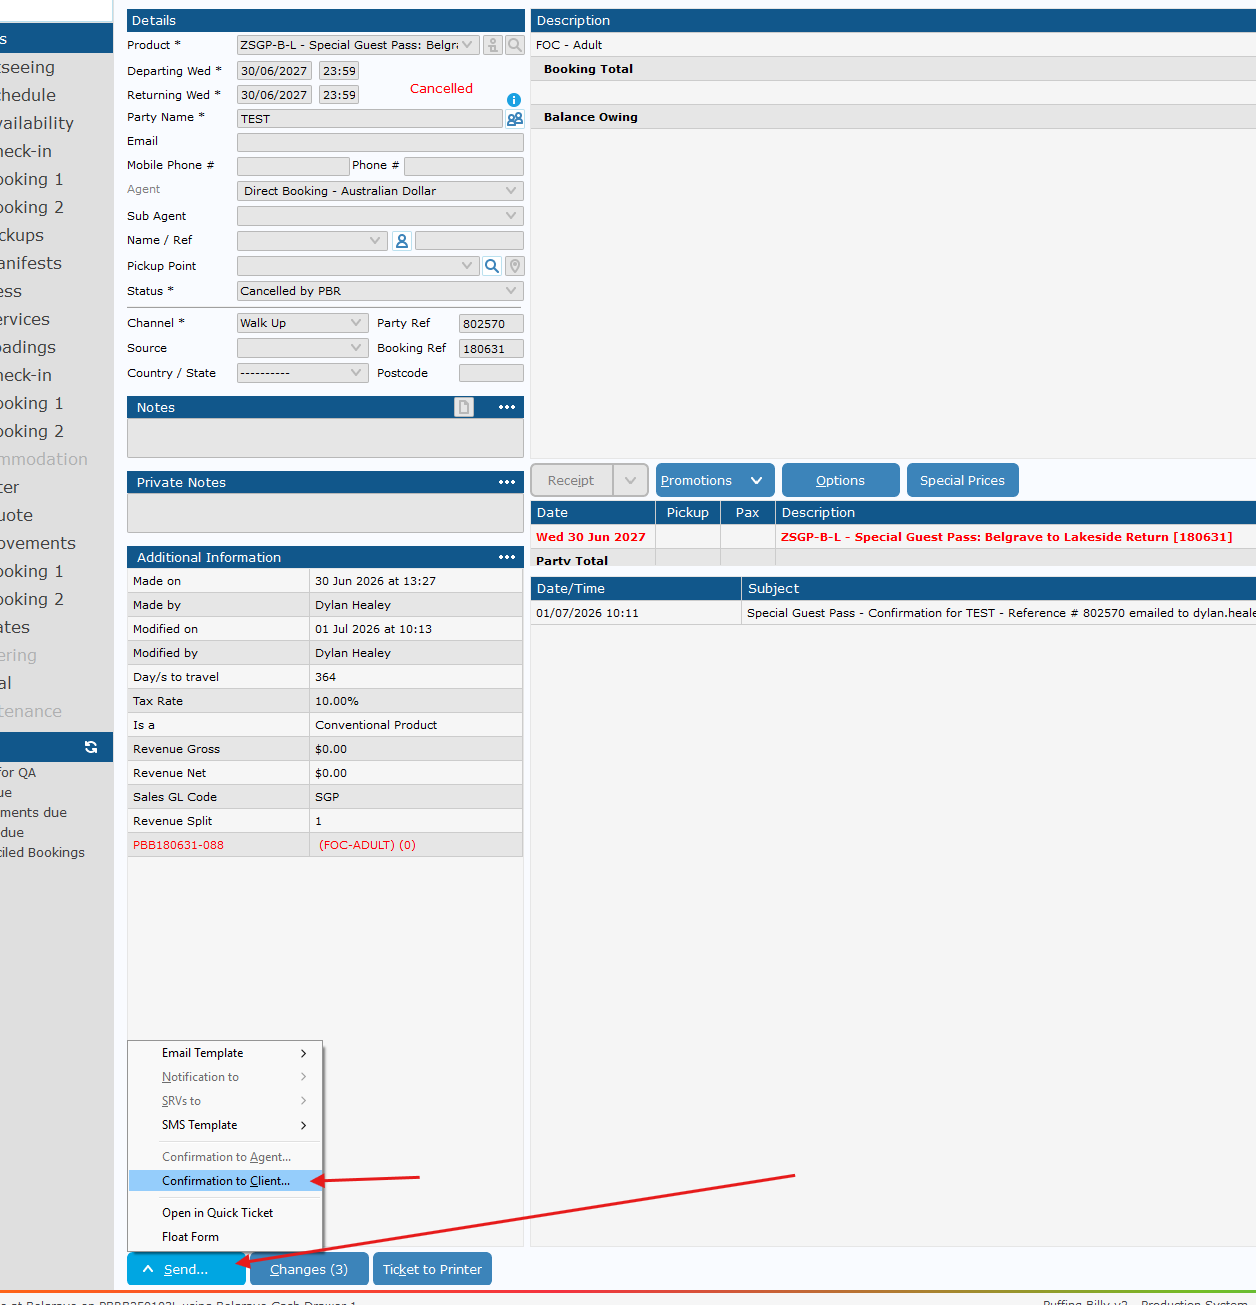
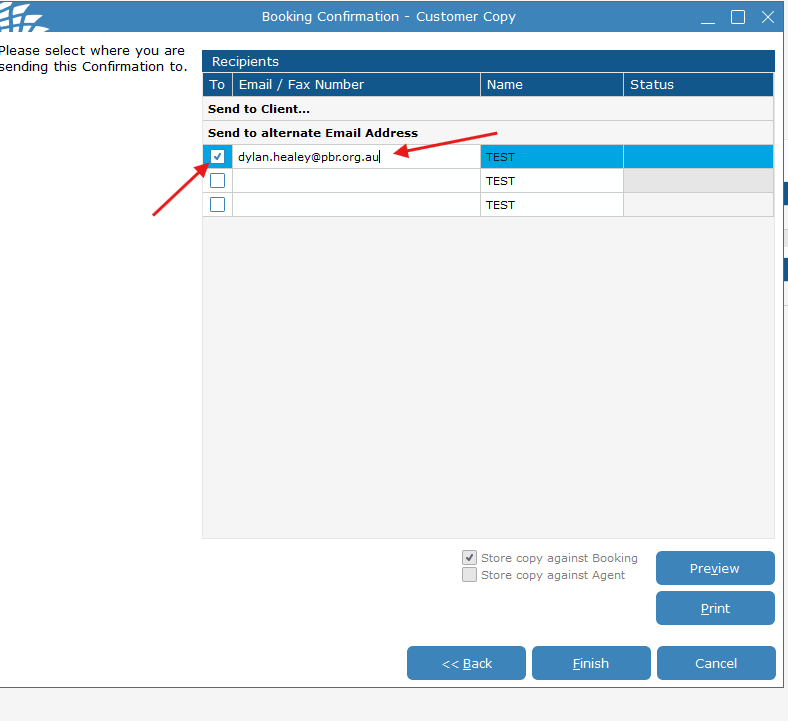
- Send Confirmation to Client to email in booking, or required address

If you need to send to a different email address, place the email in the alternate email address area and make sure the button to the left is ticked.

- Click finish and it will queue an email to be sent - this should be sent within 5 minutes or so.
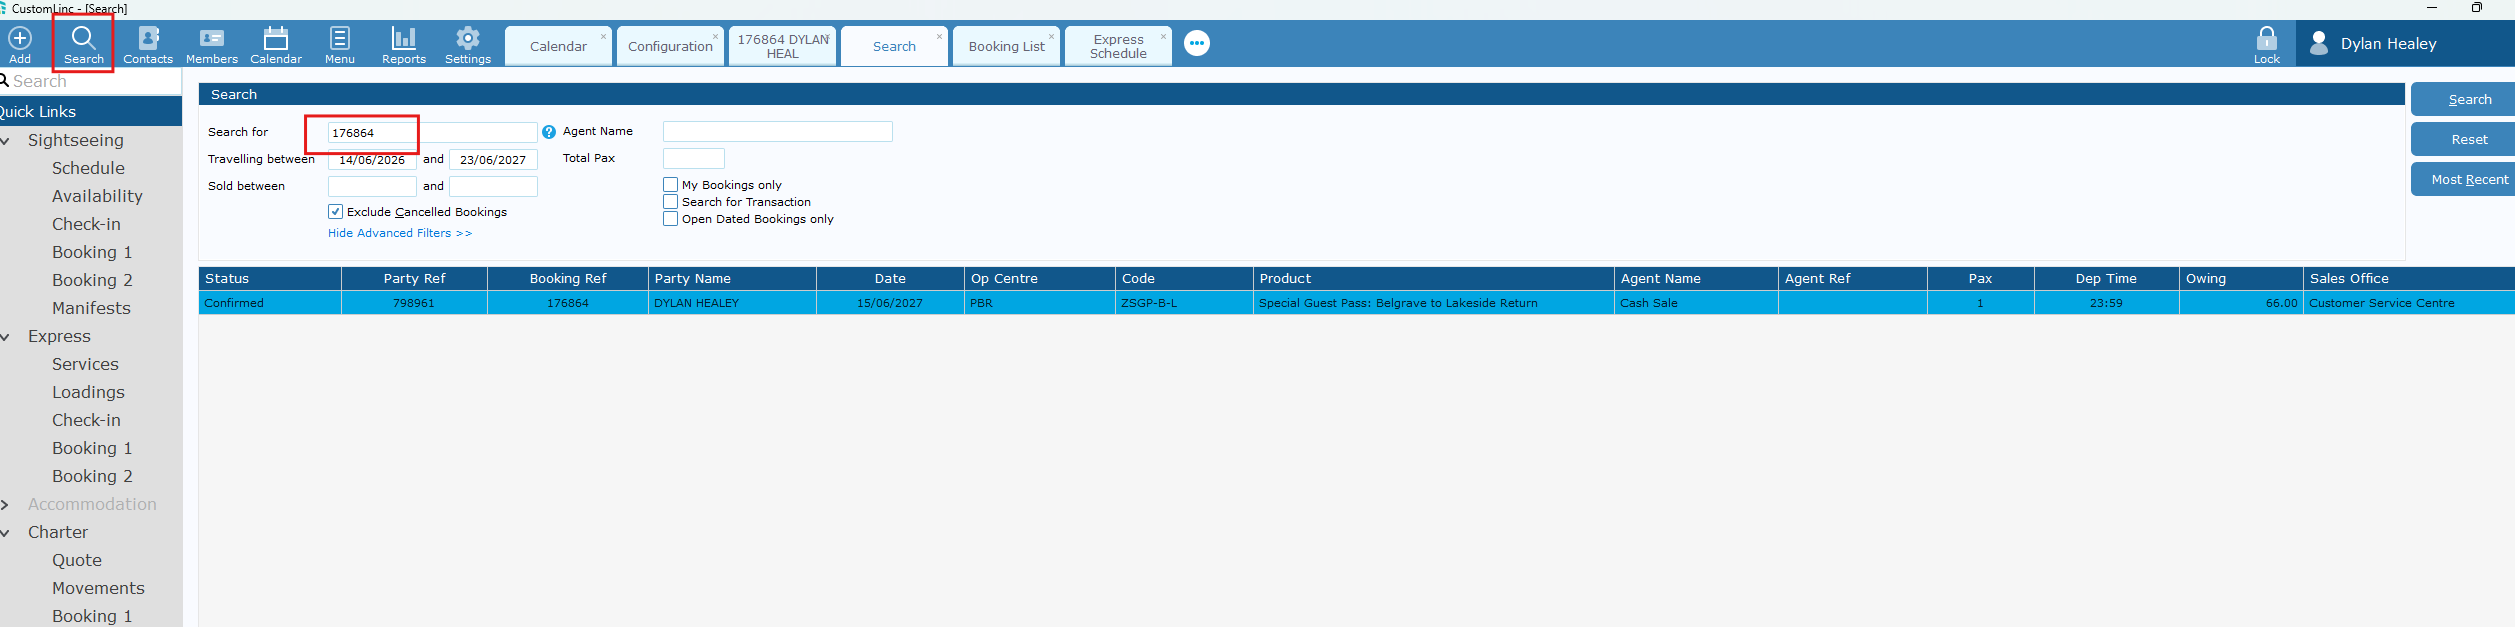
How to Redeem a SGP or Gift Voucher Booking
- Request for the Reference number on their confirmation email & Use CL Search to find the booking

- Confirm an applicable product and available date with the customer.

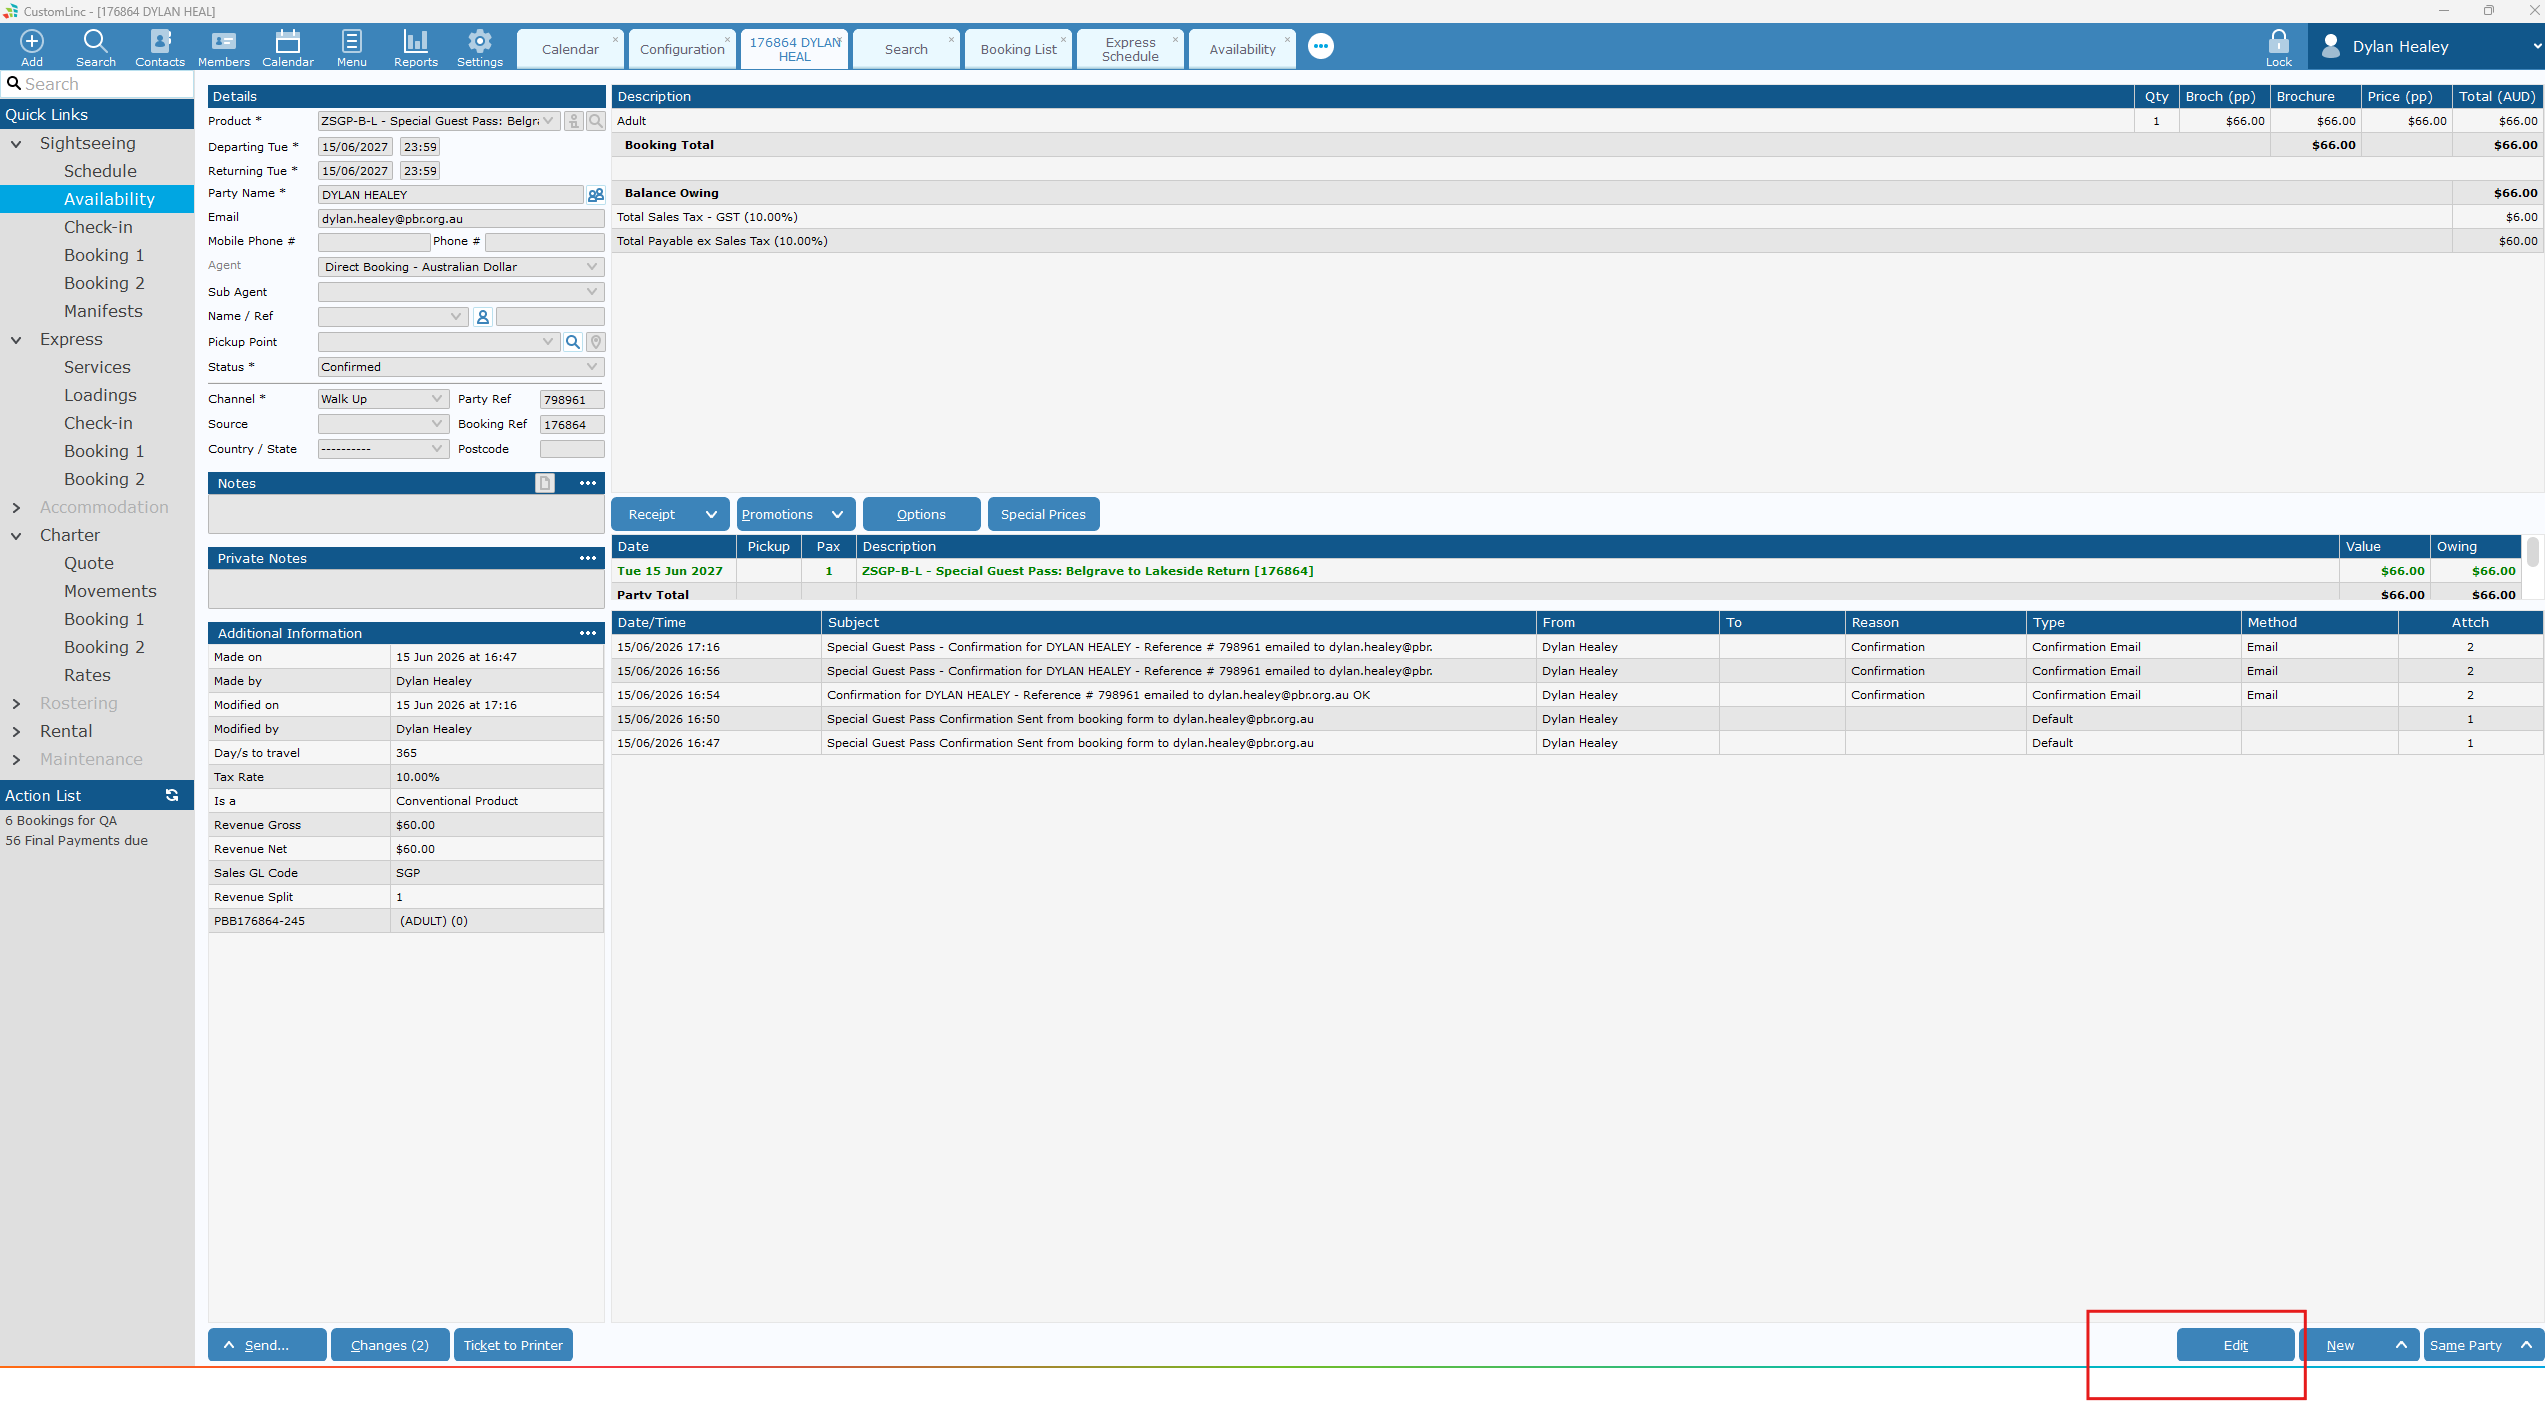
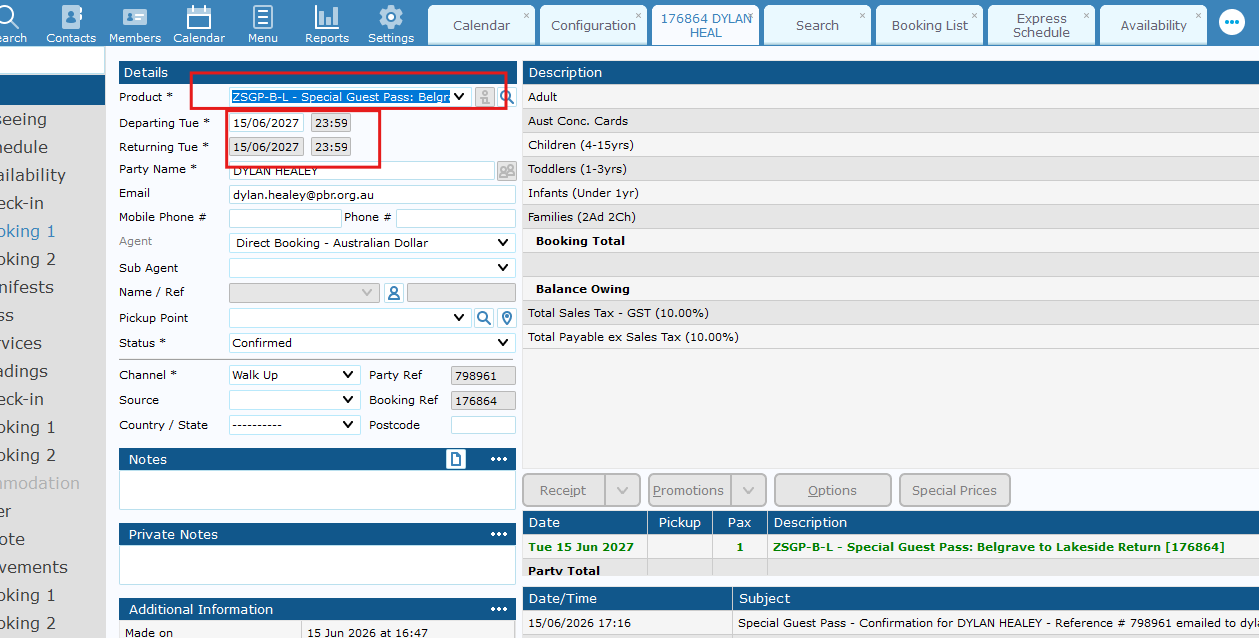
- Click edit on the booking

- Change Date THEN Product to what was select in step 2

- Change booking Details if needed to customers name, and email.
- Click Update.
- Go to Send > Confirmation to Client.