# 1Password

Using 1Password — PBR's password manager — to store and manage your passwords securely.

# Importing password from browser to 1password

This article will show you how to import passwords from chrome or edge to 1password.

1. In the 1password app select the 3 dots at the top left corner of the screen and select "import". [![image.png](https://bookstack.pbr.org.au/uploads/images/gallery/2024-08/scaled-1680-/r1yimage.png)
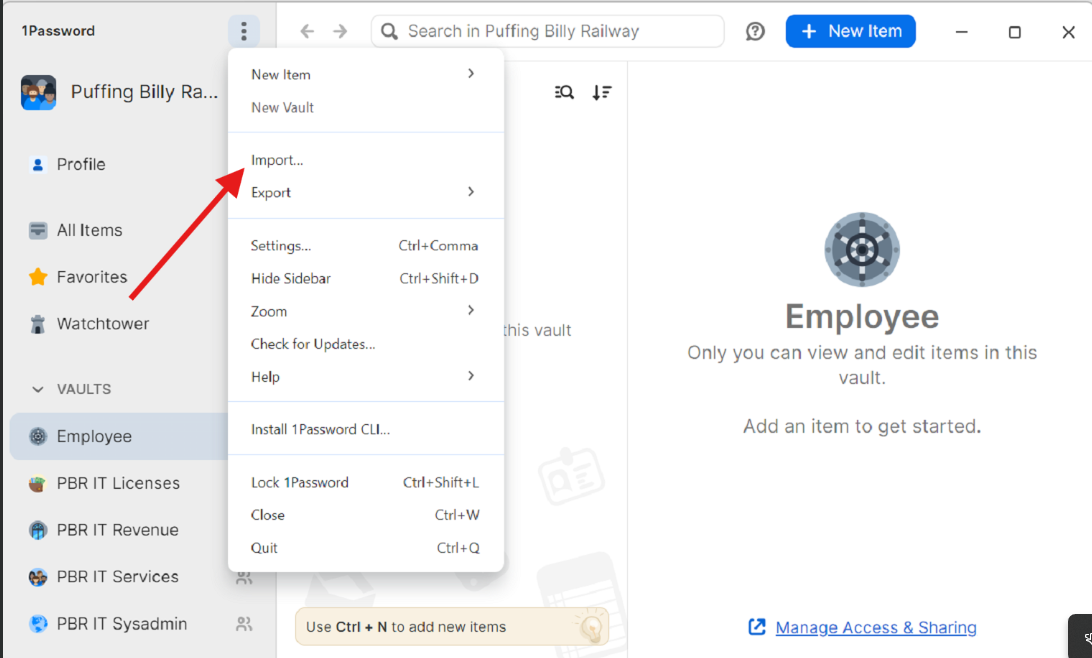
](https://bookstack.pbr.org.au/uploads/images/gallery/2024-08/r1yimage.png)
2. Select your browser and click on the link. For this one we will do chrome. See below for Edge. [![image.png](https://bookstack.pbr.org.au/uploads/images/gallery/2024-08/scaled-1680-/A3Uimage.png)
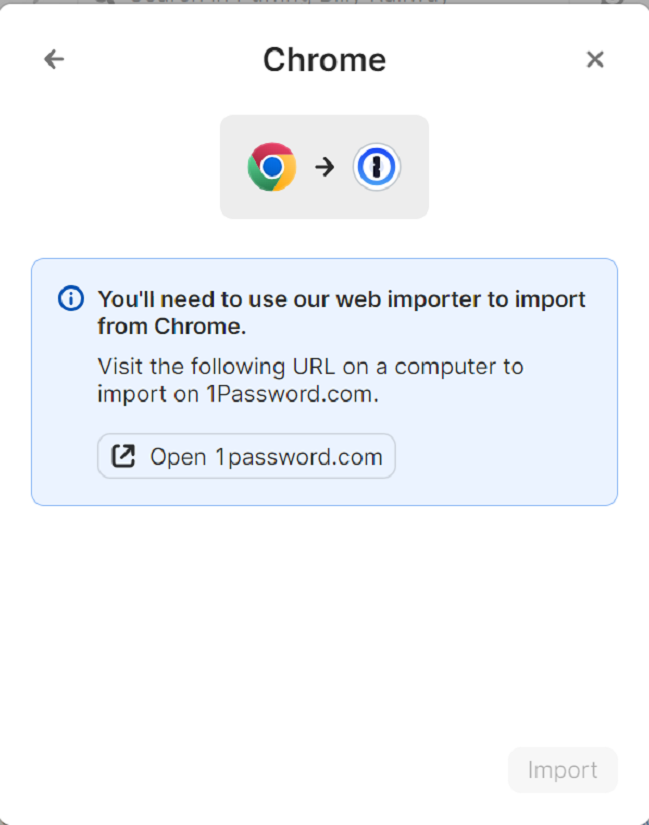
](https://bookstack.pbr.org.au/uploads/images/gallery/2024-08/A3Uimage.png)
3. Follow these steps. [![image.png](https://bookstack.pbr.org.au/uploads/images/gallery/2024-08/scaled-1680-/2oiimage.png)
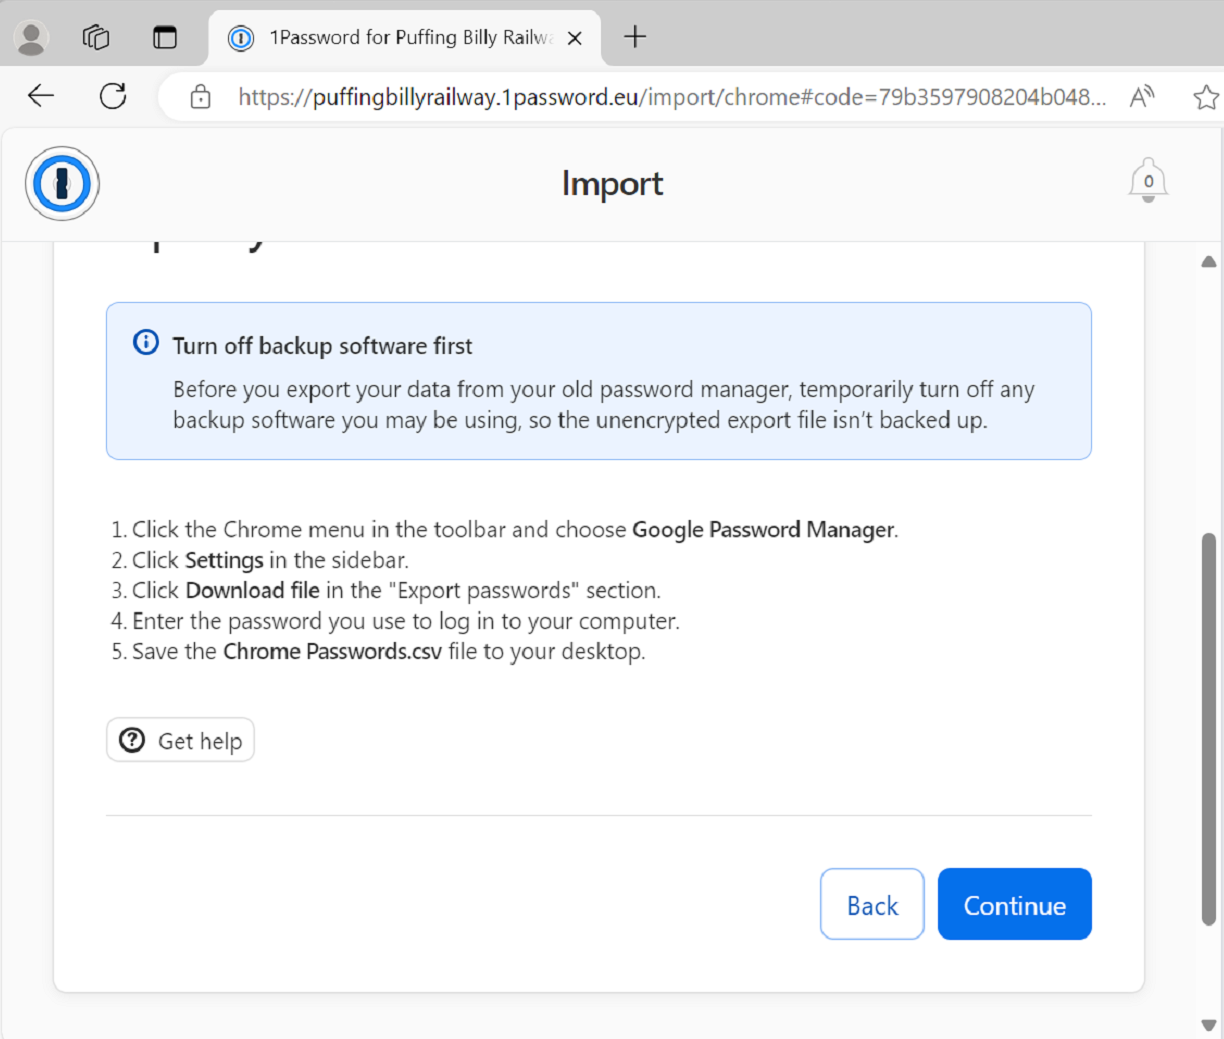
](https://bookstack.pbr.org.au/uploads/images/gallery/2024-08/2oiimage.png)
4. The next will ask you to select which vault you would like to store your passwords. As these are your personal passwords select your "Employee" vault as you are the only person that can see this vault.
5. Then drag and drop the file you downloaded earlier.  and hit continue.[![image.png](https://bookstack.pbr.org.au/uploads/images/gallery/2024-08/scaled-1680-/alsimage.png)](https://bookstack.pbr.org.au/uploads/images/gallery/2024-08/alsimage.png)
6. You can then see it in your "Employee" vault. Make sure to delete the file off your computer. [![image.png](https://bookstack.pbr.org.au/uploads/images/gallery/2024-08/scaled-1680-/Dirimage.png)](https://bookstack.pbr.org.au/uploads/images/gallery/2024-08/Dirimage.png)
7. For Edge. Follow up to step 3. Follow these steps. [![image.png](https://bookstack.pbr.org.au/uploads/images/gallery/2024-08/scaled-1680-/w9zimage.png)
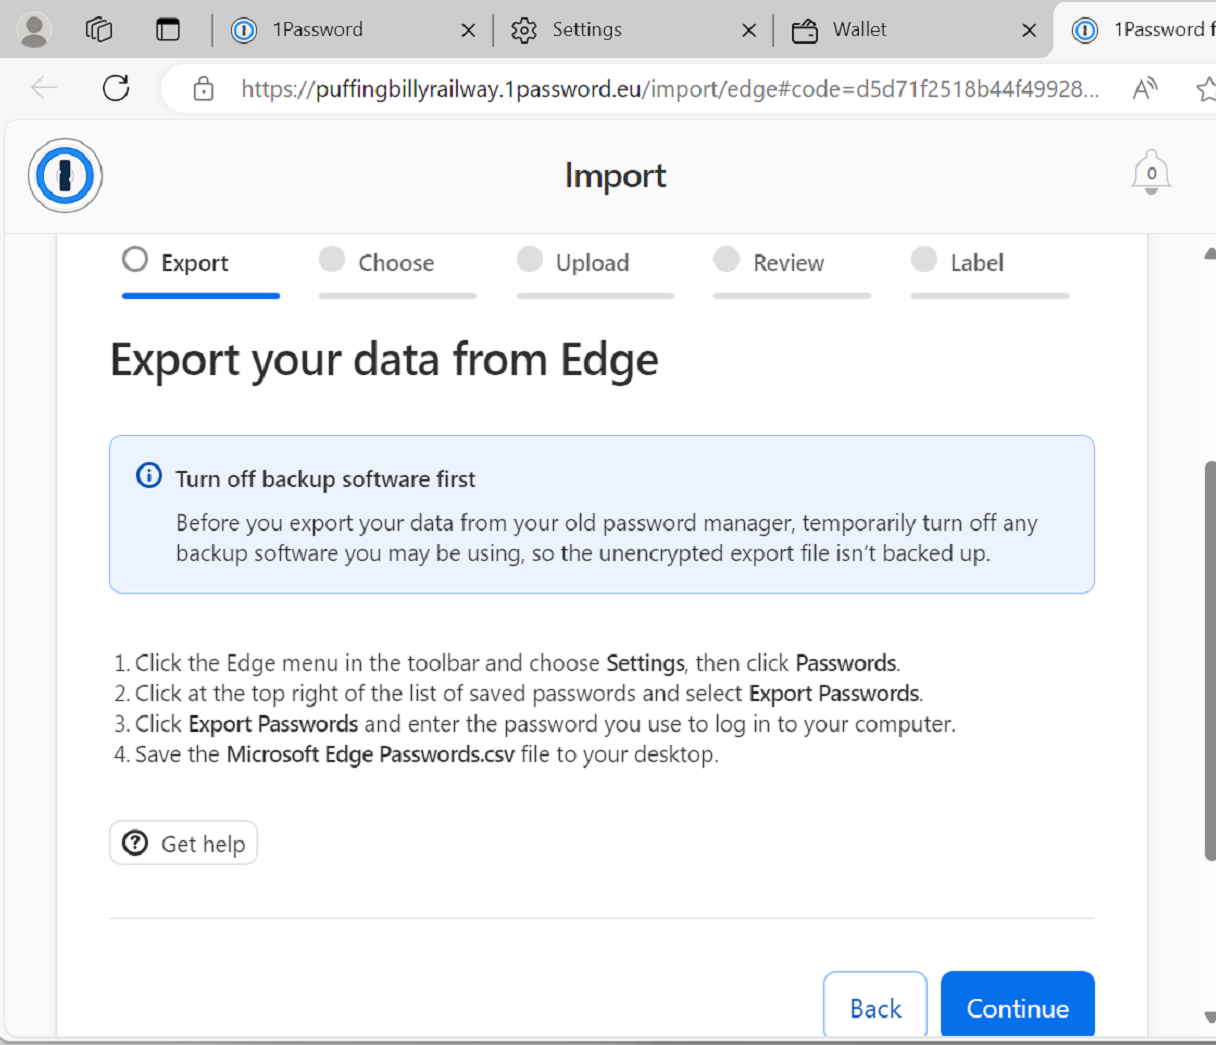
](https://bookstack.pbr.org.au/uploads/images/gallery/2024-08/w9zimage.png)
8. After these steps the process will be the same as Chrome.

# Deleting passwords from browsers

This article will show you how to delete passwords from chrome and Edge once 1password is enabled.

1. When at the chrome home page (for Edge see below) click the 3 dots at the top right of the page and select 'Delete browsing data". [![image.png](https://bookstack.pbr.org.au/uploads/images/gallery/2024-08/scaled-1680-/oVHimage.png)
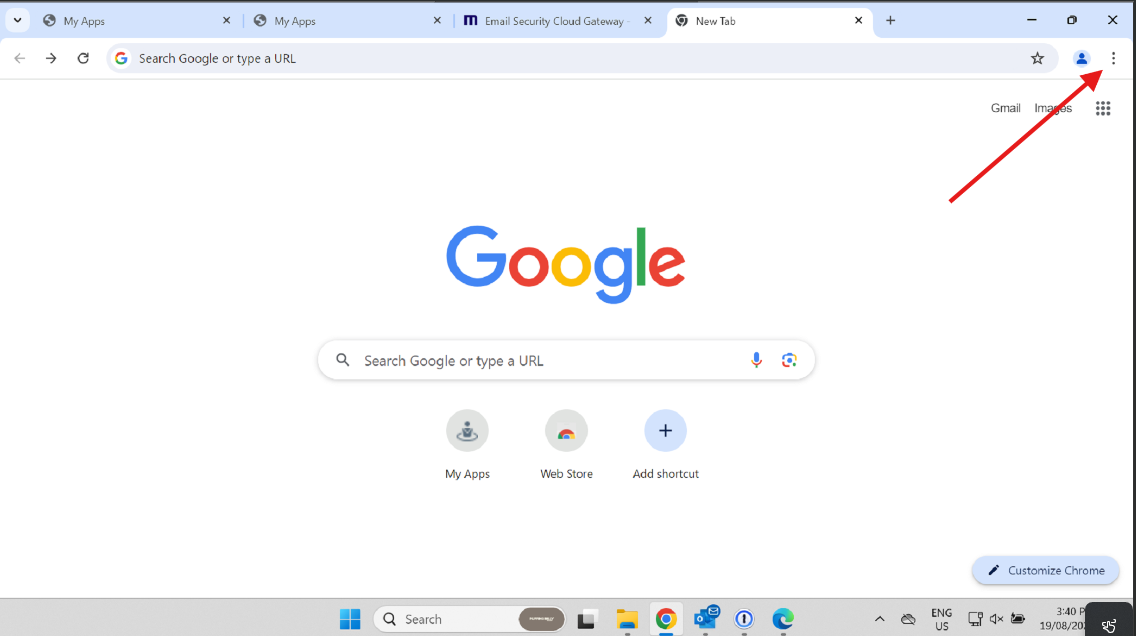
](https://bookstack.pbr.org.au/uploads/images/gallery/2024-08/oVHimage.png)
2. Select the "advanced tab", specify range as "all-time", and only select the checkbox "passwords and other sign-in data" and select "delete data". [![image.png](https://bookstack.pbr.org.au/uploads/images/gallery/2024-08/scaled-1680-/R4yimage.png)
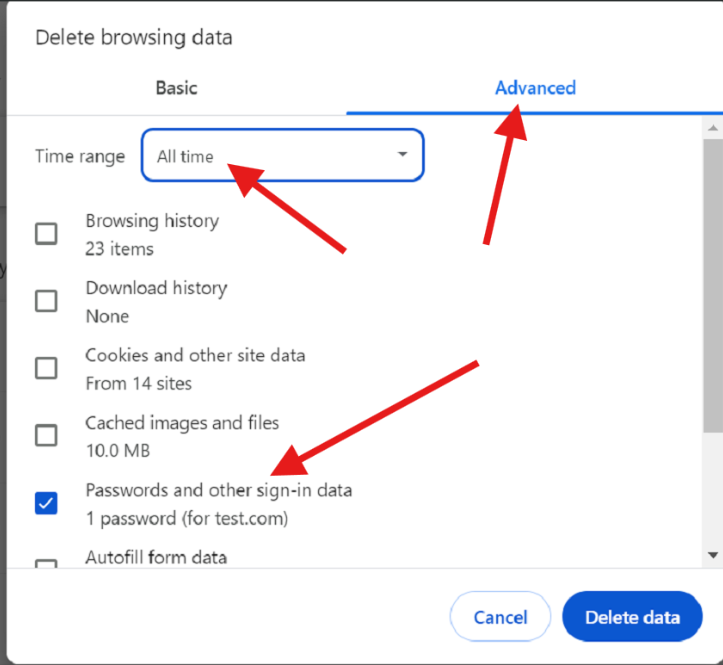
](https://bookstack.pbr.org.au/uploads/images/gallery/2024-08/R4yimage.png)
3. Make sure to change the settings in chrome so passwords don't save anymore. Go to the same 3 dots (settings). Select "Passwords and autofill", then "google password manager".
4. Select the settings tab and uncheck these checkboxes. [![image.png](https://bookstack.pbr.org.au/uploads/images/gallery/2024-08/scaled-1680-/r22image.png)
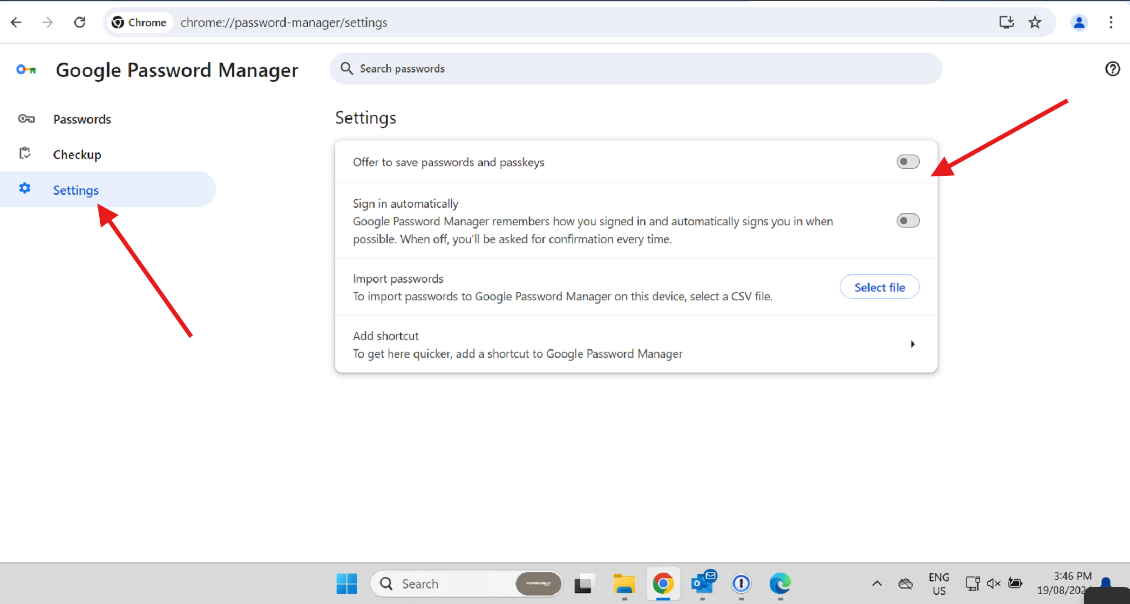
](https://bookstack.pbr.org.au/uploads/images/gallery/2024-08/r22image.png)
5. For Edge. Select the 3 dots in the top right hand corner and select settings. Scroll down to passwords. Select the cog on the left hand side and scroll down to passwords and uncheck the 2 checkboxes. [![image.png](https://bookstack.pbr.org.au/uploads/images/gallery/2024-08/scaled-1680-/A1Timage.png)
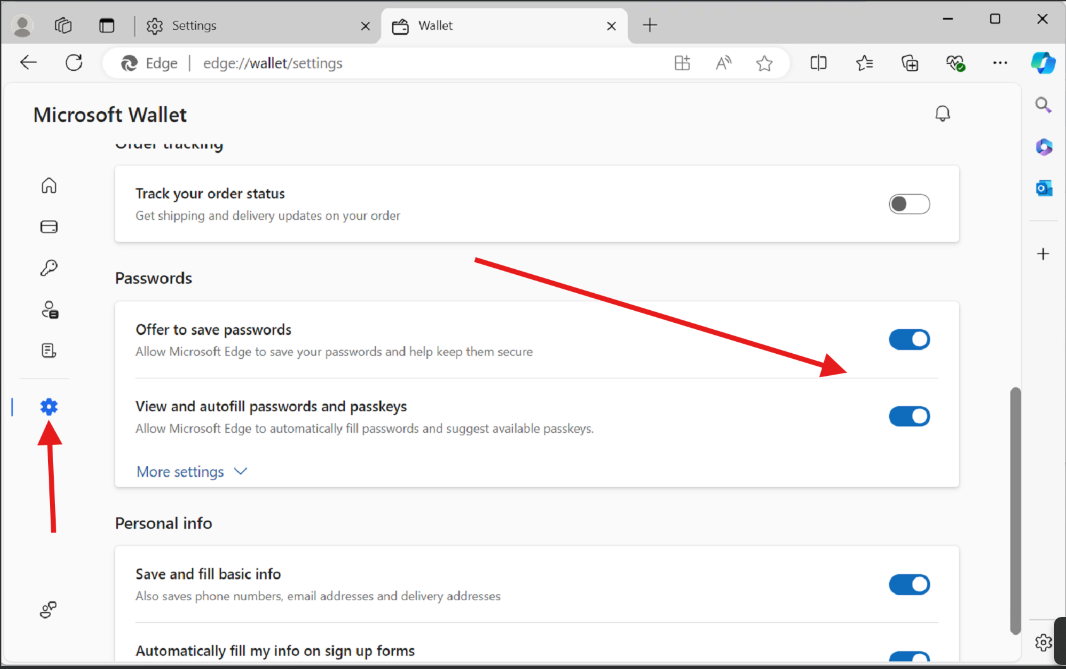
](https://bookstack.pbr.org.au/uploads/images/gallery/2024-08/A1Timage.png)

# Enable TOTP (Time-based one-time password)

Some websites/programs allow the use of TOTP as an extra layer of security to authenticate. This article will show you how to do that with 1password. In this example I will be using discord.

1. Login to your desired app as per normal and look for anywhere that says MFA or authenticator app. [![image.png](https://bookstack.pbr.org.au/uploads/images/gallery/2025-02/scaled-1680-/ZQzimage.png)
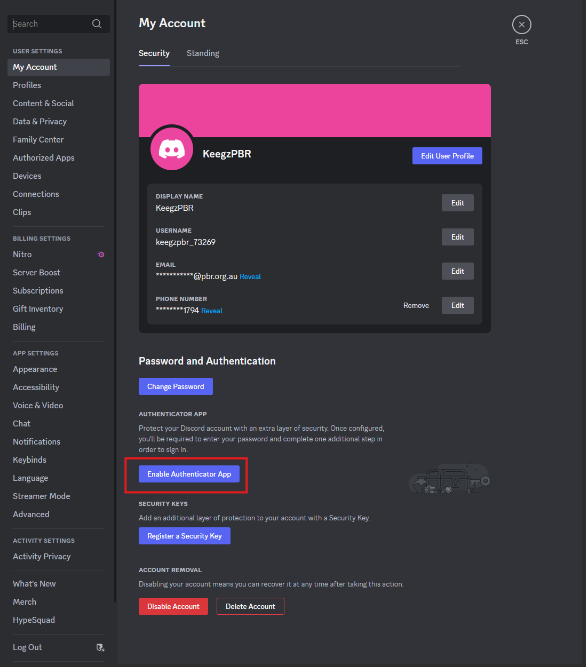
](https://bookstack.pbr.org.au/uploads/images/gallery/2025-02/ZQzimage.png)
2. Follow the prompts until the website/app displays a QR code. [![image.png](https://bookstack.pbr.org.au/uploads/images/gallery/2025-02/scaled-1680-/Tv8image.png)
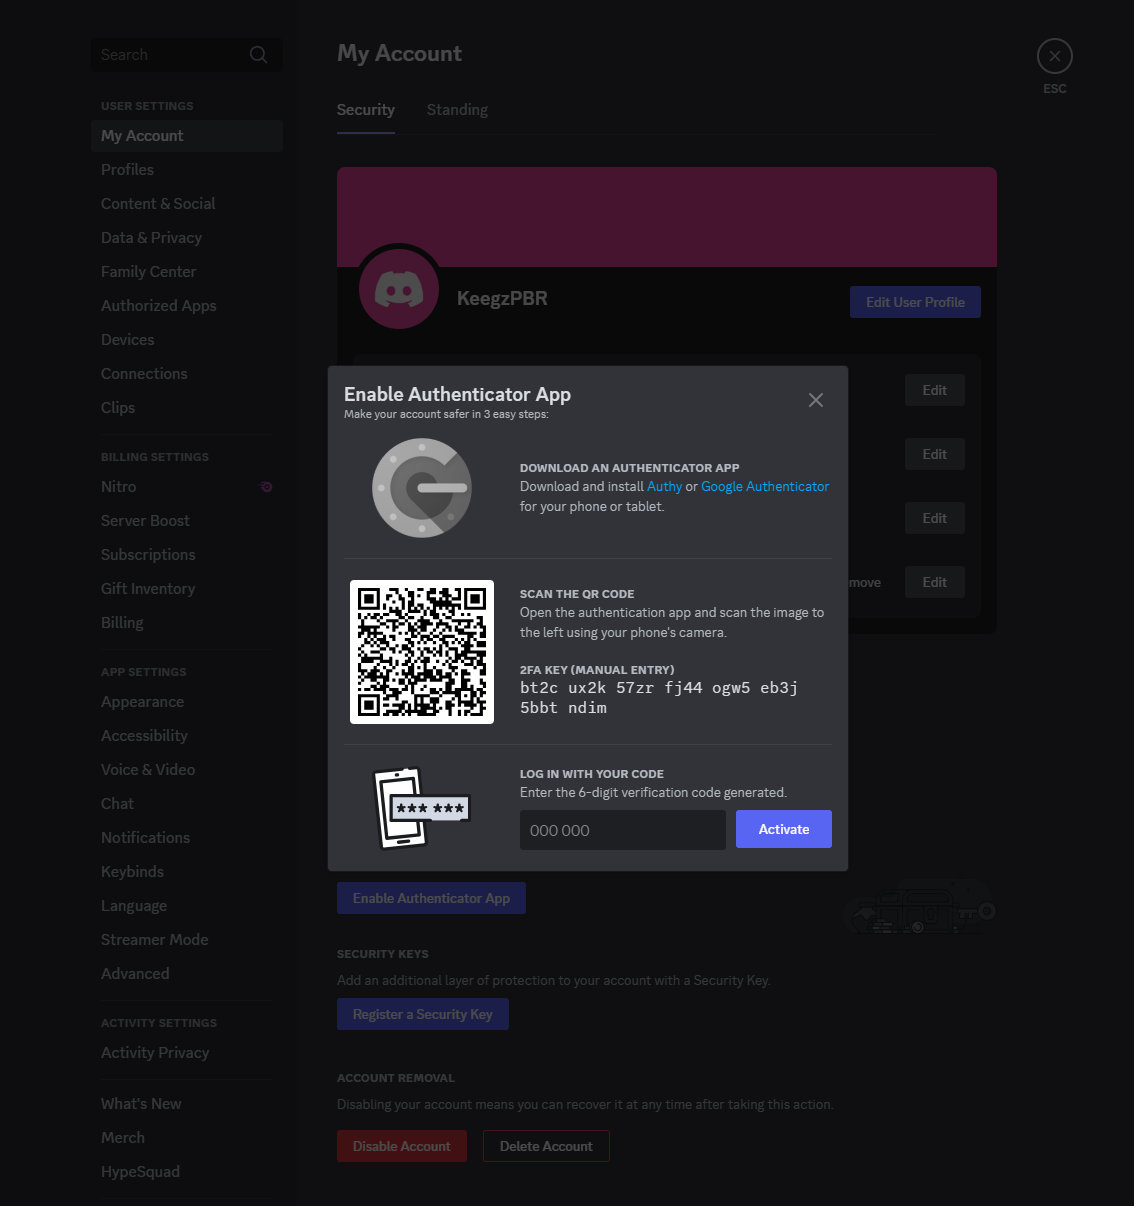
](https://bookstack.pbr.org.au/uploads/images/gallery/2025-02/Tv8image.png)
3. Open 1pass in the browser extension, click the 3 dots and select "scan QR code". [![image.png](https://bookstack.pbr.org.au/uploads/images/gallery/2025-02/scaled-1680-/8mEimage.png)
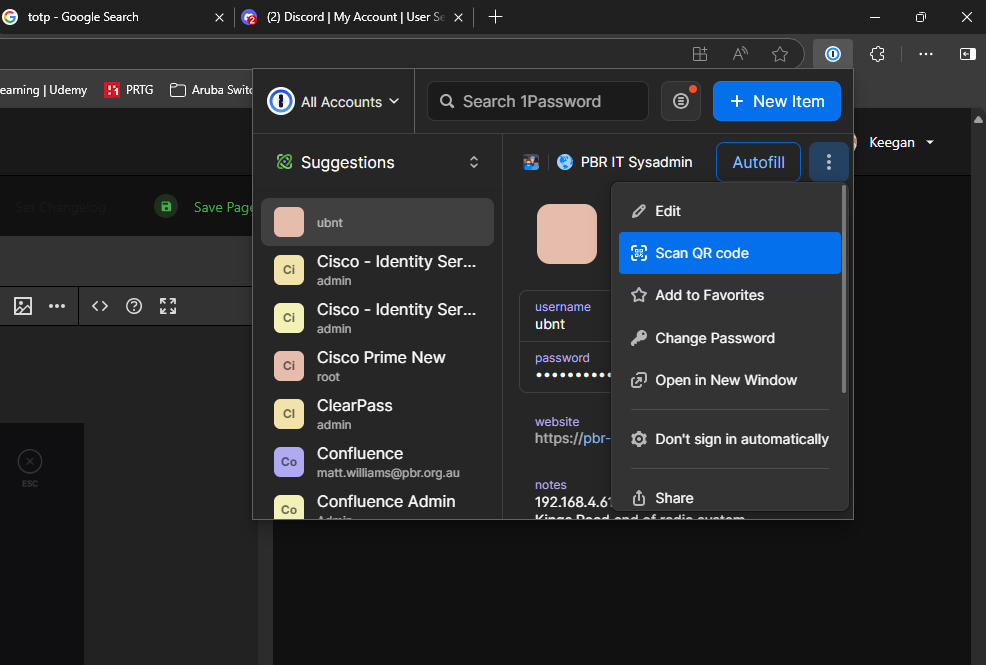
](https://bookstack.pbr.org.au/uploads/images/gallery/2025-02/8mEimage.png)
4. The new TOTP will appear in 1pass, here we can use it to activate it. [![image.png](https://bookstack.pbr.org.au/uploads/images/gallery/2025-02/scaled-1680-/QAhimage.png)
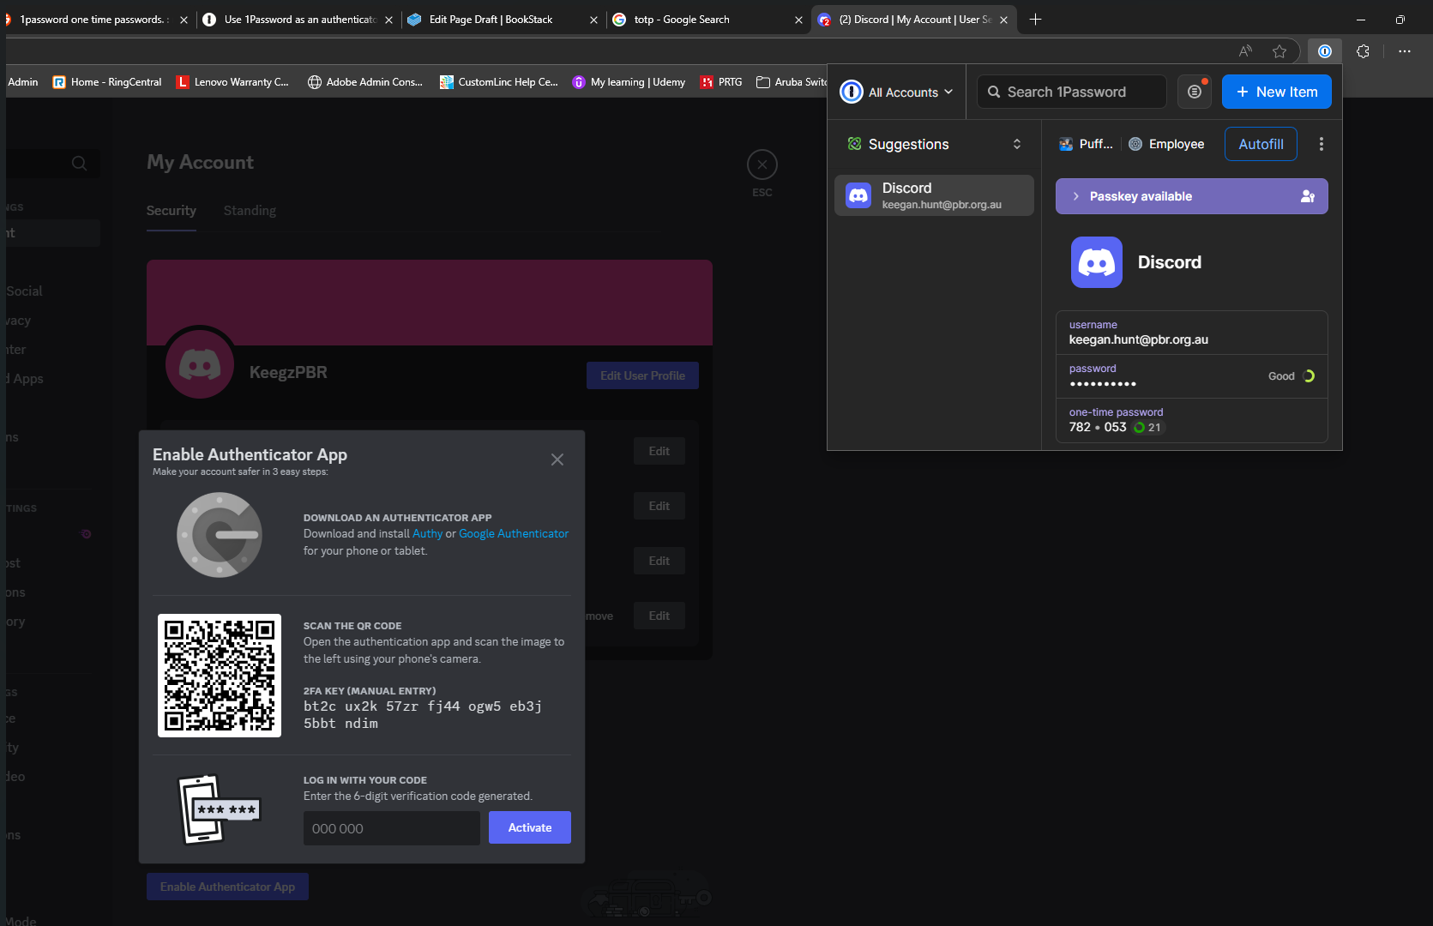
](https://bookstack.pbr.org.au/uploads/images/gallery/2025-02/QAhimage.png)
5. The process to find MFA will differ from website to website, but the 1pass activation with the QR code will be the same.

# How To Use 1password

## Create and edit items

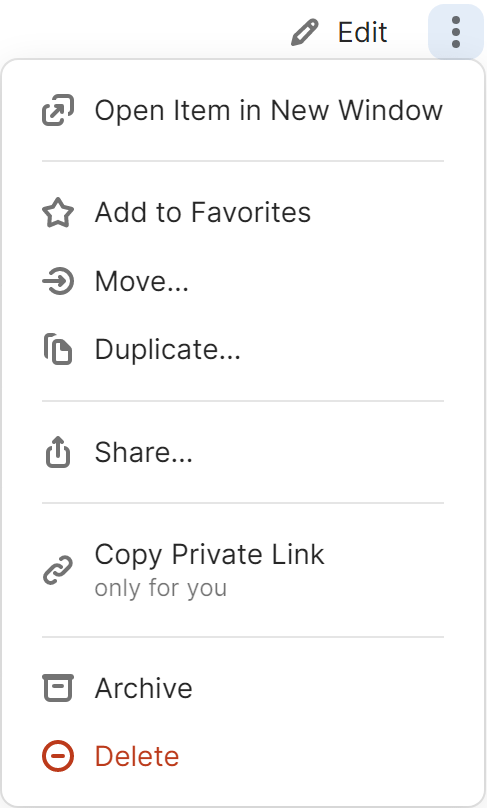
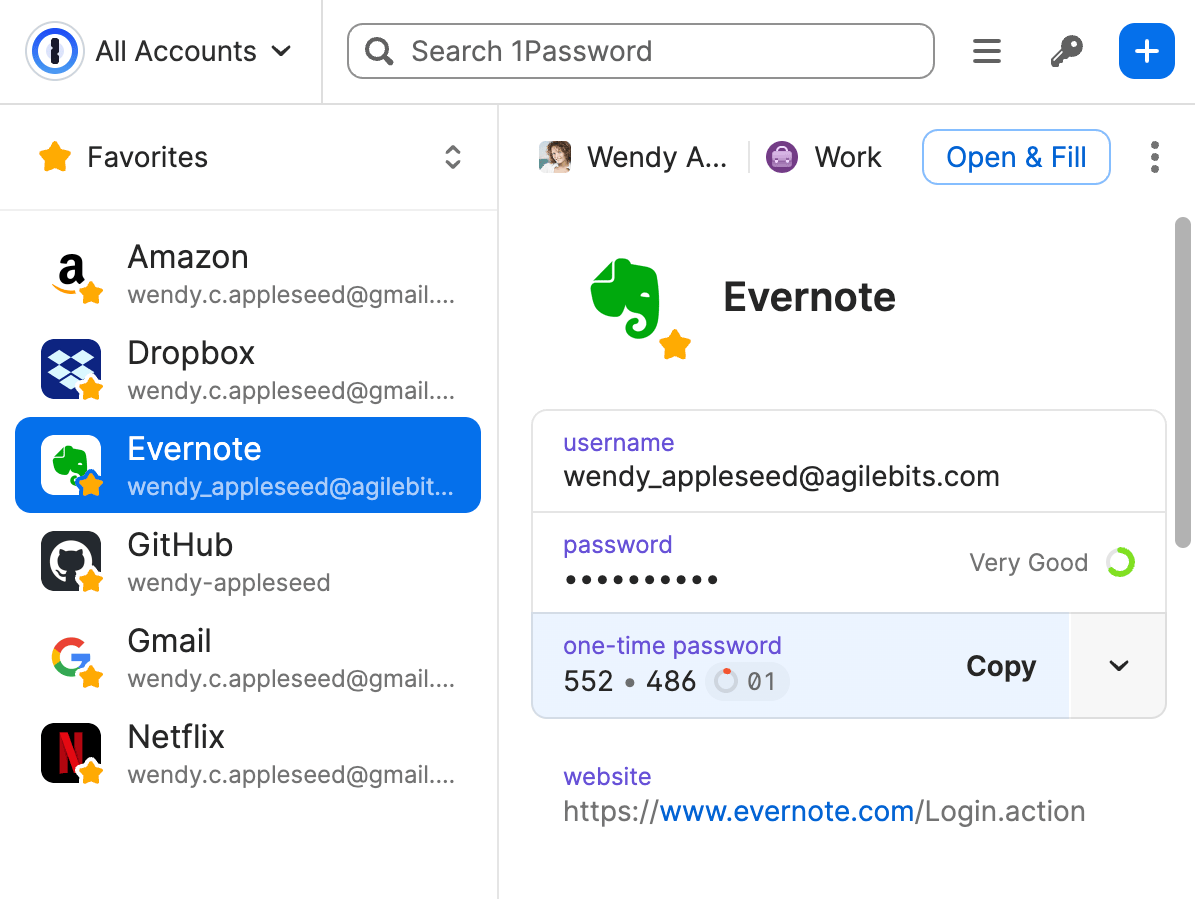
When you open 1Password, you’ll see a list of all your items, like your passwords and credit cards. Select an item to see its details:

![An overview of 1Password 8 for Windows](https://i.1password.com/media/opw8/overview.png)

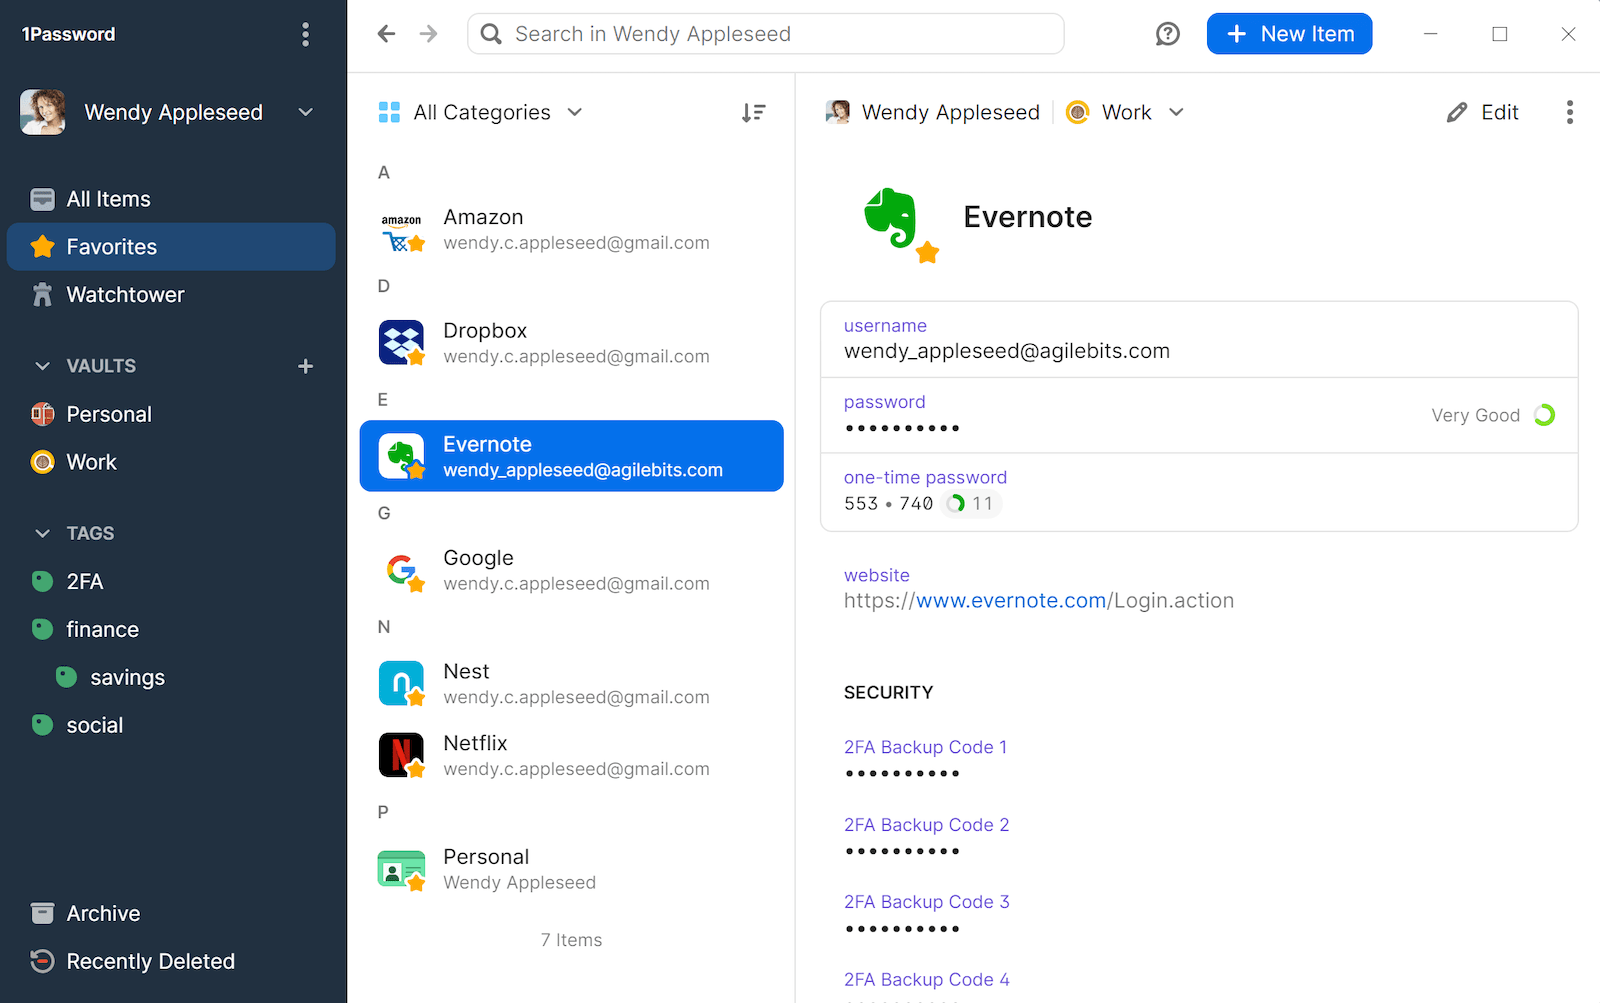
To create an item, click **New Item** (or press <kbd>Ctrl</kbd><kbd>N</kbd>) and choose an [item category](https://support.1password.com/item-categories/). You can also search for popular logins and item categories.

To edit an item, select it and click **Edit** (or press <kbd>Ctrl</kbd><kbd>E</kbd>). When you’re done making changes, click **Save** (or press <kbd>Ctrl</kbd><kbd>S</kbd>).

To see only certain types of items, click **All Categories** at the top of the item list and choose an item category.

You can personalize your items with your own icons that appear throughout 1Password. Edit an item and click the item’s icon to get started.

You can also add [custom fields](https://support.1password.com/custom-fields/), including [unique answers to security questions](https://support.1password.com/generate-security-questions/).
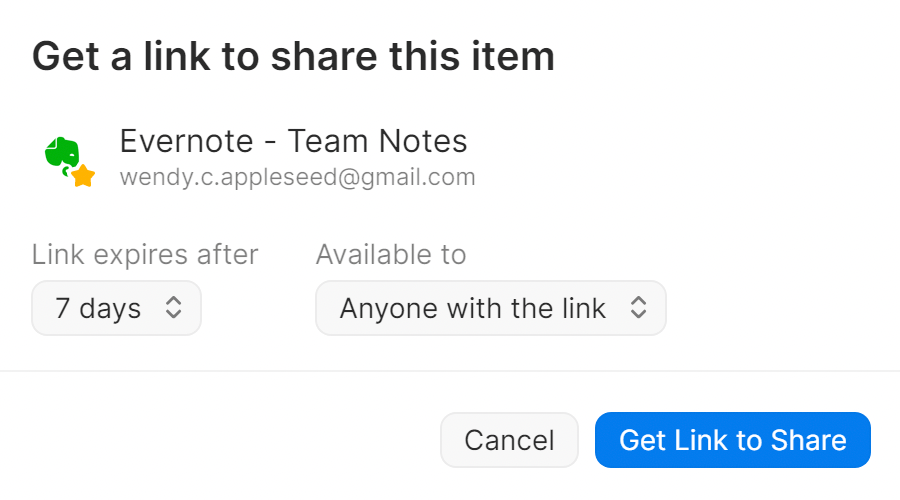
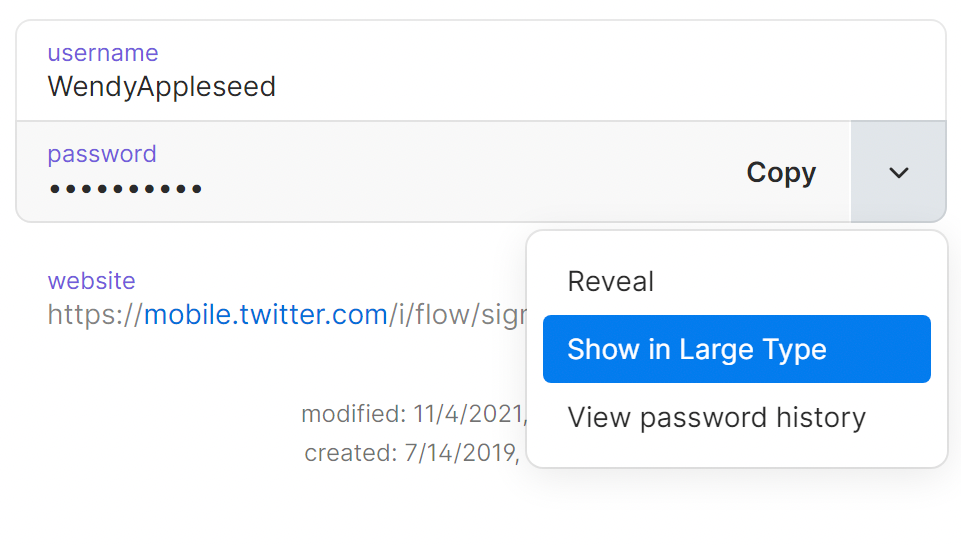
## Share items

You can securely share copies of passwords and other items you’ve saved in 1Password with anyone, even if they don’t use 1Password.

Select an item, then click **Share** in the item’s details.

You’ll get a unique link that you can send to others. You can choose when the link expires and who can access it. [Learn more about securely sharing 1Password items with anyone.](https://support.1password.com/share-items/?windows)

[![image.png](https://bookstack.pbr.org.au/uploads/images/gallery/2025-02/scaled-1680-/KWHimage.png)](https://bookstack.pbr.org.au/uploads/images/gallery/2025-02/KWHimage.png)
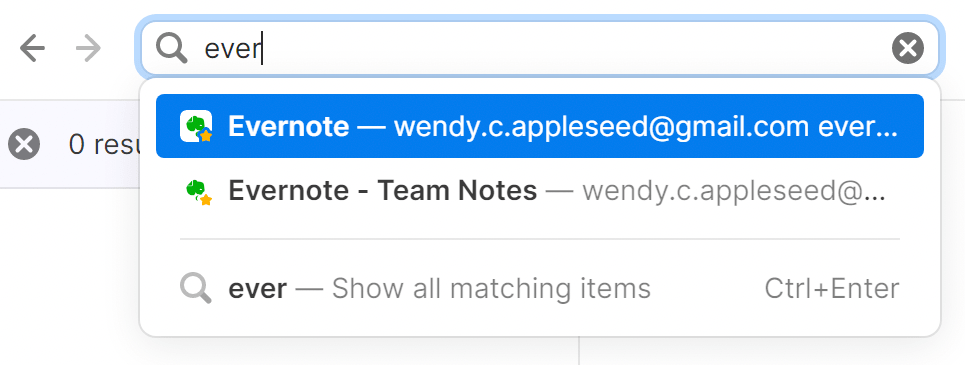
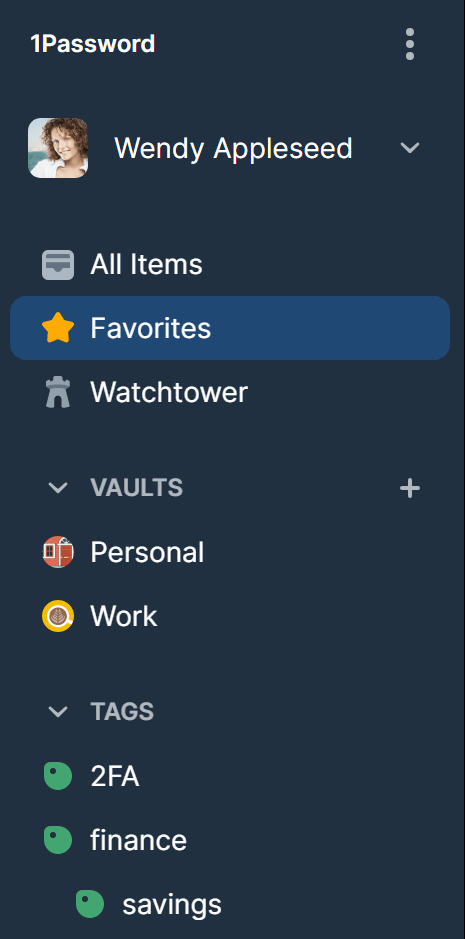
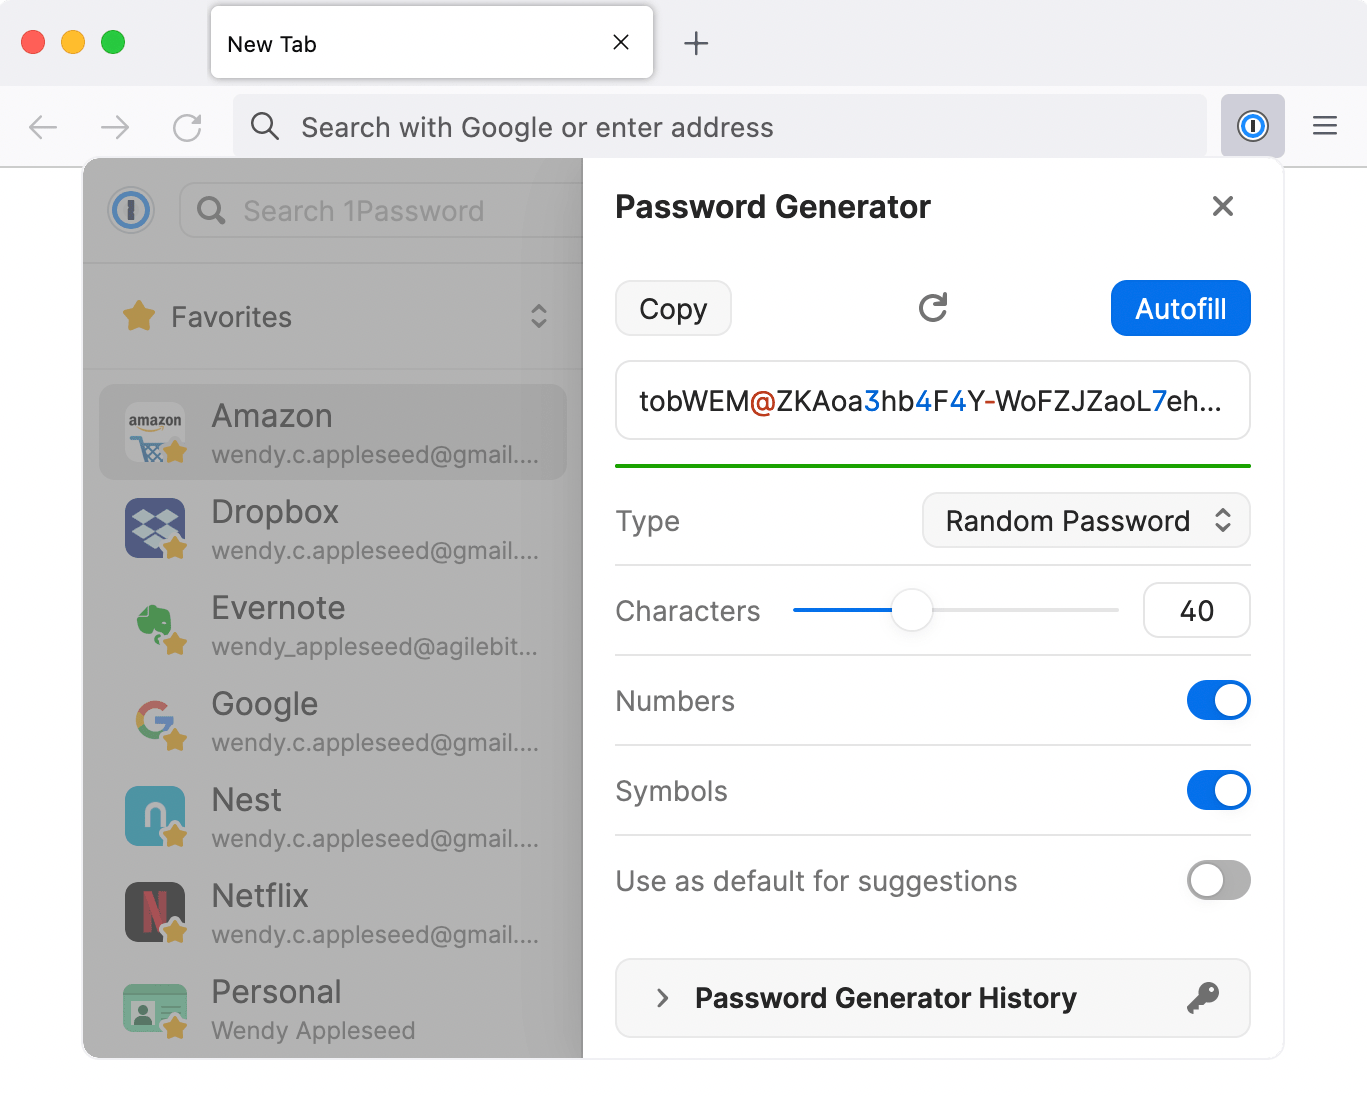
## Search 1Password

Searching is the fastest way to find what you need in 1Password. Use the search field above the list of items to find what you’re looking for.

You can search and find anything, like items, tags, categories, accounts, and vaults. You can also limit your search to the current view (Ctrl + F).

[Learn more about searching 1Password.](https://support.1password.com/search-1password/?windows)

[![image.png](https://bookstack.pbr.org.au/uploads/images/gallery/2025-02/scaled-1680-/i5Pimage.png)](https://bookstack.pbr.org.au/uploads/images/gallery/2025-02/i5Pimage.png)
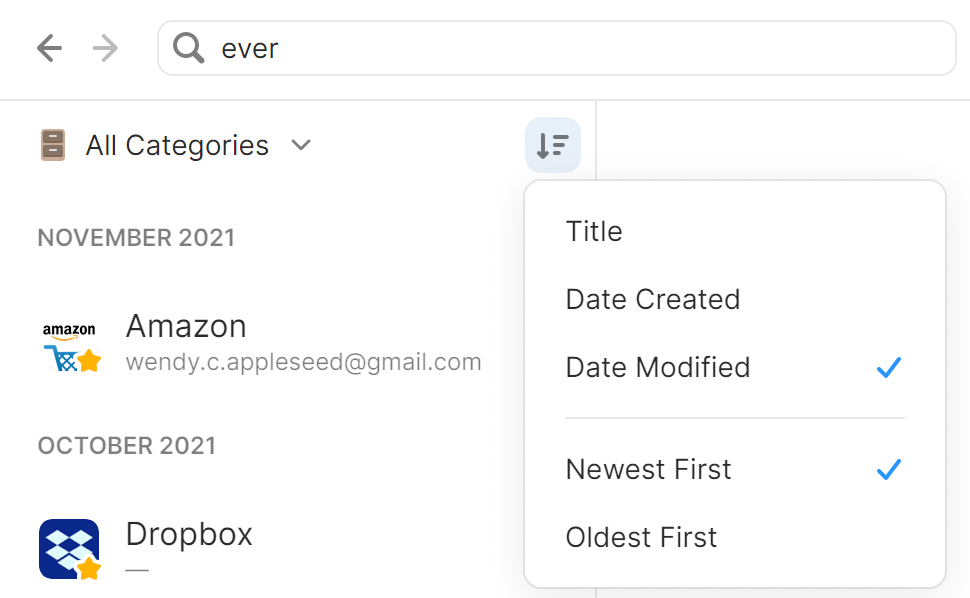
## Sort items

To change how items are sorted in a list, click ![Sort](https://i.1password.com/media/getting-started-linux/sort-items-icon.svg) at the top.

For example, you can sort your items by their title, the date you last made changes to them, or how frequently you use them.

<div class="row" id="bkmrk--3"><div class="col-xs-12 col-sm-6">  
</div><div class="col-xs-12 col-sm-6">![Sort items by date modified](https://i.1password.com/media/opw8/sort-windows.png)</div></div>## Organize with favorites and tags

You can organize your items with tags or mark them as favorites to quickly access them when you need them.

To mark an item as a favorite, select it, click the ellipsis in the item’s details, and choose **Add to Favorites**. Or drag items onto **Favorites** in the sidebar.

To create a tag, [edit an item](https://support.1password.com/getting-started-windows/#create-and-edit-items), enter the name of the tag in the tag field, and click **Save**. Or drag items onto a tag in the sidebar.

[Learn more about favorites and tags.](https://support.1password.com/favorites-tags/)

<div class="col-xs-12 col-sm-6" id="bkmrk--4"><div class="row"><div class="col-xs-12 col-sm-8">  
</div><div class="col-xs-12 col-sm-4">![Access your favorites and tags from the sidebar](https://i.1password.com/media/opw8/organize-windows.png)</div></div><div class="col-xs-12 col-sm-4">  
</div></div>## Use collections to create custom groups of vaults

Every item in 1Password is stored in a vault. You can use vaults to organize your items and [share them with others](https://support.1password.com/create-share-vaults/). If you have multiple 1Password accounts, each account has its own vaults.

You can create collections to view items from a custom group of vaults from any of your accounts. Click your account or collection at the top of the sidebar and choose **Manage Collections**. Then click **New Collection**.

To switch to a collection or account, click your account or collection at the top of the sidebar and choose it.

[Learn more about collections.](https://support.1password.com/collections/)

<div class="col-xs-12 col-sm-6" id="bkmrk--5"><div class="col-xs-12 col-sm-4"><div class="row"><div class="col-xs-12 col-md">  
</div><div class="col-xs-12 col-sm-4">![List of accounts and collections](https://i.1password.com/media/opw8/vaults-list-windows.png)</div></div></div><div class="col-xs-12 col-sm-4">  
</div></div>## Move and copy items

To move an item, drag it to a different vault in the sidebar. Or right-click the item, click **Move**, then select a vault.

To copy an item, right-click the item, click **Duplicate**, then choose the vault to copy it to.

When you move or copy an item, the confirmation screen will show you who will have access to the item in the new vault.

[Learn more about moving and copying items.](https://support.1password.com/move-copy-items/?windows)

## Use Watchtower

[Watchtower](https://watchtower.1password.com/) tells you about password breaches and other security problems on the websites you have saved in 1Password.

To view your Watchtower dashboard click **Watchtower** in the sidebar.

To see when a website you have an account for is added to Watchtower, click the account or collection at the top of the sidebar and choose **Settings**. Then click **Privacy** and turn on Watchtower options you’d like to see results for.

[Learn how to use Watchtower.](https://support.1password.com/watchtower/?windows)

<div class="row" id="bkmrk--6"><div class="col-xs-12 col-sm-5">  
</div><div class="col-xs-12 col-sm-7">![Use Watchtower in the sidebar](https://i.1password.com/media/getting-started-mac/opm8-watchtower-dashboard.png)</div></div><div class="col-xs-12 col-sm-7" id="bkmrk--7"></div>## Reveal and enlarge passwords

You can temporarily reveal or enlarge a password to make it easier to see while entering it on another device or reading it aloud.

To reveal a password, hover over it. Then click the down arrow and choose **Reveal**.

To enlarge a password, hover over it. Then click the down arrow and choose **Show in Large Type**.

<div class="col-xs-12 col-sm-7" id="bkmrk--8"><div class="row"><div class="col-xs-12 col-sm-5">  
</div><div class="col-xs-12 col-sm-7">![Click 'Large Type' to enlarge passwords](https://i.1password.com/media/opw8/enlarge-passwords.png)</div></div></div><div class="col-xs-12 col-sm-7" id="bkmrk--9"></div>## Archive and delete items

To archive an item, drag it to the **Archive** in the sidebar. Or click the ellipsis in the item’s details and choose **Archive** (or press <kbd>Delete</kbd>).

To restore an item from the Archive, click **Archive** in the sidebar. Select the item you want, then click the ellipsis in the item’s details and choose **Restore Item**.

To delete an item, drag it to **Recently Deleted** in the sidebar. Or click the ellipsis in the item’s details and choose **Delete** (or press <kbd>Ctrl</kbd><kbd>Delete</kbd>).

To restore a deleted item, click **Recently Deleted** in the sidebar, then right-click the item and choose **Restore Item**.

[Learn more about archiving and deleting items.](https://support.1password.com/archive-delete-items/)

<div class="col-xs-12 col-sm-7" id="bkmrk--10"><div class="row"><div class="col-xs-12 col-sm-8">  
</div><div class="col-xs-12 col-sm-4">![Archive and delete items](https://i.1password.com/media/getting-started-windows/archive-delete-item.png)</div></div></div><div class="col-xs-12 col-sm-4" id="bkmrk--11"></div><div class="col-xs-12 col-sm-4" id="bkmrk-for-any-more-informa">For any more information on how to use the windows app, head to [Get to know 1Password for Windows | 1Password Support](https://support.1password.com/getting-started-windows/#create-and-edit-items).</div><div class="col-xs-12 col-sm-4" id="bkmrk--12"></div><div class="col-xs-12 col-sm-4" id="bkmrk--13"></div>## Using the browser extension
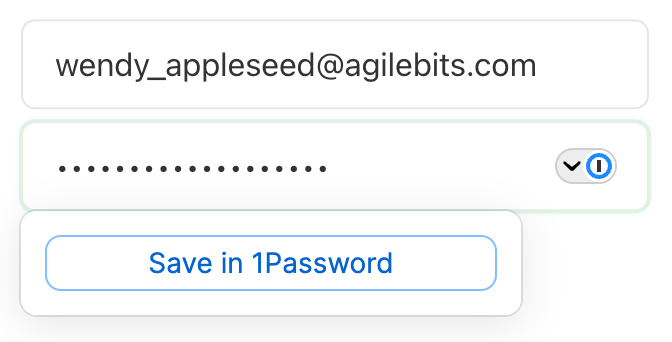
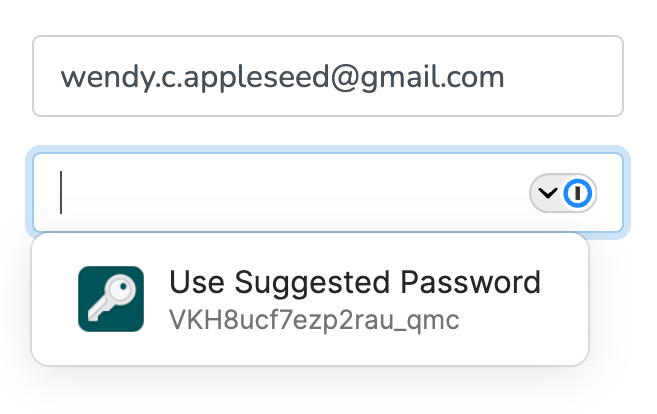
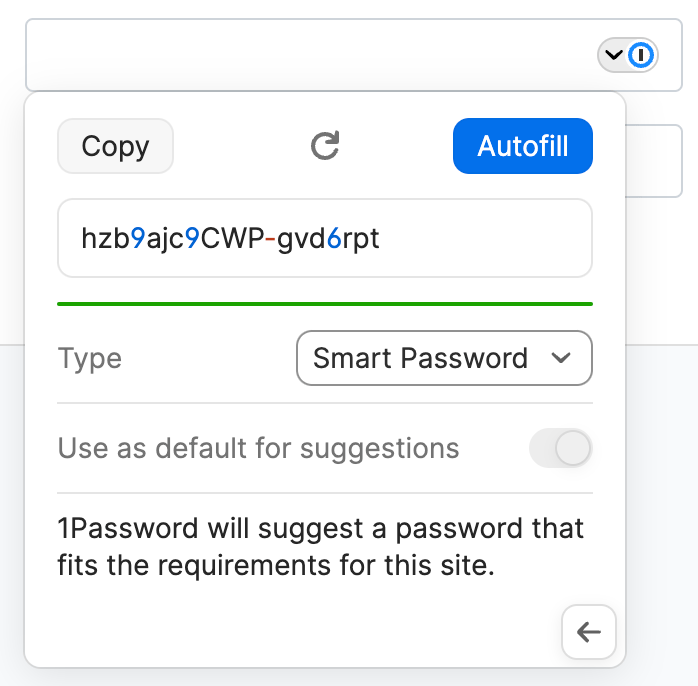
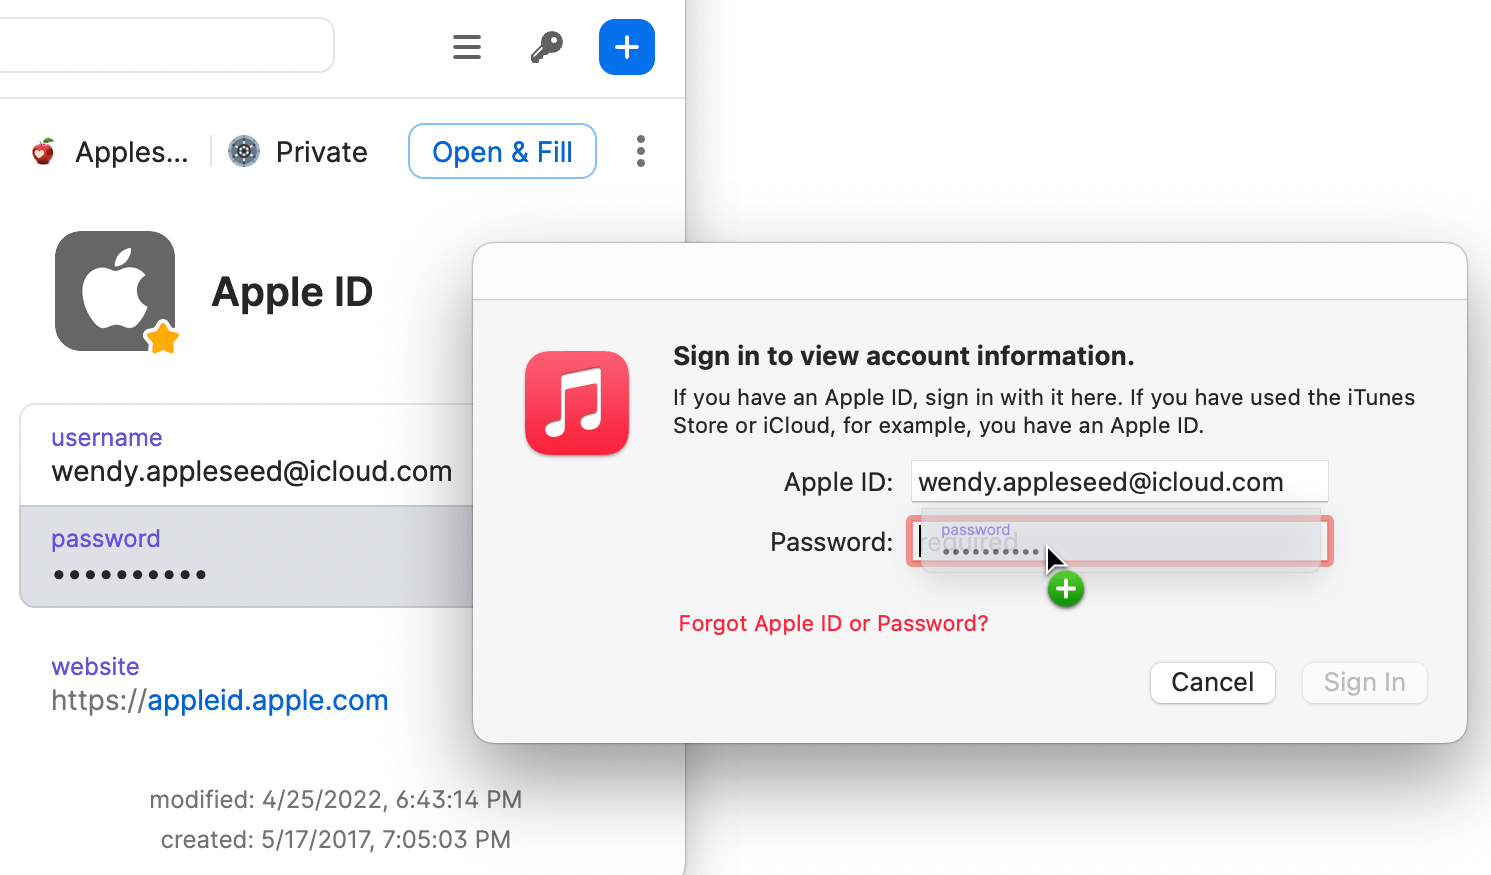
## Save your passwords

To save a login, enter your username and password. Then choose **Save in 1Password**.

You can edit the title of the login and the vault where you want to save it. Then select **Save**.

To update an incorrect or incomplete login, make your changes, then choose **Save in 1Password** and select **Update**.

[Learn more about saving and filling passwords.](https://support.1password.com/save-fill-passwords/)

<div class="row" id="bkmrk--14"><div class="col-xs-12 col-sm-7">  
</div><div class="col-xs-12 col-sm-5">![Saving a login inline with the 1Password browser extension.](https://i.1password.com/media/getting-started-browser/save-login.png)</div></div><div class="col-xs-12 col-sm-5" id="bkmrk--15"></div>## Fill logins and other items

To fill an item, choose it from below the username or password field.

If 1Password suggests more than one item, you can use the arrow keys to select the one you want, or start typing to filter your items.

[Learn more about filling credit cards and addresses.](https://support.1password.com/credit-card-address-filling/)

![The 1Password icon in a password field](https://i.1password.com/media/getting-started-browser/fill-login.png)

![Filtering items in a credit card field](https://i.1password.com/media/getting-started-browser/fill-card.png)

## Use a suggested password

1Password suggests strong passwords when you’re changing a password or signing up for a new account.

To use a suggested password, select ![the 1Password icon](https://i.1password.com/media/buttons-and-icons/extension-inline.svg) in a password field and choose **Use Suggested Password**.

[Learn more about changing your passwords.](https://support.1password.com/generate-website-password/)

<div class="row" id="bkmrk--18"><div class="col-xs-12 col-sm-7">  
</div><div class="col-xs-12 col-sm-5">![1Password suggesting a new password](https://i.1password.com/media/getting-started-browser/flll-suggested.png)</div></div><div class="col-xs-12 col-sm-5" id="bkmrk--19"></div>## Create a custom password

You can create a custom password from the inline menu that appears below form fields.

Select a password field and then select ![inline settings button](https://i.1password.com/media/inline-password-generator.png). Choose **Password Generator**, adjust the settings for your new password, then select **Autofill**.

<div class="col-xs-12 col-sm-5" id="bkmrk--20"><div class="row"><div class="col-xs-12 col-sm-6">  
</div><div class="col-xs-12 col-sm-6">![The password generator in the inline menu](https://i.1password.com/media/password-generator-inline.png)</div><div class="col-xs-12 col-sm-6">  
</div></div></div>You can also use the 1Password pop-up to create custom passwords. To open the pop-up, select ![the 1Password button](https://i.1password.com/media/buttons-and-icons/1password-browser-inline-icon.svg) in your browser’s toolbar.

To create a custom password, select ![the 1Password in your browser menu](https://i.1password.com/media/buttons-and-icons/1password-browser-menu.svg) and choose **Password Generator**.

Adjust the settings for your new password, then copy it to the clipboard or fill it on the page.

To see all the passwords you’ve created, select **Password Generator History** below the password generator.

Memorable Passwords will be generated based on the language you have set under **Settings** &gt; **Appearance &amp; shortcuts** &gt; **Language**. At this time, English, French, Spanish, German, Italian, Portuguese, and Dutch are supported in the password generator.

<div class="col-xs-12 col-sm-5" id="bkmrk--21"><div class="row"><div class="col-xs-12 col-sm-6"><div class="col-xs-12 col-sm-6">![The password generator in the 1Password pop-up](https://i.1password.com/media/getting-started-browser/password-generator.png)</div></div></div></div><div class="col-xs-12 col-sm-6" id="bkmrk--22"></div><div class="col-xs-12 col-sm-6" id="bkmrk--23"></div>## Use drag and drop to fill in apps

To fill in an app, drag your login details from 1Password to it. For example, drag your password to the password field in the app.

You can also use drag and drop in your browser. Fill answers to security questions, membership numbers, and more.

<div class="col-xs-12 col-sm-6" id="bkmrk--24"><div class="row"><div class="col-xs-12 col-sm-5">  
</div><div class="col-xs-12 col-sm-7">![Use drag and drop to fill in apps from 1Password](https://i.1password.com/media/getting-started-browser/fill-in-apps.png)</div></div></div><div class="col-xs-12 col-sm-7" id="bkmrk--25"></div>## Fill one-time passwords

You can use 1Password as an authenticator for a site that supports two-factor authentication. First, [find the site on 2fa.directory](https://2fa.directory/) and follow the instructions to turn on two-factor authentication for the site.

When you see a QR code for 1Password to scan, select ![the 1Password button](https://i.1password.com/media/buttons-and-icons/1password-browser-inline-icon.svg) in your browser’s toolbar and select your login for the site to view the item’s details.

Select the ellipsis &gt; **Scan QR Code** to save it to your 1Password item. 1Password can then fill your one-time passwords any time you need to sign in to that site.

[Learn about saving and filling one-time passwords.](https://support.1password.com/one-time-passwords/)

<div class="col-xs-12 col-sm-7" id="bkmrk--26"><div class="row"><div class="col-xs-12 col-sm-5">  
</div><div class="col-xs-12 col-sm-7">![Set up two-factor authentication from the 1Password pop-up](https://i.1password.com/media/getting-started-browser/2fa.png)</div></div></div><div class="col-xs-12 col-sm-7" id="bkmrk--27"></div><div class="col-xs-12 col-sm-7" id="bkmrk-for-more-information">For more information on how to use 1password in your browser, head to [Get to know 1Password in your browser | 1Password Support](https://support.1password.com/getting-started-browser/).</div>

# Signing In to 1password

1. To sign in on the app, click "sign in" &gt; "Enter account details". Enter the users email address with the sign-in address as below and hit next. You will need to authenticate with duo. [![image.png](https://bookstack.pbr.org.au/uploads/images/gallery/2024-08/scaled-1680-/z6vimage.png)
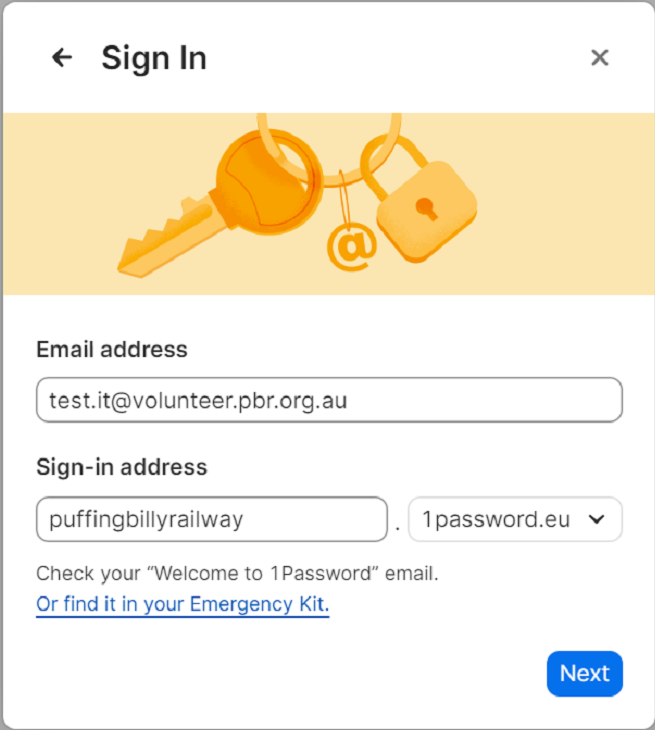
](https://bookstack.pbr.org.au/uploads/images/gallery/2024-08/z6vimage.png)
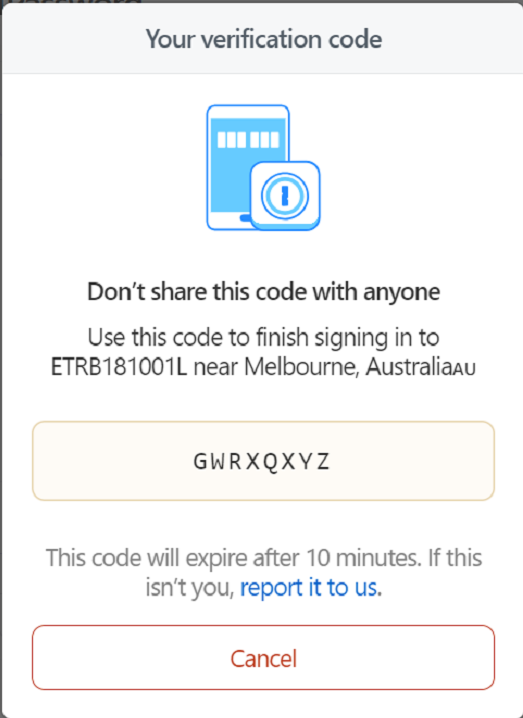
2. 1password will then ask to trust the device. You will need to input a code. Go back to the web portal where it will ask you to allow or deny the device. Once allowed it will give you a code to enter in the app version. Once completed the app can then trust the device and the app version can be used. [![image.png](https://bookstack.pbr.org.au/uploads/images/gallery/2024-08/scaled-1680-/Jt7image.png)
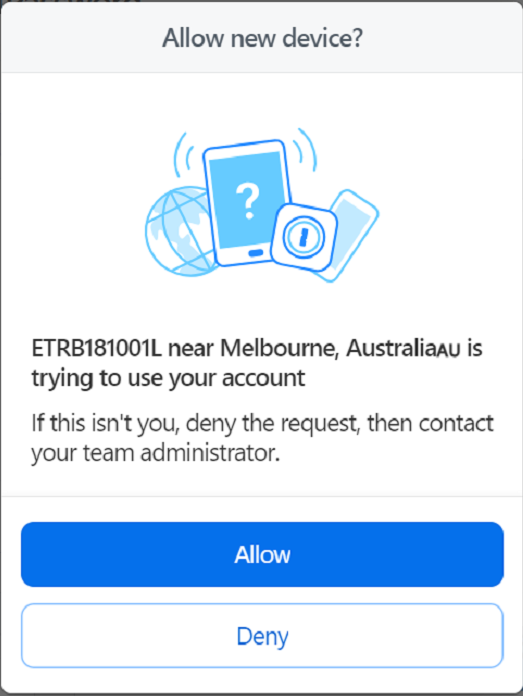
](https://bookstack.pbr.org.au/uploads/images/gallery/2024-08/Jt7image.png)
    
    [![image.png](https://bookstack.pbr.org.au/uploads/images/gallery/2024-08/scaled-1680-/BZBimage.png)](https://bookstack.pbr.org.au/uploads/images/gallery/2024-08/BZBimage.png)
3. The web browser extension can also be installed from the app. Click the 3 dots and select settings. [![image.png](https://bookstack.pbr.org.au/uploads/images/gallery/2024-08/scaled-1680-/Gs2image.png)
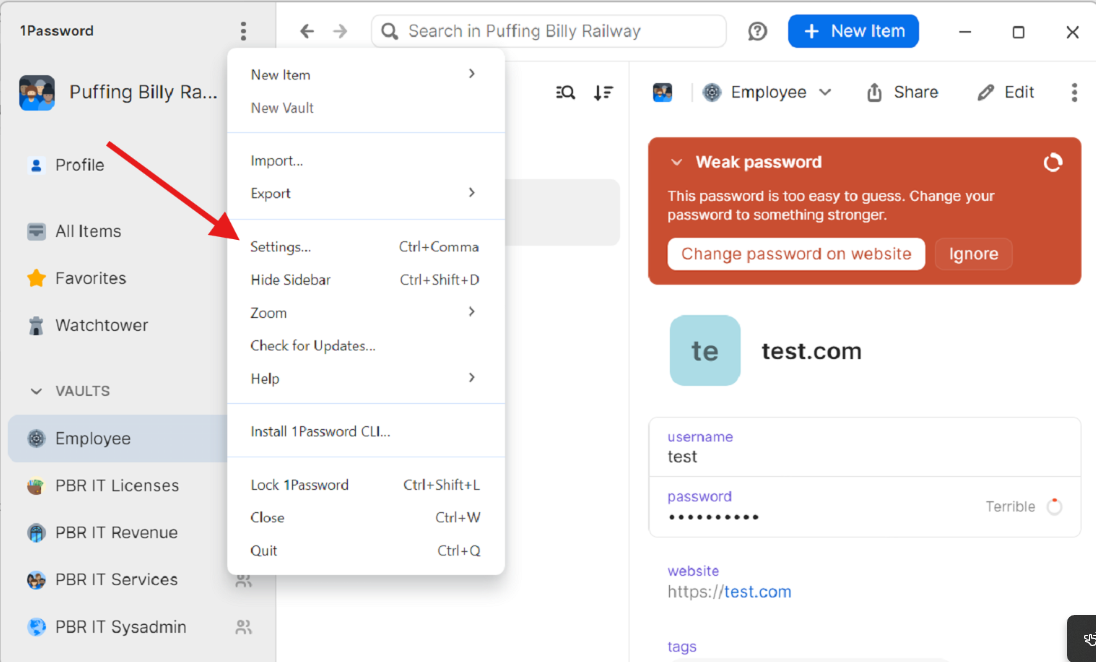
](https://bookstack.pbr.org.au/uploads/images/gallery/2024-08/Gs2image.png)
4. Select "Browser" and "Get 1Password for Your Browser" (If the link does not work, copy the link and paste it into a new tab) [![image.png](https://bookstack.pbr.org.au/uploads/images/gallery/2024-08/scaled-1680-/9kGimage.png)
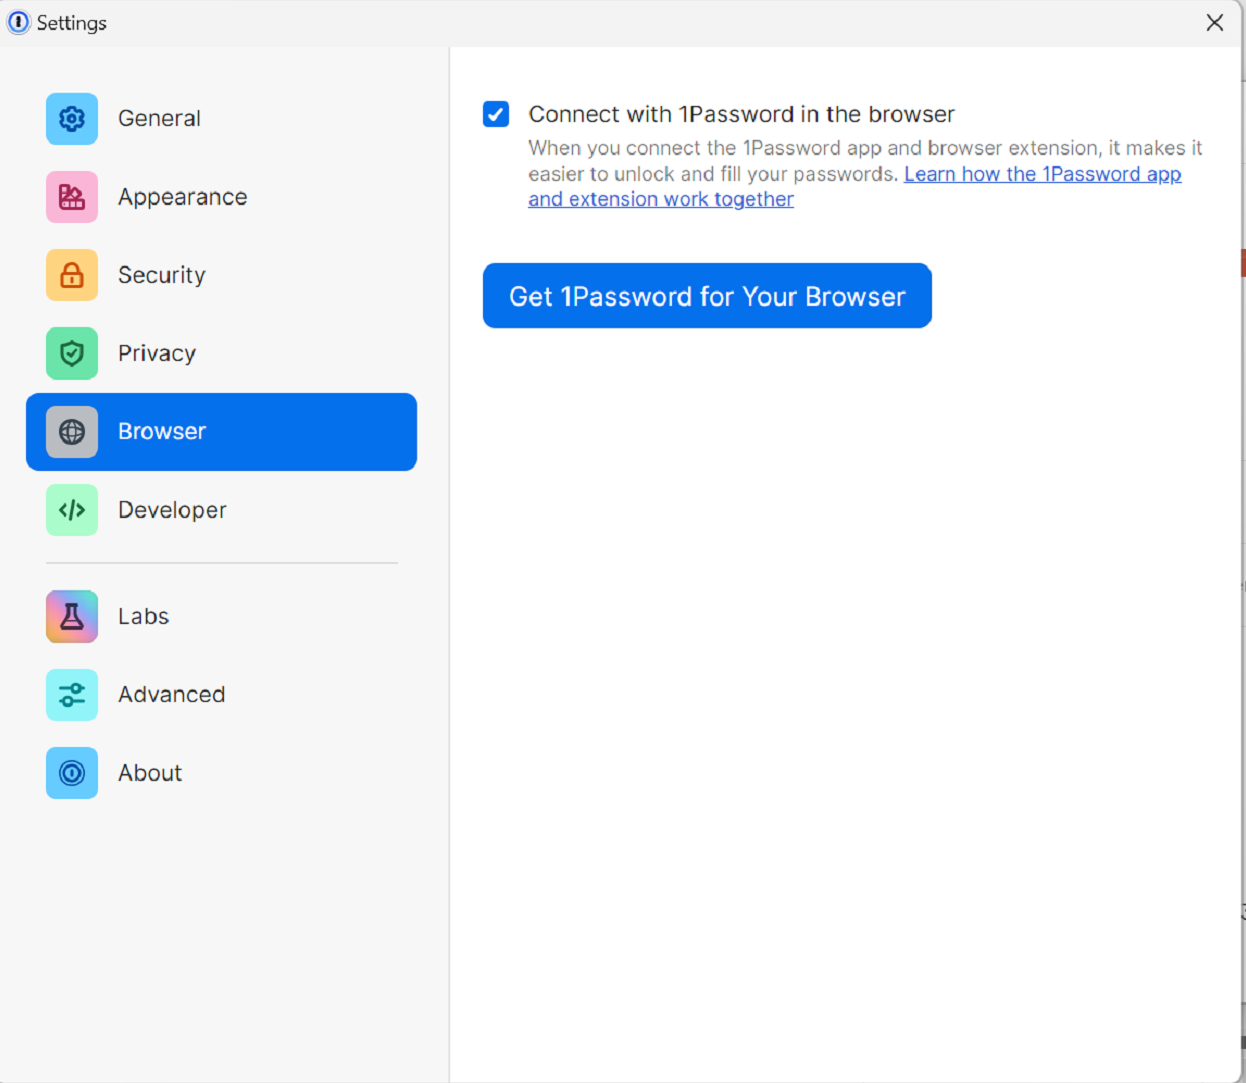
](https://bookstack.pbr.org.au/uploads/images/gallery/2024-08/9kGimage.png)
5. Select "Get" and "Add Extension" [![image.png](https://bookstack.pbr.org.au/uploads/images/gallery/2024-08/scaled-1680-/JWzimage.png)
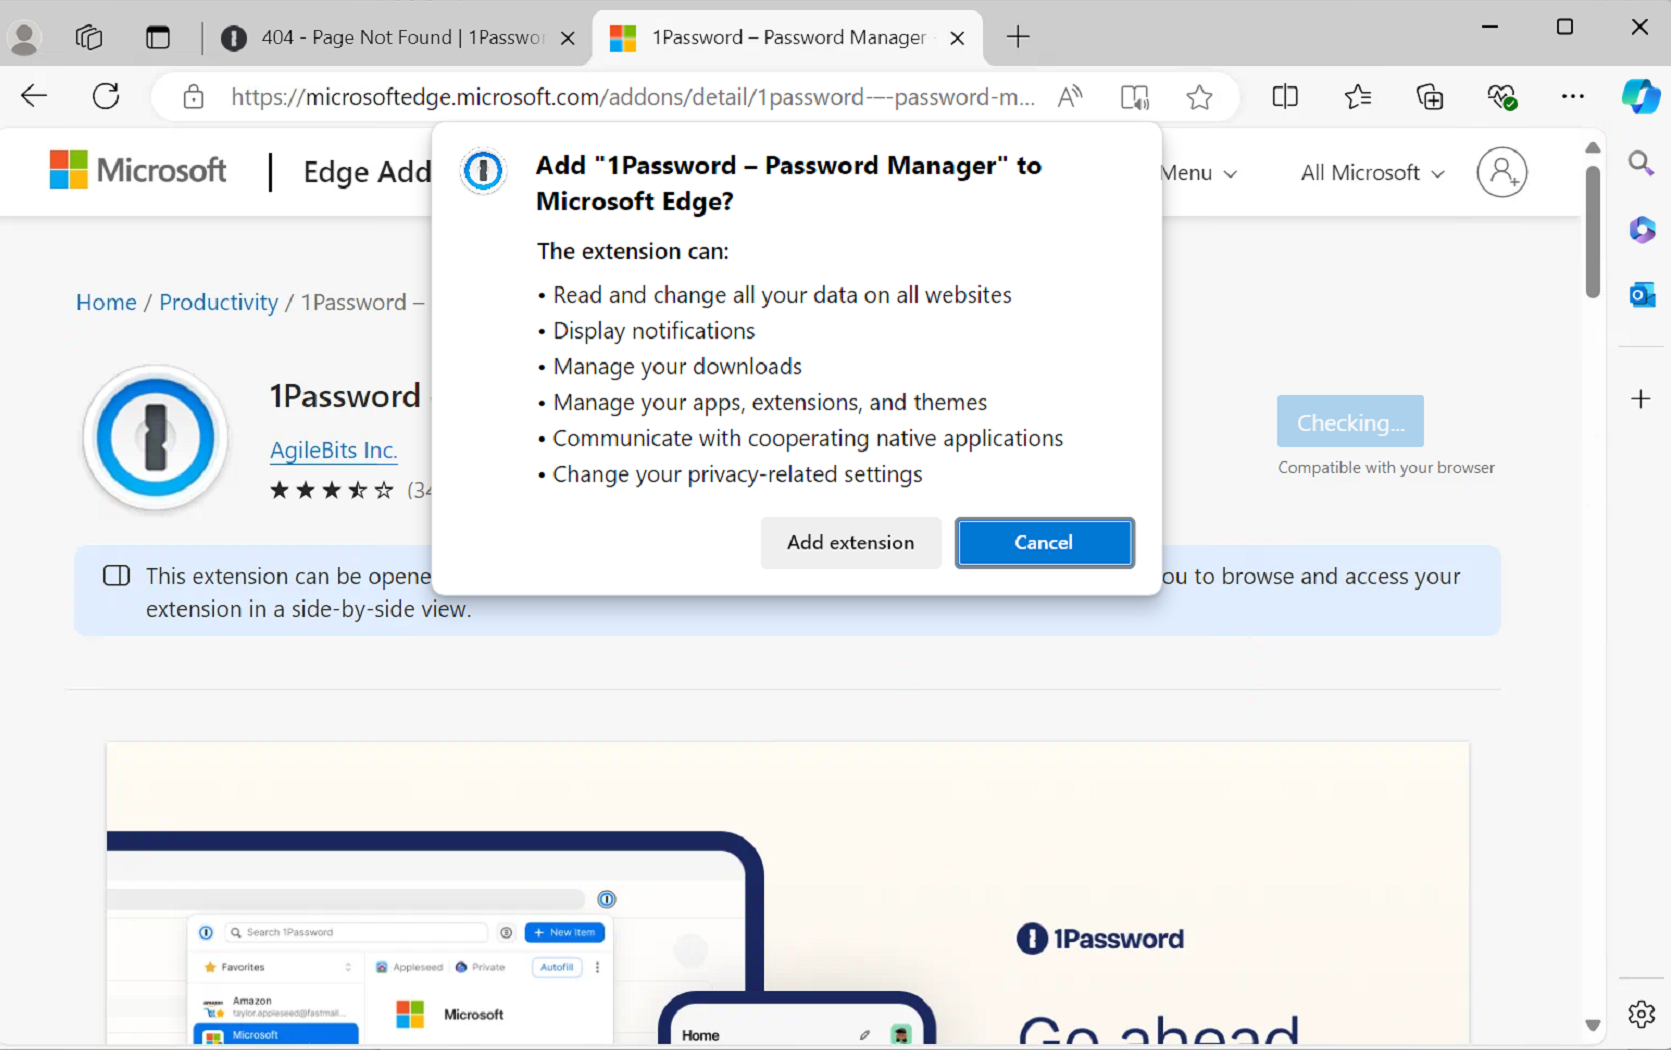
](https://bookstack.pbr.org.au/uploads/images/gallery/2024-08/JWzimage.png)
6. Make sure to delete passwords from the browser and disable and browser settings. If you need to import existing passwords from chrome or edge, see bookstack [https://bookstack.pbr.org.au/books/1password-pPd/page/importing-password-from-browser-to-1password](https://bookstack.pbr.org.au/books/1password-pPd/page/importing-password-from-browser-to-1password)